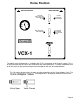
OPERATION MANUAL VCX-1 Vacuum Coolant Exchanger RTI Technologies, Inc 4075 East Market St. York, PA 17402 800-468-2321 www.rtitech.
Table of Contents Component Description . . . . . . . . . . . . . . . . . . . . . . . . 2 Safety Precautions . . . . . . . . . . . . . . . . . . . . . . . . . . . 3 Home Position . . . . . . . . . . . . . . . . . . . . . . . . . . . . . . . 4 Fill New Tank . . . . . . . . . . . . . . . . . . . . . . . . . . . . . . . . 5 Empty Radiator . . . . . . . . . . . . . . . . . . . . . . . . . . . . . . 6 Special Hookups . . . . . . . . . . . . . . . . . . . . . . . . . . . . . 8 Fill Radiator . . . . . . . . . . .
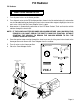
Component Description Unpack all components and verify quantities per this illustration. Contact RTI if any items are missing.
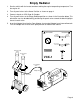
Safety Precautions WARNING: Failure to follow these precautions can result in serious injury or death. • Read and understand the Operation Manual completely before operating this unit. • Always wear proper eye and skin protection when operating and maintaining this equipment. • Automotive cooling systems can be under pressure and extremely hot. Use extreme caution when removing caps. Place a rag over the radiator cap during removal.
Home Position WASTE COOLANT NEW COOLANT (PRESSURE) (VACUUM) EMPTY WASTE TANK EMPTY NEW TANK TOP OFF FILL NEW TANK EMPTY RADIATOR HOME FILL NEW TANK FILL RADIATOR EMPTY NEW TANK TOP OFF EMPTY WASTE TANK EMPTY RADIATOR HOME VCX-1 HOME The above valve configuration is set before the VCX is connected to the shop air supply. This is also the position that the valves are returned to after each procedure.
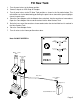
Fill New Tank 1. Turn all panel valves to the Home position. 2. Connect shop air to VCX Shop Air Coupler. 3. Turn all panel valves to the Fill New Tank position as shown in the illustration below. This orientation can also be obtained by positioning the panel valves toward the green highlights closest to each valve. 4. Place the Cone Adapter, with the Adapter Hose attached, into the container of new coolant. Open the Cone Adapter Valve to draw coolant into the New Coolant Tank. 5.
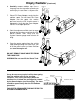
Empty Radiator 1. Run the vehicle with the heater turned on to bring the engine to operating temperature. Turn the engine off. 2. Turn all panel valves to the Home Position as shown on page 4. 3. Connect shop air to VCX Shop Air Coupler. 4. Turn all panel valves to the Empty Radiator position as shown in the illustration below. This orientation can also be obtained by positioning the panel valves toward the black highlights closest to each valve. 5. Insert the Adapter Hose into the Cone Adapter.
Empty Radiator (Continued) 6. 7. Carefully remove radiator cap. Use a shop rag over the cap when removing to avoid injury in case there is still pressure. Waste Coolant Tank New Coolant Tank Place VCX Cone Adapter snugly into the radiator spout. Do not force the Cone Adapter into the spout, the suction pressure from the VCX should secure it adequately. Verify that the Cone Adapter Valve is in the open position. Cone Adapter Valve Hose Adapter Clear Hose Engine Block Heater Core Water Pump 8. 9.
Special Hookups Seal Tight Radiator 1. Insert the Adapter Hose into the end of the Cone Plug Adapter. 2. Place the Cone Adapter snugly into the radiator, coiling the excess length of Adapter Hose at the bottom. 3. Follow the Empty Radiator procedure steps 1-9. More Effective Setup for Empty Radiator During the Empty Radiator procedure clamp off the upper radiator hose and follow steps 1-9 of the Empty Radiator section. PINCH HOSE Radiator Hose Overflow Adapter Seal PINCH HOSE 1.
Fill Radiator Fill Radiator MAKE SURE ENGINE IS OFF 1. Turn all panel valves to the Home position. 2. Turn all panel valves to the Fill Radiator position shown in the illustration below, this orientation can also be obtained by positioning the panel valves toward the magenta highlights closest to each valve. Verify that the Cone Adapter Valve is open. 3. New coolant is automatically pulled out of the VCX New Coolant Tank and into the vehicle radiator through the clear hose.
Top Off 1. Turn all panel valves to the Home position. 2. Turn the Cone Adapter Valve to the closed position. 3. WASTE COOLANT NEW COOLANT (PRESSURE) (VACUUM) EMPTY WASTE TANK EMPTY NEW TANK TOP OFF Turn all panel valves to the Top Off position as shown in the illustration. This orientation can also be obtained by positioning the panel valves toward the blue highlights closest to each valve.
Empty Waste Tank 1. Turn all panel valves to the Home position. 2. Connect shop air to VCX Shop Air Coupler. 3. Close Cone Adapter Valve. 4. Turn all panel valves to the Empty Waste Tank position shown in the illustration below. This orientation can also be obtained by positioning the panel valves toward the red highlights closest to each valve. 5. Place the end of the clear hose into a bulk waste container and open the Cone Adapter Valve. 6.
Empty New Tank 1. Turn all panel valves to the Home position. 2. Connect shop air to VCX Shop Air Coupler. 3. Close Cone Adapter Valve. 4. Turn all panel valves to the Empty New Tank position shown in the illustration below. This orientation can also be obtained by positioning the panel valves toward the blue highlights closest to each valve. 5. Place the end of the clear hose into a bulk storage container and open the Cone Adapter Valve. 6.
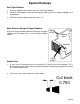
Troubleshooting Problem Vacuum becomes weak Solution Inside of the VCX, there is a venturi vacuum generator that may have collected debris during the operation of the unit. If this occurs, the vacuum will become weak resulting in a lower vacuum reading on the System Vacuum gauge and poor performance. Remove the venturi from the line and blow shop air through it. Use the Parts Identification (page 12) to locate the venturi. Reconnect to correct lines when done.
Parts Identification 1 2 P/N 3 4 Description 1 022-80115-00 Valve Relief 1/4 MPT X 1/4 FPT 2 060-81209-00 028-80229-00 028-80228-00 Top Cylinder Plate Large O-Ring Small O-Ring 3 040-80196-00 Compression Spring 4 370-80085-00 Acrylic Tube with Decal 5 035-80880-00 Tank Level Decal (VCX-1) 6 026-80238-00 Vacuum Gauge 30"-0 PSIG 7 022-80028-00 Ball Valve 3-Way 1/4 FPT (BHD) 8 060-81215-00 Cone Plug Adapter 9 370-80109-00 Cone Adapter Valve Assy 10 370-80110-00 Clear Hose Assy
Flow Page 15