BELANGRIJK MAIKO SMARTCOOL Gelieve deze handleiding zorgvuldig door te nemen voor ingebruikname of installatie van uw mobiele airconditioner. Bewaar deze handleiding voor hulp bij onderhoud en bediening. GEBRUIKERSHANDLEIDING LET OP! 1. Zorg dat de lucht in- en uitlaat altijd vrij zijn en niet worden geblokkeerd. 2. Plaats de mobiele airconditioner enkel op een vlakke ondergrond. Hiermee voorkomt u dat het systeem condenswater gaat lekken. 3.
voordat de compressor en ventilator in werking treden. 10. Wanneer de stroomkabel beschadigd is mag deze enkel vervangen worden door de fabrikant van het systeem of een gecertificeerde GEFELICITEERD MET DE AANSCHAF VAN UW SMARTCOOL MOBIELE AIRCONDITIONER monteur. 11. Wanneer u het systeem gedurende langere tijd niet gebruikt, dient u alle batterijen uit het systeem te verwijderen en veilig op te bergen. 12.
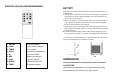
INSTRUCTIE BIJ HET UITPAKKEN BENAMING VAN DE ONDERDELEN 1. Zorg dat het apparaat tijdens vervoer en bij plaatsing altijd rechtop blijft staan. 1. Soft-Touch Bedieningspaneel 2. Snijd de twee banden door. 2. Afstandsbediening ontvanger 3. Schuif het karton opwaarts zodat deze loskomt van de bodem. 3. Verstelbaar luchtrooster 4. Pak het apparaat op met behulp van de draaghendels aan beide zijden van het 4. Slangbevestiging apparaat en til het voorzichtig uit de foam bodem. 5. Afvoerslang 5.
SOFT-TOUCH BEDIENINGSPANEEL Hiermee stelt u de ventilatorsnelheid in op LOW, MEDIUM, 6. SPEED HIGH of AUTO. Wanneer "AUTO" is geselecteerd tijdens koelingsmodus, "HIGH" of "MEDIUM" of "LOW" zullen automatisch afgewisseld worden afhankelijk van het verschil tussen de ingestelde temperatuur en de werkelijk kamertemperatuur. Let op: in de verwarmings- en ontvochtiginsmodus is deze functie niet in te stellen. Deze werkt standaard in "HIGH" bij verwarming en in "LOW" bij ontvochtiging. 7.
FUNCTIES VAN DE AFSTANDSBEDIENING LET OP! Dit systeem kan het condenswater verdampen en automatisch afvoeren door een luchtafvoerslang. 1. Wanneer de unit in koelmodus draait, hoeft het afvoerslangetje niet aangesloten te zijn. Zorg ervoor dat het rubberen afsluitdopje vast op de condensafvoer zit, wanneer de unit ingeschakeld is. 2. Wanneer het systeem in verwarmingsmodus draait, moet het rubberen dopje (1) uit de condensafvoer gehaald worden.
CONDENSER/VERDAMPER Gerbruik een stofzuiger in combinatie met een borstelkop. STROOMVOORZIENING (1) Gebruik alleen de aangegeven spanning. APPARAAT Afvegen met een vochtige doek en nadrogen met een zachte doek. (2) Plaats de stekker stevig in het stopcontact. Zorg ervoor dat de stroomkabel niet beschadigd, om stroomlekken, schade en letsel te voorkomen. (3) Trek niet krachtig aan de stroomkabel, dit kan uw stroomkabel beschadigen. Om het luchtfilter te verwijderen volgt u de pijlen.
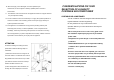
HANDIGE TIPS Gebruik van de verwarmingsmodus Het systeem is uitgerust met een thermische beveiliging. Om een goede werking te garanderen mag het systeem niet te dicht bij muren en voorwerpen geplaatst worden INSTALLATIE LUCHTAFVOERSLANG 1. Draai de slang in de richting van pijl ①. U kunt de afvoerslang nu van het systeem afnemen. 2. Draai de slang in de richting van pijl ② om de afvoerslang aan te sluiten. Bij werking in verwarmingsmodus: 1. Ontkoppel de luchtuitlaat en afvoerslang als in Fig.01.
SPECIFICATIES Type SM26W 220-240V~ 50Hz Type SM35G SM40G Elektriciteit Elektriciteit 220~240VV/50Hz 220~240VV/50Hz Vermogen (EN60335) Vermogen (EN60335) Cooling Koelen Heating 1100W 950W 1480W 1700W 1300W 1500W Koelcapaciteit 2600W Koelcapaciteit 3500W 4000W Verwarmingscap. 2600W Verwarmingscap.
VERY IMPORTANT MAIKO SMARTCOOL Do not install and use your portable air conditioner unit before carefully reading this instruction guide. Please retain this manual brochure for product warranty and future reference INSTRUCTION FOR USE CAUTION 1." DO NOT BLOCK VENTILATION "! Please make sure the inlet and outlet ventilation is not blocked at all times. 2. Operate this unit on a horizontal surface to avoid water leakage. 3. Do not operate this unit in an explosive or corrosive atmosphere. 4.
. When the supply cord is damaged, it must be replaced by the manufacturer, its service agent or similarly qualified persons in order to avoid hazard. CONGRATULATIONS ON YOUR SELECTION OF A QUALITY PORTABLE AIR CONDITIONER 11、The batteries must be removed from the appliance before it is scrapped and that they are disposed of safely. PORTABLE AIR CONDITIONER 12.
UNPACKING INSTRUCTIONS NAME OF THE PARTS 1. Control panel 1. Place the unit in the correct upright position before unpacking. 2. Remote receiver 2. Cut the two packing straps. 3. Adjustable air vent 3. Slide the carton in an upwards motion and it will release from the base. 4. Joint tube 4. Grip the carry handles located on either side of the unit and carefully lift until it slides 5. Exhaust tube out of the foam base. 6. Up drain pipe 5.
CONTROL PANEL & DESCRIPTION OF FUNCTION 6. SPEED Press to select either LOW, MEDIUM, HIGH or AUTO fan speed. If "AUTO" is selected(During cooling function),”HIGH” or "MEDIUM" or “LOW" will be selected automatically according to the difference between setting temperature and room temperature. . Note: In heating function and dehumidifying function, the wind-speed setting is inefficacy because the unit has setted high-speed(heating) and low-speed(dehumidifying). 7.
setting the hours the L.E.D. display will automatically return to REMOTE CONTROL FUNCTION the current pre-set temperature. To increase this setting "up" press button indicating and for each press, the temperature will be increased by 1℃. Likewise to set for a lower temperature press button indicating and for each press the temperature will be decreased by 1℃. During the course of this cycle, to ensure maximum sleep comfort. the micro-processor memory will raise the pre-set temperature 0.
CONDENSER/EVAPORATOR NOTICE Use a brush attachment with a vacuum cleaner. This unit can evaporate the condensation and flow out through the exhaust hose automatically. 1. When the unit is in the cooling function, it does not need the exhaust hose installed. Please make sure that the rubber cap is locked on drain hose, when the unit is CABINET Wipe with a damp cloth and polish with a soft cloth. running. 2.
POWER SUPPLY EXHAUST TUBE INSTALL (1) Confirm the correct power. 1. Circumrotate the wind pipe according to the direction as the arrowhead ① indicates (2) Insert the plug into the outlet firmly. In case of dangerous leak, prevent the AC cord from scarring. (3) Don’t pull power wire by force because it will cause damage to power and then the wind pipe can be took out from the unit. 2.
SPECIFICATION When operating heating function: 1. Disassemble the subassembly of outlet and the subassembly of exhaust pipe as arrow direction Fig.01 and then exchange the two subassemblies to install. The Model No.
(CE) N 842/2006: R410A is a kind of fluorinated greenhouse gases covered by the Kyoto Protocol. Its total global warming potential (GWP) is 1975 This marking indicates that this product should not be disposed with other household wastes throughout the EU. To prevent possible harm to the environment or human health from uncontrolled waste disposal, recycle it responsibly to promote the sustainable reuse of material resources.
TRES IMPORTANT N’installez pas et n’utilisez pas votre climatiseur portable avant d’avoir lu attentivement le présent guide d’instruction. Veuillez conserver ce manuel pour la garantie du produit et pour une consultation ultérieure. ATTENTION 1." NE BLOQUEZ PAS LA VENTILATION ! Veillez à ce que la ventilation d’entrée et de sortie ne soit pas bloquée, et ce, en aucune circonstance. 2. Utilisez cet appareil sur une surface horizontale afin d’éviter toute fuite d’eau. 3.
ALIMENTATION ELECTRIQUE (1) Confirmez l’alimentation adéquate. (2) Insérez fermement la fiche dans la prise afin d’obtenir l’alimentation électrique et de réduire la possibilité de risque de blessure. (3) Retirez la fiche de la prise sans tirer sur le cordon car cela risquerait d’endommager le câble électrique. LIEUX CONVENANT A L’UTILISATION (1) En raison de l’expulsion d’air chaud, n’utilisez pas cet appareil dans une trop petite pièce.
MERCI D’AVOIR ACHETE UN CLIMATISEUR PORTABLE LOGIK DE QUALITE Votre climatiseur a été conçu et fabriqué en respectant les normes d’ingénierie moderne les plus rigoureuses. Ses nombreuses fonctionnalités comprennent une télécommande qui vous permettra de contrôler toutes les fonctions en toute simplicité, mais aussi : - Un déplacement aisé de pièce en pièce grâce à des roulettes - Aucune installation requise – branchez tout simplement l’appareil à n’importe quelle prise électrique de la maison.
INSTRUCTIONS RELATIVES AU DEBALLAGE 1. Placez l’appareil en position droite avant le déballage. 2. Coupez les deux bandes d’emballage. 3. Faites glisser le carton vers le haut afin de le dégager de la base. 4. Saisissez les deux poignées de transport de chaque côté de l’appareil et tirez-les avec précaution jusqu’à ce qu’il glisse hors de la base en mousse. 5. Retirez la bandelette située à l’intérieur du conduit d’aération et retirez le conduit d’aération. 6.
INSTALLATION DU TUYAU DE SORTIE 1. Tournez le tuyau dans le sens indiqué par la pointe de flèche 2. Tournez le tuyau dans le sens indiqué par la pointe de la flèche afin de retirer le tuyau de l’appareil. afin de le fixer à l’appareil. INSTALLATION DU KIT POUR FENETRE Lorsqu’il est placé à l’extérieur Maintenez l’appareil à l’abri de la lumière du soleil pour une utilisation durable.
et un tuyau d’évacuation adéquat doit être installé. 3. Lorsqu’il fonctionne en mode déshumidification, le capuchon en caoutchouc situé sur le tuyau d’évacuation doit être retiré et un tuyau d’évacuation adéquat doit être installé. ƔVeuillez retirer le tuyau de sortie d’air, connecter un tuyau d’évacuation à l’orifice d’évacuation afin de permettre à l’eau de sortir afin de laisser la capacité de déshumidification s’intensifier.
DESCRIPTION DE LA FONCTION Lorsqu’un signal de contrôle est transmis, une icône de transmission clignote une fois sur l’écran, afin d’indiquer que le signal a été transmis 1. BOUTON DE MISE SOUS/HORS TENSION Appuyez sur ce bouton pour mettre l’appareil sous ou hors tension. 2. FONCTION Appuyez sur ce bouton pour sélectionner le refroidissement, la déshumidification ou le chauffage. 3.
2. Au terme de l’heure définie, l’appareil s’éteint automatiquement. 3. Appuyez sur la touche « POWER » (Marche/arrêt) avant l’échéance pour annuler le délai programmé et pour mettre l’appareil hors tension. 8. COMMANDE DE LA VEILLE Lorsque vous avez programmé le mode « sleep comfort » (Veille), appuyez sur le bouton FUNCTION (Fonction) et précisez le nombre d’heure requis, puis appuyez sur le bouton de la minuterie jusqu’à ce que ces heures soient indiquées sur l’écran LED.
(CE) N 842/2006: R410A est un gaz à effet de serre fluorescent relevant du protocole de Kyoto. Son potentiel de réchauffement planétaire (GWP) est.1975. Ce symbole indique que les équipements célectriques et électroniques font l'objet d'une collecte sélective. Lorsque votre appareil ne fonctionne plus, ne la jetez pas n'importe où, apportez le dans un point de collecte des appareils électriques afin qu'il puisse être retraité efficacement dans la filière d'élimination des déchets adéquate.