0 29986 18510 1851335W 5 STOP DO NOT RETURN PRODUCT TO THE STORE Individual stores do not stock parts. Date of Purchase ___ / ___ / ___ If a part is missing or damaged, visit our website or call our toll-free customer service line. We will gladly ship your replacement parts FREE of charge. Need Parts or Assistance? WWW.AMERIWOOD.COM/PARTS or call toll free: 1-800-489-3351 For prompt, reliable service please have your assembly manual ready.
Parts Parts shown are the base cabinet of your model. Please note, most parts are labeled with a sticker or have a letter stamped on a raw edge. Parts List ITEM QTY PART NUMBER DESCRIPTION A 1 31851335010 LEFT PANEL B 1 31851335020 RIGHT PANEL 1 31851335030 C UPPER PARTITION D 3 31851335040 PARTITION E 1 31851335050 TOP F 1 31851335060 SHELF 1 31851335070 G BOTTOM H 2 31851335080 KICK PANEL I 1 K185133500 BACK PANEL E A F C I D G This piece is of paperboard construction.
Hardware HARDWARE COMPARTMENT LAYOUT 1 5 3 cam bolt #A22510 Qty: 12 2 1/2" pan screw #A12210 Qty: 16 6 4 cam lock #A22570 Qty: 12 wood dowel #A21660 Qty: 14 angle bracket #A53600 Qty: 8 WARNING 1-3/4" flat screw #A13410 Qty: 8 7 nail #A21110 Qty: 40 8 warning label #B64356 Qty: 1 4 /19 B341851335W00
This illustration shows how the cam fastening system works. Esta ilustración muestra el sistema de fijación de leva y como funciona. 2 1 us Tit Tighten to fully seat. Do not over tighten. Apriétese a totalmente asiento. No haga encima de apriétese. Proper orientation of cam. La orientación apropiada de leva. 4 3 ½ turn to fully lock. ½ se vuelven a totalmente cerradura.
1 Screw four Cam Bolts (1) into the Left Panel (A). Insert two Cam Locks (2) and tap one Wood Dowel (5) into the Left Panel (A).
2 Screw four Cam Bolts (1) into the Right Panel (B). Insert two Cam Locks (2) and tap one Wood Dowel (5) into the Right Panel (B).
3 Screw four Cam Bolts (1) into the Top (E).
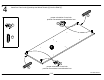
4 Insert four Cam Locks (2) and tap two Wood Dowels (5) into the Shelf (F).
Insert four Cam Locks (2) and tap two Wood Dowels (5) into the Bottom (G). Fasten the Kick Panels (H) to the Bottom (G) with Angle Brackets (4) and Screws (3).
1851335W No regrese el producto a esta tienda, tiendas individuales no almacenan partes. Si le falta una parte o esta danada, llame al numbero gratis a la lineas de servicio al cliente. Nosotros con gusto le mandaremos la parte sin ningun costo adicional. El numero recomendado de las personas necesito para la asamblea: 1 El tiempo de la asamblea estimado es 2 horas. EL FOLLETO DE LA INSTRUCCION CONTIENE LE INFORMACION DE SEGURIDAD IMPORTANTE. POR FAVOR LEA Y GUARDE PARA LA REFERENCIA FUTURA.
LISTA DE PARTES ITEM DESCRIPCION A B C D E F G H I panel izquierdo panel derecho partición superior partición cima estante fondo panel de soporte panel trasero CANTIDAD 1 1 1 3 1 1 1 2 1 ITEM DESCRIPCION 1 2 3 4 5 6 7 8 perno de la leva cerradura de la leva tornillo 1/2” anaquel del angulo clavija de madera tornillo 1-3/4” clavo etiqueta CANTIDAD 12 12 16 8 14 8 40 1 PAGINA 2 Gracias por comprar de AMERIWOOD. Visite WWW.AMERIWOOD.COM para vel la garantia limitada valido en U.S. y Canada.
PASO 3 Atornille cuatro Pernos de la Leva (1) dentro el Cima (E) PASO 4 Insertar cuatro Cerraduras de la Leva (2) y toque dos Clavijas de Madera (5) dentro el Estante (F) PASO 5 Insertar cuatro Cerraduras de la Leva (2) y toque dos Clavijas de Madera (5) dentro el Fondo (G) Fijar los Paneles de Soporte (H) al Fondo (G) con los Anaqueles del Angulo (4) y Tornillos (3) PASO 6 Toque una Clavija de Madera (5) dentro el Partición Superior (C) y cada Partición (D) PASO 7 Fijar el Partición Superior (C) al Est
PASO 11 Coloque el Panel Trasero (I) como se muestra. Enjuague con el borde inferior del Fondo (G) Alinee directamente con los bordes externos y clave directamente en el borde crudo de los paneles Asegura que el unidad is cuadrada Distancia de esquina a esquina debe ser igual como se muestra por favor IMPORTANTE! EL PANEL TRASERO ES UNA PARTE ESTRUCTURAL DE ESTA UNIDAD Y DEBE SER INSTALADO CORRECTAMENTE Todos los clavos deben ser utilizados.
6 Tap a Wood Dowel (5) into the Upper Partition (C) and each Partition (D).
7 Fasten the Upper Partition (C) to the Shelf (F) with Screws (6).
8 Fasten the Partitions (D) to the Shelf (F) with the Wood Dowels. Fasten the Bottom (G) to the Partitions (D) with Screws (6).
B x8 Titus 9 Fasten the Left Panel (A) and Right Panel (B) to the Shelf (F) and Bottom (G), and tighten cam locks.
10 Fasten the Top (E) to the Left Panel (A), Right Panel (B), and Upper Partition (C), and tighten cam locks.
11 Position the Back Panel (I) as shown. Flush with the lower edge of the Bottom (G). Align squarely with outer edges and nail straight into the raw edge of the panels. Assure that the unit is square. Distance from corner to corner must be equal as shown. 7 raw surface superficie cruda I 7 x34 G WARNING turn the unit onto its front apagar la unidad en su frente Please make sure that the Back Panel is attached securely. All nails must be driven into the parts straight and centered.
12 Apply the WARNING LABEL (8) to the Top (E). You should be able to read the label when the TV is removed from the unit. When the TV is in place, it should hide the label. Peel off the backing and apply the label as shown. NOTE: this is a permanent label intended to last for the life of the product. Once applied, do not try to remove it.
Call our toll free number for any assistance you should need or visit our website: 1-800-489-3351 Weight Limits Limites de peso www.Ameriwood.com/parts Clean the product with your favorite furniture polish and a soft cloth. DO NOT USE harsh chemicals or abrasive cleaners. Move your new furniture carefully with two people. Lift and carry the unit. Never push or drag the unit. Do not allow children to climb or play on the unit. Failure to comply could result in severe injury.
Certificate of Conformity 1. This certificate applies to the Dorel Home Furnishings Inc. product identified by this instruction manual. 2. This certificate applies to compliance of this product with the CPSC Ban on Lead-Containing Paint (16 CFR 1303). 3. This product is distributed by: Dorel Home Furnishings Inc. 410 East First Street South Wright City, MO 63390 636-745-3351 4. Site of Manufacture: □ Cornwall ON 5. See front page of instruction manual for date of manufacture.