
Operation Manual


ASSEMBLY INSTRUCTIONS
NOTE: The assembly of the 1 Star Grill requires (2) two people. Before
you begin the assembly process, take the outer cardboard packing
surrounding the grill from the pallet. You may either flatten it, or leave it
as is to place the barbecue body onto it during assembly. Remove all
parts and components from the grill and pallet, and place them in an area
that does not interfere with the assembly process. Lay the grill on its
back on the cardboard. Install screws part way in each step, but do not
tighten until all screws have been started.
STEP 1 - Leg Panel Assembly
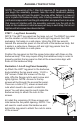
Illustration 1-A Left Leg Panel Assembly
NOTE: The LEFT leg panel has the large cut out. The RIGHT leg panel
has the smaller cut out. Remove left and right leg panels from the
packaging. Set aside in a safe place. Using the 5/32 hex wrench,
remove the access/fan panel on the left end of the barbecue body. Set
it aside in a safe place. Remove left and right leg panels from the
packaging. Set aside in a safe place.
Position the leg panel so that the screw holes align with those on the
barbecue body. This may require lifting the barbecue body in order to
properly position the leg panel so that all the screw holes align with
those on the barbecue body.
a) Attach the LEFT leg panel to the barbecue
body installing the leg panel using 1/4-20 x
3/8” screws. Install the screws on the top
side. Affix the flange nuts to each screw and
lightly tighten. NOTE: Access to the top
screws will be through the access/fan panel.
There are a total of (11) eleven screws and
nuts which need to be used to install this
panel. You will also need to reach inside the
barbecue body to attach the nuts to the
screws.
b) Install the remaining (3) three screws and
nuts below the fan panel opening. NOTE: You
will need to reach under the barbecue and
behind the leg panel to attach the nuts to some
of the screws.
5
Illustration 1-A
Illustration 1-B