MAKEBLOCK MUSIC ROBOT KIT V2.
Makeblock Music Robot V2.0 User Guide www.makeblock.com Catalog Music Robot Kit V2.0 Introduction ........................................................................................................... 1 1 2 3 What is Music Robot Kit V2.0? ............................................................................................................ 1 1.1 Mechanical part .............................................................................................................................. 1 1.
Makeblock Music Robot V2.0 User Guide www.makeblock.com Music Robot Kit V2.0 Introduction 1 What is Music Robot Kit V2.0? Makeblock Music Robot Kit V2.0 is upgrade featured kit based on Makeblock Music Kit V1.0. It drives the stepper motor to move by ultrasonic sensor detecting the direction of gestures. When the wooden stick moves to the exact position, it hit the xylophone by controlling the electromagnet.
Makeblock Music Robot V2.0 User Guide www.makeblock.com 2 Music Robot Kit V2.0 Mechanical Building Guide There are 9 steps of building the mechanical part, please follow the guide step by step. 2.
Makeblock Music Robot V2.0 User Guide www.makeblock.
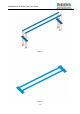
Makeblock Music Robot V2.0 User Guide www.makeblock.com 2.2 Install the silde rail Connect the Plate 7x9 and V-slot Bearing by using Socket Cap Screw M4 as Figure 2-1 shows. When you’ve done this please make sure put it in the middle of 2 Slides. (Note: Pay attention of the position of V-slot Bearing is near the Plate 7 x 9.
Makeblock Music Robot V2.0 User Guide www.makeblock.
Makeblock Music Robot V2.0 User Guide www.makeblock.
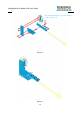
Makeblock Music Robot V2.0 User Guide www.makeblock.com 2.3 Install the hitting section Connect the Bracket, Plate, Beam, DC Frame Type Solenoid and hitting stick by using Countersunk Screw M3, M4, then the strike device is done. (Note: Make sure the small end of spring inside the DC Frame Type Solenoid HCNE10530 should install outward, and the threaded slot of Beam 0808-88 should install upside down.
Makeblock Music Robot V2.0 User Guide www.makeblock.com Be careful installation to prevent damage to the solenoid coil.
Makeblock Music Robot V2.0 User Guide www.makeblock.com Figure 12 2.4 Connect the slide rail and hitting section together Connect the strike divide and the base set by 2 X Nut M4. (Note: Pay attention to the connection of Slide Rail and Hitting Section.
Makeblock Music Robot V2.0 User Guide www.makeblock.
Makeblock Music Robot V2.0 User Guide www.makeblock.com 2.5 Install the stepper motor and limit switches The stepper motors and limit switches mounted on the stepper motor bracket. (Note: Pay attention on the position and direction of the limit switches.
Makeblock Music Robot V2.0 User Guide www.makeblock.
Makeblock Music Robot V2.0 User Guide www.makeblock.
Makeblock Music Robot V2.0 User Guide www.makeblock.com 2.6 Install the timing pulley and add into sliding rail section Prepare 2 x timing pulley wheels and add them onto sliding rail section. (Note: Please make sure the Timing Pulley 62T install at the same side of stepper motor, the Plastic Rivet R4120 side forward to the stepper motor.
Makeblock Music Robot V2.0 User Guide www.makeblock.
Makeblock Music Robot V2.0 User Guide www.makeblock.
Makeblock Music Robot V2.0 User Guide www.makeblock.
Makeblock Music Robot V2.0 User Guide www.makeblock.
Makeblock Music Robot V2.0 User Guide www.makeblock.com 2.7 Install the timing belt Using the timing belt to connect the 2 x Timing Pulley Wheels. (Note: Please adjust the timing belt tight enough, it can’t be too loose.
Makeblock Music Robot V2.0 User Guide www.makeblock.
Makeblock Music Robot V2.0 User Guide www.makeblock.com 2.8 Install the electronic modules Please install the electronic modules as the figure shown below.
Makeblock Music Robot V2.0 User Guide www.makeblock.
Makeblock Music Robot V2.0 User Guide www.makeblock.
Makeblock Music Robot V2.0 User Guide www.makeblock.
Makeblock Music Robot V2.0 User Guide www.makeblock.
Makeblock Music Robot V2.0 User Guide www.makeblock.com 2.9 Music robot kit mechanical part complete Here’s the complete picture of Music Robot Kit. Figure 38 Figure 39 3D model download:https://grabcad.
Makeblock Music Robot V2.0 User Guide www.makeblock.com 3 Music Robot Kit V2.0 Electronic Wiring Guide 3.1 Connect the Me Ultrasonic Sensor V2.0 to Port 3 of Me Orion. 3.2 Connect the Me Stepper Motor Driver to Port 1 of Me Orion. 3.3 Connect the DC Frame Type Solenoid to Port M1. 3.4 Connect the Me RJ25 Adapter V2.1 to Port 6. Pay attention: Me RJ25 Adapter SLOT 1 can connect the LED RGB Strip and SLOT 2 can connect the Me Limit Switch Sensor V2.0.
Makeblock Music Robot V2.0 User Guide www.makeblock.
Makeblock Music Robot V2.0 User Guide www.makeblock.
Makeblock Music Robot V2.0 User Guide www.makeblock.com ( Note: The smaller excitation mode is, the slower motor is spinning, the higher precision you get.) Table 1 MS1 MS2 MS3 Microstep Resolution Excitation Mode L L L Full Step 2 Phase H L L Half Step 1-2 Phase L H L Quarter Step W1-2 Phase H H L Eight Step 2W1-2 Phase H H H Sixteenth Step 4W1-2 Phase b).Me Ultrasonic Sensor V2.
Makeblock Music Robot V2.0 User Guide www.makeblock.com C).Me Stepper Motor Driver Wiring Diagram Figure 43 d).
Makeblock Music Robot V2.0 User Guide www.makeblock.com e). Whole Frame Diagram of Music Robot Kit V2.
Makeblock Music Robot V2.0 User Guide www.makeblock.com 4 Music Robot Kit V2.0 Software Programming Guide 1.When we installed the Music Robot Kit V2.0 and LED RGB Strip-Addressable, Sealed (0.5M) as below shown. Make sure the smaller side of Xylophone towards to stepper motor as shown below. Figure 51 Connect the Me Orion with PC via USB cable, start the up-computer software MusicBot , click the Serial pull-down menu and choose correct port (expect COM1), as shown below.
Makeblock Music Robot V2.0 User Guide www.makeblock.com Figure 52 2.Choose the type of your Arduino board, you can figure out by checking the back of your Arduino board. Here we use Arduino Uno as example. Figure 53 3.Click the “Connect” , and click “Upgrade”, the firmware will update. (A stable network is required.) Figure 54 4. After updating, Music Robot Kit V2.0 will keep moving until reach the Me Limit Switch Sensor V2.0.
Makeblock Music Robot V2.0 User Guide www.makeblock.com 4.1 Using gestures When your hand in front of some note to move, the Music Robot will hit the note key correspondingly. Make sure your hand is in range of Ultrasonic Sensor gapmeasurement. You can also use MusicBot to turn on/off the Ultrasonic function. 4.2 Using up-computer 4.2.1 By mouse click When you click the of Musicbot software to some note, the Music Robot will hit the corresponding note key as below shown. Figure 55 4.2.
Makeblock Music Robot V2.0 User Guide www.makeblock.
Makeblock Music Robot V2.0 User Guide www.makeblock.com 5 FAQs (Frequently Asked Questions of Music Robot Kit) Q1: Why I connect the power, the Music Robot will out of control and slide back and forth. Answer: Because once you turn on the Music Robot, it will hit the Xylophone by us Music Robot will play “Brother John” and it will stop play when the music is finished. You can control by using gestures and up-computer.
Makeblock Music Robot V2.0 User Guide www.makeblock.com Q4: Why the LED RGB strip isn’t working? Answer: 1.Firstly we need to update the firmware (A stable network is required.) 2. Make sure the LED RGB Strip connect with adapter module SLOT 1, and the adapter module RJ25 port need to connect the Me Orion Port 6. 3. Check if the Red LED light of adapter module is turn on, if not, it might a poor contact, try to rewiring.
Makeblock Music Robot V2.0 User Guide www.makeblock.com Q8: When power on, the stepper motor rotates inversely, what can we do? Answer: You might install on the wrong connectors.
Makeblock Music Robot V2.0 User Guide www.makeblock.com Shenzhen Maker Works Technology Co., Ltd Technical Support: tec-support@makeblock.com www.makeblock.