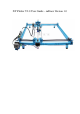
XY Plotter V2.0 User Guide – mDraw Version 1.
Content 1. Before Get Start .......................................................................................................... i 2. Part List ..................................................................................................................... ii 3. Introduction ............................................................................................................... 1 1. XY Plotter V2.0.......................................................................................
1. Before Get Start 1. Hardware: XY Plotter V2.0 Kit 2. XY Plotter V2.0 Assembly instructions 3. Software: a. Must have: mDraw for Windows mDraw for Mac Inksape b. Optional: Arduino IDE Makeblock Windows Mainboard Driver (PS: Please download driver for Mac OS system at our website) Note:mDraw is best for Makeblock Orion mainboard, it also supports Arduino Leonardo/Uno mainboard, for which need to upload firmware by Arduino IDE firstly. Please download the firmware at Here.
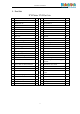
XY Plotter V2.0-mDraw 2. Part List XY Plotter V2.
XY Plotter V2.0-mDraw 3. Introduction 1. XY Plotter V2.0 XY Plotter is a drawing robot based on Makeblock platform, precision is 0.1mm, working area is 310mm×390mm. Besides the well-designed hardware, we designed a software for XY Plotter 2.0 – mDraw. 2. mDraw mDraw is a host computer software originally designed for 4-in-1 drawing robot mDrawBot, we developed the compatibility with XY Plotter 2.0 Servo mode and Laser mode.
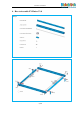
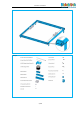
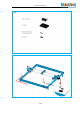
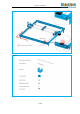
XY Plotter V2.0-mDraw 4. How to Assemble XY Plotter V2.
XY Plotter V2.
XY Plotter V2.
XY Plotter V2.
XY Plotter V2.
XY Plotter V2.
XY Plotter V2.
XY Plotter V2.
XY Plotter V2.
XY Plotter V2.
XY Plotter V2.
XY Plotter V2.
XY Plotter V2.
XY Plotter V2.
XY Plotter V2.
XY Plotter V2.
XY Plotter V2.
XY Plotter V2.
XY Plotter V2.
XY Plotter V2.
XY Plotter V2.
XY Plotter V2.
XY Plotter V2.
XY Plotter V2.0-mDraw (X Axis) (Y Axis) Black, green, red, blue) Note 1: Note 2: Laser Upgrade Attention: Due to the different host computer software, you should change the microstep settings from HHL to HHH. After you finishing this step, congratulations! You can move forward to the next stage – using mDraw to control your robot. Here you go the introduction of software mDraw.
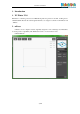
XY Plotter V2.0-mDraw 5. mDraw 1. Introduction of mDraw mDraw is an cross-platform open-source software developed by Makeblock. Compatibility: mDrawBot (mScara, mCar, mEggBot, mSpider), XY Plotter kit (servo mode, laser mode) OS Environment: Windows, Mac, Linux Supported File Type: *.svg, *.bmp (convert to *.svg)1 2. Installation Download and open the installation pack of mDraw, follow the prompts to install mDraw.2 3. Button Function in Main UI Click in the Drawing zone, robot will move accordingly.
XY Plotter V2.0-mDraw Load in BMP file, mDraw will pop out a dialogue for converting SVG file. Follow the prompts, BMP file can be converted into SVG file. Load in SVG file, drawing is as follows. 4. Setting (1) XY Plotter V2.0 a. Check and make sure all wiring is correct. Connect robot to computer via USB cable. 3 b. Choose XY as robot configuration, select the correct COM port, click “connect”, and then click “Update Firmware”).
XY Plotter V2.0-mDraw 2 1 c. Click button to entry the setup window. Generally default value is fine, you can revise parameters per your own necessary. d. Please keep graphics stay in the rectangle zone, or it will cause abnormal drawing. e. Make XY Plotter back to origin point before starting.
XY Plotter V2.0-mDraw (2) Configurations of Pen Up and Pen Down Input value of Pen Up and Pen Down in mDraw, and observe the movement of mDrawBot. If the feedback is correct as below, that means your settings are correct. 5。 Pen Up Pen Down Servo Arm Note: the default value here is only for reference. In actual use please apply the value you got after adjusting the servo arm. 6. Samples for Software mDraw and Inkscape mDraw supports SVG file which is based on open-source software Inkscape.
XY Plotter V2.0-mDraw 4. Open a BMP file with Inkscape, select the picture, and then click Path->Trace Bitmap. 5. Set value for Threshold, click Update-> Ok. 6. Drag out the generated vector graphic, select View -> Display mode -> Outline. Delete the original BMP picture.
XY Plotter V2.0-mDraw 7. Save file as type Plain SVG (*svg) 6. 8. Open the SVG file you just saved as below, adjust the position and size, and then click button to start drawing.7 7. FAQs Q1. Why cannot install driver software for Makeblock Orion? A: If your computer cannot install driver software for Makeblock Orion successfully, please download the driver installation here and install it manually. Makeblock Orion driver download link: http://learn.makeblock.
XY Plotter V2.0-mDraw Q2. How to adjust the torque and electric current of stepper motor? A: You can swirl the tiny knob of stepper motor driver module in “+” direction to increase the torque output if it’s not enough. Q3. Why the speed and ratio are incorrect? A:The microstep presets of mDraw is HHH 1/16. If the speed and ratio are incorrect, please check the setting. Here you go the setting chart and default 1 2 3 Full speed L L L 1/2 H L L 1/4 L H L 1/8 H H L 1/16 H H H Q4.
XY Plotter V2.0-mDraw Q5. How to know the corresponding physical position of the graphic in soft UI? A: Move the machine back to origin position, drag graphic to change its size and position. Lift the pen, click the 4 corners of graphic as below figure, and then observe the movement of machine to identify the graphic’s physical size and position. Q6. How to download the related sources and 3D models? A: Please download related sources at our official Grabcad website. Q7.
XY Plotter V2.0-mDraw Q9. How to contact us? A: Welcome to email us at support@makeblock.cc. Or you can contact us at below. https://www.facebook.com/Makeblock?ref=br_tf https://plus.google.com/102486511775733872783/posts https://twitter.