
M2 Assembly Guide 2_0


3
M2 ASSEMBLY GUIDE
Thanks for buying the M2 CNC Automated Cutting Machine, welcome to the Maker Made
family! The following instructions are intended for beginners - with no prior CNC experience.
We’ll be releasing an upgrade guide, as well as a paired down guide for experienced users
soon.
Here are some notes on the layout:
1. First off, I’m Drew and I took the lead on creating this guide. My notes are tips and tricks to
help you along. They are in a different font, blue, and look like this:
They are meant to answer some of the “why” questions you might have and give you tips to
get started. We suggest printing the guide in color, if you want a paper copy.
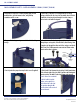
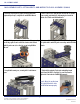
2. Setting up the M2 can be broken down into three main parts: building the M2, building the
frame (or mounting it on an existing Maslow frame), and calibration.
3. Since this guide is aimed at beginners, the calibration section also contains operation
instructions. Then you’ll know the whole process from creating a digital file to cutting it out
on your M2!
If you have experience with the Maslow, the M2’s older brother, you can use your existing
frame! Just follow the steps to build the M2 and skip the part on Easel to learn how to
calibrate with Makerverse.
We hope you enjoy setting up your kit and check out our Resources page for the most
updated version of this setup guide, support, and links to our community. Happy making!
Drew’s Note: Let us know how this guide can be improved for beginners. We love to hear from you!
SECTION 1. INTRODUCTION
This work is licensed under the creative commons Attribution
Non Commercial-No Derivatives 4.0 International license. Last Updated 1.18.2021
Version 2.0