
M2 Assembly Guide 2_0


8
M2 ASSEMBLY GUIDE
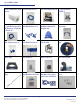
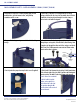
1. Attach three L-brackets to Sled by aligning with six small
predrilled holes, tall side toward center, using Phillips
screwdriver and G1 screws.
2. Attach three L-brackets to rectangular brackets on ring
carriage, with the tall side closest to the middle. Insert G2 bolts
from inside of ring bracket out through L-brackets, two per
bracket and secure with G3 wingnuts.
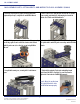
3. Hang a roller bearing carriage on each side of attached ring
carriage.
4. Assemble both roller bearing carriages by feeding F1 bolt
through larger carriage hole, then F2 washer, then bearing, then
F2 washer, out through the other end of the carriage, and attach
with F3 nut. Use F4 Allen wrench on one end and 13mm combo
wrench on the other to tighten.
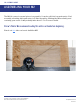
5. Peal off protective paper from acrylic dust cover (if applied). 6. Attach both C1 brick mounts by inserting C2 bolt from bottom
of the left and right of the sled, with C3 washer and C4 wingnuts.
Repeat on other side with C5 nut using 10mm combo wrench.
M2 ASSEMBLY PART 1: SLED ASSEMBLY (BAG C, BAG F, BAG G)
Shoulder
bolt
Ring
bearing
Washer
Washer
Nut
TOP VIEW SIDE VIEW
Drew’s Note: You can install
the bricks in this step, but
another, easier option is to
attach the bricks to the sled
after you have hung the M2
from the chains in the center of
your wasteboard.
This work is licensed under the creative commons Attribution
Non Commercial-No Derivatives 4.0 International license. Last Updated 1.18.2021
Version 2.0