
User manual


34
USING MAKERBOT MAKERWARE CONTINUED
3
Open MakerBot MakerWare
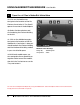
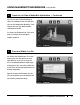
[1] CAMERA HOME: Resets MakerWare to
the default view of the object.
[2] +/-: Zoom in and out. You can also use the
scroll wheel on your mouse to zoom in and out.
[3] LOOK: Click the Look button or hit the
L key to go into Look mode. In this mode,
click and drag with your mouse to rotate
the plate and the object. Use the arrow
at the side of the selected Look button to
open the Change View submenu for Top,
Side and Front views.
[4] MOVE: Click the Move button or hit the
M key to go into Move mode. In this mode,
click and drag with your mouse to to move
an object around the plate. Use the arrow at
the side of the selected Move button to open
the Change Position submenu and move an
object by a specific distance and direction.
[5] TURN: Click the Turn button or hit the
T key to go into Turn mode. In this mode,
click and drag with your mouse to to rotate
the object. Use the arrow at the side of the
selected Turn button to open the Change
Rotation submenu and rotate an object by
a specified angle and direction.
[6] SCALE: Click the Scale button or hit
the S key to go into Scale mode. In this
mode, click and drag with your mouse to to
enlarge or shrink your object. Use the arrow
at the side of the selected Scale button to
open the Change Dimensions submenu
and scale by a percentage or to a specific
measurement.
[7] ADD: Click this button to add an object
to your build plate. You can add as many
objects as you can fit on the plate.
[8] MAKE IT: Click this button to open
the Make dialog, where you can specify
print resolution and other options and send
your object to your MakerBot Replicator 2
for building.
[9] SAVE: Allows you to save the current
plate as a file for later use.
[10] HELP: Opens a guide to MakerWare’s
basic functions.
[11] STATUS: Displays the status
of your connection to your MakerBot
Replicator 2.
D MAKING AN OBJECT WITH MAKERBOT MAKERWARE