® TROUBLESHOOTING AND MAINTENANCE
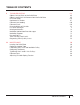
TABLE OF CONTENTS 1 TROUBLESHOOTING Objects Do Not Stick to the Build Plate Objects are Difficult to Remove from the Build Plate Extrusion Stops Replicator 2X Shakes Filament Not Loading Filament Stuck Disassembling an Extruder LCD Error Messages Misaligned Nozzles MakerBot MakerWare Error Messages MakerBot Support Dos and Don’ts Tools You May Find Useful Diagnosing Print Quality Issues 04 05 05 06 07 08 09 10 11 14 16 21 21 22 23 2 MAINTENANCE Leveling the Build Plate Replacing Kapton Tape Lubricating
1 Troubleshooting
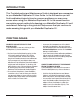
INTRODUCTION This Troubleshooting and Maintenance Guide is designed as a companion to your MakerBot Replicator 2X User Guide. In the first section you will find troubleshooting solutions to common problems you may come across when using your Makerbot Replicator 2X. In the second section we explain several methods for keeping your MakerBot Replicator 2X well maintained. Referring to this guide will help ensure that you continue to make amazing things with your MakerBot Replicator 2X.
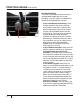
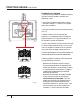
PRINTING ISSUES CONTINUED EXTRUSION STOPS There are a few problems that can cause your MakerBot Replicator 2X to stop extruding. Use this checklist to determine the cause and appropriate solution. Fig. 1.1 Motor shafts 6 • Is your extruder motor rotating? Use a marker to draw a line across the end of the motor shaft that is visible at the back of the motor. When the extruder is running, you should be able to see the shaft turning.
PRINTING ISSUES CONTINUED REPLICATOR 2X SHAKES Your Replicator 2X will shake during printing if you print at high speeds with acceleration turned off. Attempting to print at high speeds with acceleration turned off can harm your MakerBot Replicator 2X. To check and change the Acceleration setting, go to the LCD menu on your Replicator MakerBot 2X and navigate to Info and Settings > General Settings > Accelerate. You can turn acceleration off and on.
PRINTING ISSUES CONTINUED FILAMENT NOT LOADING If you are having problems loading filament into one of the extruders, perform the following steps: 1. Go to the LCD panel and select Utilities > Filament Options > Unload. This option heats the extruders. 2. Set the extruder arm to the open position. [Fig 1.2] 3. Make a fresh cut at the end of the filament. It is important that the filament have no bends in it. If there are bends, cut off the bent section of filament. 4.
PRINTING ISSUES CONTINUED FILAMENT STUCK Filament can swell inside the extruder and get stuck. If you cannot unload filament from one of the extruders, do the following: 1. Go to the LCD panel and select Utilities > Filament Options > Unload. This option heats the extruders. 4. Try pulling the filament out of the extruder again. If you are unable to unload filament because it has broken off inside the extruder, you might not be able to reach inside the extruder to clear the blockage.
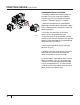
PRINTING ISSUES CONTINUED DISASSEMBLING AN EXTRUDER 1. Unload the MakerBot Filament from the extruder. To run the script for unloading filament, go to the LCD panel and select Utilities > Filament Options > Unload. 2. Switch off the power on the MakerBot Replicator 2X and unplug the power supply. Pull on the connector to release it from the power input port. Fig. 1.3 3. Unscrew the two bolts at the lower corners of the fan guard using your 2.5 mm hex wrench.
LCD ERROR MESSAGES If your MakerBot Replicator 2X encounters problems during operation, the LCD menu will display an error message. The following table describes each possible error message. NOTE: If you see an error message in an unexpected context, please contact MakerBot Support by emailing support@makerbot.com. Error Message Description Use the LCD menu to check your target extruder temperatures.
LCD ERROR MESSAGES CONTINUED These messages indicate that your MakerBot Replicator 2X cannot read the temperature for one of the extruders. Ensure that the wires going into your extruders are securely plugged in or contact MakerBot Support by emailing support@makerbot.com. To clear Heating Errors #3 and 4, you will have to restart your MakerBot Replicator 2X. Your MakerBot Replicator 2X cannot read SD cards larger than 2GB. Try a smaller card.
LCD ERROR MESSAGES CONTINUED Something might be wrong with your extruder. Please contact MakerBot Support by emailing support@makerbot.com. This is just an informational message. If you are loading or unloading filament, the process times out after five minutes. The onboard preheat sequence was interrupted by instructions sent by the software telling the MakerBot Replicator 2X to change the extruder temperature.
MISALIGNED NOZZLES MakerBot executes an alignment script on every MakerBot Replicator 2X before shipping. However, if plastic coming from the two extruders does not appear to be aligned correctly during dual extrusion prints, you can run the alignment script again at home. 1. Make sure filament is loaded into both extruders. 2. To start the nozzle alignment script, go to the LCD menu and navigate to Utilities > Calibrate Nozzles. Fig. 1.4 3.
MISALIGNED NOZZLES CONTINUED 5. Look closely at your test print. First look at the set of lines to the left (the lines that are parallel to the front of the build plate). Notice that the first lines on the left are farther from the front of the build plate than the first lines on the right. Examine the lines and find the pair of lines that match best. The best match will look the most like a single continuous line, with both test lines perfectly centered. Note the number.
MAKERBOT MAKERWARE ERROR MESSAGES MakerWare displays error messages to help you avoid potential problems and diagnose existing problems. INSTALLATION The following error message could appear during installation of MakerBot MakerWare: Error Message Description The installation failed. This message appears when installation is not successful. The installer encountered an error that caused the installation to fail. Contact the software manufacturer for assistance. Perform the installation steps again.
MAKERBOT MAKERWARE ERROR MESSAGES CONTINUED MAKERWARE WINDOW The following error messages could appear in the main MakerWare window during operation: Error Message Description Print failed. This error message appears when: See MakerWare log for more information. • A print is cancelled before completion. • The MakerBot Replicator 2X is disconnected from the computer where MakerWare is running during a print via USB. Check the USB connection between the MakerBot Replicator 2X and the computer.
MAKERBOT MAKERWARE ERROR MESSAGES CONTINUED OPENING A FILE The following messages could appear when you add an object to the plate: Error Message Description The file could not be loaded. It may be an unsupported file format. This message appears when you load a file of a format other than OBJ, STL or Thing, or a badly formatted STL, OBJ or Thing file. Error opening file Couldn’t open [file name] MakerWare is unable to open the file.
MAKERWARE ERROR MESSAGES CONTINUED Printer is busy. This message appears when you try to print something while another print is still in progress. Print failed. This error message appears when: See MakerWare log for more information. • A print is cancelled before completion. • The MakerBot Replicator 2X is disconnected from the computer where MakerWare is running during a print via USB. Check the USB connection between the MakerBot Replicator 2X and the computer.
MAKERWARE ERROR MESSAGES CONTINUED UPLOADING FIRMWARE The following error messages could appear when you try to update the firmware on your MakerBot Replicator 2X: Error Message Description Firmware upload requires an internet connection. This message appears when a user selects the menu entry MakerBots > Upload Firmware and the computer running MakerWare is not connected to the internet. Upload Failure.
DOS AND DON’TS MakerBot encourages you to tinker with your Replicator 2X Experimental 3D Printer, but there are some things we know are bad ideas, and you should know about them, too. • Don’t put any liquids into your extruder. Whether it’s boiling water or acetone or anything in between, it’s not going to help and it could do a lot of harm. • Don’t overheat your extruder.
USEFUL TOOLS Your MakerBot Replicator 2X package includes everything you need to start printing, but here are a few other things that might come in handy as you begin to experiment. A craft spatula. A thin metal craft spatula is a great tool for removing stubborn prints form the build plate. Carefully work the edge of the spatula under the edge of your print, making sure to keep the spatula at a low angle. If the spatula is pointing down too steeply, it’s more likely to damage your Kapton tape.
DIAGNOSING PRINT QUALITY ISSUES Sometimes little things can go wrong with a print – things that are easy to fix, but only if you know what’s causing the problem. This guide can help: just find the picture of the problem you’re experiencing and read the tips on how to fix it. File Name: Frank’s Head Design by: michaelmelcone Thingiverse: 142860 Fig. 1.5 Warping or Cracking Are your prints curling off the build plate? This can happen during printing when the air around your print is too cool.
DIAGNOSING PRINT QUALITY ISSUES CONTINUED Filament Variation Does it seem like there’s too much or too little plastic being used in your prints? This can happen when your filament doesn’t look or behave exactly how the slicing engine expects it to. Sometimes 1.75 mm plastic filament is actually closer to 1.65 mm or 1.85 mm. Your extruder can handle this range of sizes, but the slicer requires an accurate description of your filament to create a good toolpath. setting.
DIAGNOSING PRINT QUALITY ISSUES CONTINUED If you are overextruding [Fig. 1.6], increase the “feedstockMultiplier” setting by 0.05, save the config file, and Export your file again. If the “feedstockMultiplier” setting reaches a value of 1.0 without the problem being resolved, you might have a different issue. Please contact MakerBot Support. File Name: 3D mouse Fig. 1.6 Design by: DDStarkey Thingiverse: 61909 File Name: 3D mouse If you are underextruding [Fig. 1.
DIAGNOSING PRINT QUALITY ISSUES CONTINUED Rippling Do you see faint vertical ripples on the walls of your prints? [Fig. 1.8] This is due to mechanical feedback and occurs at higher speeds. Reduce your print speed in the Advanced Options section of MakerWare’s Make dialog. File Name: light house Fig. 1.8 To print quickly but avoid rippling, reduce your print speed only on outer shells. To do this, you must create a custom profile. Instructions on creating custom profiles are available at makerbot.
DIAGNOSING PRINT QUALITY ISSUES CONTINUED Loose drive gear: If the drive gear in the extruder comes loose on the extruder motor shaft, the gear cannot grip the filament and drive it down into the extruder. Use the Disassembling an Extruder section on page 10 to remove the motor assembly from the extruder. Then: 1. Use the 2 mm hex wrench from the accessory box to remove the two bolts holding the drive block to the extruder motor. Remove the drive block and set it aside.
2 Maintenance
LEVELING THE BUILD PLATE LEVELING THE BUILD PLATE One of the best things you can do to keep your MakerBot Replicator 2X in top shape is to level your build plate frequently. It never hurts to re-level, but forgetting to do so can hurt your success rate. Fig. 2.1 • If the build platform is too far from the extruder nozzle, or if one part of the plate is farther from the nozzle than another part, your prints might not stick to the build plate.
LEVELING BUILD PLATE CONTINUED You should level your build plate regularly, especially if you notice that your extruder nozzle is scratching the build plate, or that the first layer of an object doesn’t adhere to the plate. Each time you level, you should also make sure that your build plate is clean: dust, scratches and oil from your hands can cause some of the same problems as a plate that’s too far from the extruder.
REPLACING KAPTON TAPE Over time, the Kapton tape on your build plate will be scratched and torn, and you will need to replace it with one of the die-cut Kapton sheets that was included in the package with your MakerBot Replicator 2X. To replace the Kapton tape: 1. Peel off the old Kapton tape and discard it. Fig. 2.2 Fig. 2.3 2. Locate the extra sheets of Kapton tape that were included with your MakerBot Replicator 2X. [Fig. 2.
REPLACING KAPTON TAPE CONTINUED 7. If there are still bubbles under the Kapton tape, lift the edge of the tape that is nearest to the bubbles and use the tape applicator to smooth the tape from the center out. 8. When the Kapton tape is applied as smoothly as possible, trim the edges of the sheet or fold them over the sides of the build plate. NOTE: To view a video of this process, go to the MakerBot Replicator 2X video page at makerbot.
LUBRICATING Z-AXIS ROD AND IDLER PULLEY CONTINUED 4. Grasp both sides of the build platform and move it to the top of the MakerBot Replicator 2X. 5. Use a clean, lint-free rag [or your finger] to spread the PTFE-based grease onto the bottom section of the threaded rod. Make sure you get the grease inside the threads themselves. X-axis idler pulley Fig. 2.6 6. Locate the X-axis idler pulley. Facing the front of the MakerBot Replicator 2X, the idler pulley is at the top left side. [Fig. 2.
REALIGNING THE GANTRY The gantry is the system of rods and belts that moves the extruder. If one side is too far out of alignment with the other, the outlines of printed objects might appear slanted on the build plate. You should make sure you gantry is aligned after moving or jolting your MakerBot Replicator 2X. Fig. 2.8 To determine whether your gantry is aligned correctly, push the extruders all the way to the front of the MakerBot Replicator 2X.
REALIGNING THE GANTRY CONTINUED 6. Use the 1.5 mm hex wrench to tighten the set screw in each of the two back pulleys. Make sure these set screws are very tight. Make sure these set screws are very tight. NOTE: If you cannot see one of the set screws, hold both sides of the gantry and very gently push it NOTE: If you cannot see one of the set screws, hold away from the back of the MakerBot Replicator 2X.
FILAMENT CARE Your MakerBot Replicator 2X Experimental 3D Printer is optimized to print with 1.75 mm MakerBot ABS plastic filament. For maximum performance, you must keep your ABS filament cool and dry. Heat and humidity can cause the ABS plastic to absorb moisture and swell. To reduce the absorption of moisture, keep the filament in a sealed plastic bag when not in use. Keep your filament tightly wound on the spool. Loose filament will become tangled, and can break or jam during a print.
CONTACT US SUPPORT makerbot.com/support Our website has extensive documentation and troubleshooting information about your MakerBot Replicator 2X Experimental 3D Printer. It’s a great resource when you want to try to solve issues quickly on your own. support@makerbot.com If you ever need help resolving an issue with your MakerBot Replicator 2X, send an email to the address above to open a ticket with the MakerBot Support Team.
WARRANTY, RETURNS, AND REPLACEMENT POLICY MakerBot products do not carry a long-term warranty. Returns are possible only on unaffected items, within 14 days of receipt. After such time, all sales are considered final. “Unaffected” means a device has never been assembled, powered up, programmed, or otherwise changed. MakerBot cannot accept returns on purchased items that have had electrical power applied to them, or been otherwise programmed, changed, or affected.
NOTES TERMS OF SERVICE 39
MakerBot One MetroTech Center, 21st Floor, Brooklyn, NY support@makerbot.com makerbot.