
User guide


24
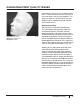
Filament Variation
Does it seem like there’s too much or too little
plastic being used in your prints? This can
happen when your filament doesn’t look or
behave exactly how the slicing engine expects
it to. Sometimes 1.75 mm plastic lament is
actually closer to 1.65 mm or 1.85 mm. Your
extruder can handle this range of sizes, but the
slicer requires an accurate description of your
lament to create a good toolpath.
To compensate for lament variation, you
can create a custom prole. Instructions
on creating custom proles are available
at makerbot.com/support/makerware/
documentation/slicer.
1. Unspool a couple of feet of lament
and use a caliper to measure it at several
dierent points. Average out those
measurements and note the averaged value.
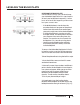
2. Create a custom prole and click the Edit
Prole button to open the cong le in a text
editor. Then nd the correct “feedDiameter”
setting. You will see two “feedDiameter”
settings, one enclosed in each of the extruder
proles. Change the rst “feedDiameter”
setting if you are printing using the right
extruder on your MakerBot Replicator 2X and
change the second “feedDiameter” setting if
you are using the le extruder.
3. Save the cong le and use your new
custom prole to print.
If you are having trouble with the amount
of plastic being extruded and the value
entered for “feedDiameter” is accurate, look
at the “feedstockMultiplier” setting. This
setting compensates for any dierence
between the calculated volume of plastic
going into the extruder and the actual
amount of the plastic coming out of the
extruder. Like the “feedDiameter” setting,
the “feedstockMultiplier” setting appears
twice in the config file – once in each of the
two extruder proles. When changing the
“feedstockMultiplier” setting, make sure you
choose the setting for the correct extruder.
DIAGNOSING PRINT QUALITY ISSUES CONTINUED