Content 1 Preliminaries................................................................................. 3 2 Defuse a bomb.............................................................................6 3 Head or tails.................................................................................9 4 Slot machine............................................................................... 11 5 An electronic cube ......................................................................
22 Ping-pong for professionals......................................................36 23 Reaction test............................................................................. 37 24 Stroboscopes and sound effects...............................................38 25 The electronic cricket...............................................................39 26 Simon says................................................................................
1 Preliminaries The games in this package are reminiscent of the early days of the first electronic gaming devices in the 1970s and the many arcade games. Later, game computers and small electronic games arrived on the market. And even the first home computers of the 1980s were often used for computer games. Today’s game consoles, however, are much more developed and significantly more powerful. This is about the simple games and a throwback to the beginning – pure nostalgia.
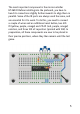
The terminals of the battery compartment use soft wire strands, which are stripped and tin-plated at the ends. The ends can be plugged into the contacts. If possible, they should only be plugged in once and then remain in their position, because they easily wear out and soften when plugged in several times. You can pierce holes in the bottom cover of the board and pass the wires from below. This facilitates strain relief and stable attachment.
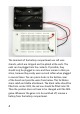
The most important component is the microcontroller HT46F47. Before installing into the pinboard, you have to bend its connections slightly further inwards to align them in parallel. Some of the 18 ports are always used the same, and are essential for it to work. To do this, you need to connect a couple of wires and an additional reset button, two 47k Ω (yellow, purple, orange) and 27k Ω (red, purple, orange) resistors, and three 100 nF capacitors (printed with 104).
Components and connections The HT46F47 microcontroller has 18 connections. If you use it as shown in the picture, the label is legible. There is also a notch on the left edge. The right position is crucial, because subsequent additional components have to fit to be added. It is also important that the battery is connected to the correct terminals. The negative supply voltage (GND) pin is pin 9 (bottom right), and the positive pin (VCC) is pin 12 (the third pin from the right in the top row).
the upper contact row. The reset switch is on the top right of the pinboard. First of all, only the blue wires are used; the coloured connections will follow later. After everything has been connected correctly and carefully checked again, the battery may be inserted. Now the green LED flashes. This is a first success, because the whole system works correctly. Almost all connections can stay that way in the following games. And now, the game. The whole setup is a ticking time bomb that needs to be defused.
know which order and at what time. If you do it right, the LED stays off. If you do it wrong, the LED stays on, and the bomb explodes. But unlike in real life, you can remove the wire, press the reset button, and try again. Who will discover the rule? How exactly does this bomb have to be defused? LED with built-in resistor The green LED only needs a voltage of about 2 V, but the microcontroller works with 4.5 V. A normal LED should not be connected directly to the controller.
All LEDs have another indicator for the connections. The small collar at the bottom is flattened on the cathode side, so you can easily see the negative pole when the LED is installed. If something does not work out as planned, it could be due to a wrong LED. But that doesn’t matter, you just have to turn them around. 3 Head or tails The game is called head or tails. Red or green is the question in this case. At the beginning, both LEDs flash so fast that it looks like a flicker.
Series connection and switch output The red and green LEDs are connected in series in this game and are located directly on the battery. Incidentally, this is only allowed here because the LEDs have built-in resistors. Without the microcontroller, both LEDs would be lit up. However, pin 4 of the microcontroller has an internal electronic switcher that alternately connects the pin to GND and VCC. This will turn off one of the LEDs and turn the other fully on.
4 Slot machine With a total of three LEDs, one can now build a small slot machine, which is otherwise only found in the casino or in the pub. All three LEDs are connected in series to the adjacent ports of the microcontroller. The short connections (cathodes) must be reconnected to the lower negative row. Now all the LEDs are flashing fast, much like the rolls of a machine turn. The aim of the game is to stop the LEDs with the button so that all three LEDs light up at the same time (111).
5 An electronic cube Same structure, different game: To start the cube, you have to hold down the lower button when switching on, i.e. when inserting the batteries or pressing the reset button. If you release it, the first number appears, and after each new press, another number appears.
8 0 0 0 0 0 0 0 0 1 1 1 1 1 1 1 1 4 0 0 0 0 1 1 1 1 0 0 0 0 1 1 1 1 2 0 0 1 1 0 0 1 1 0 0 1 1 0 0 1 1 1 0 1 0 1 0 1 0 1 0 1 0 1 0 1 0 1 Decimal 0 1 2 3 4 5 6 7 8 9 10 11 12 13 14 15 13
6 Slot machine with four LEDs The slot machine is expanded with a yellow LED, making the game even more difficult. Again, all LEDs flash and must be stopped with the button. For a change, this time one needs to achieve a shutdown of all LEDs (0000). This is pure gambling, because the LEDs are flashing so fast that it is impossible to tell the right time. Theoretically, one should, on average, win every 16th game. This can be checked with a larger number of runs.
7 Hot wire A piezo transducer is used here as a small speaker. It is used in this game to produce acoustic signals for the well-known skill game “Hot Wire”. In it, a wire loop must be guided along a curved wire so that both never touch. Each time you touch it, a warning sound goes off, indicating that the game has been lost. When, at the end, the target contact is touched without first coming in contact with the hot wire, a winning sound plays. For this game a new program must be started.
To prepare, you have to cut a wire about 30 cm long and completely strip it. This is the wire that you have to move along and avoid touching. A second wire, about 5 cm long, which is also completely stripped, acts as a contact at the end. A third wire, about 15 cm in length, serves as a contact loop. In this case, only the ends have to be stripped off; in fact, only one end needs to be stripped so long as a loop can be formed.
Microcontroller inputs While most of the microcontroller‘s connectors are used as outputs for connecting the LEDs and speaker, some serve as inputs. Here, those are pins 5 and 6. Internally, a resistor is connected with VCC (+4.5 V). When the microcontroller reads the state of these inputs, a high voltage is normally detected, i.e. a one-state is read. But if a connection to GND is made via the wires or a switch, the controller detects a zero state. In this case, the corresponding sound is switched on.
Clock frequency Every computer and every microcontroller use a clock frequency that is often stabilized with a quartz crystal. The microcontroller HT46F47 has an internal oscillator with which a clock frequency of up to 12 MHz can be set. The frequency is set via the resistor at pin 13.
With 47k Ω, you get a frequency of about 4.5 MHz. At 100k Ω, the frequency is about halved, so you only have 2.25 MHz, and the controller slows down. For comparison: The home computer Sinclair ZX81 from 1981 ran at 3.25 MHz and had a working memory of 1 KB. In the meantime, everything is integrated into one chip, so the HT46F47 runs much faster and with much more memory, i.e. 2 KB. That‘s why all games are already in the memory.
10 Concentration game This time, the piezo transducer is connected to another pin and generates a rattling noise while the slot machine is running. The LEDs are now connected to the upper outputs. This time, they flash so slowly that you can follow it well. The resistor with 47k Ω is again connected to the clock input pin 13 so that it does not become too slow. The game works as follows: Press the reset button to restart the game, then watch the LEDs closely.
soon as you let go, the next state will follow (0000), and then all the other follow until the goal state of 1100. 11 Play me a song So far, there were only two programs that were selected with 0 V and 4.5 V at the selected input (pin 8). But the controller also detects other voltages. In this case, a voltage divider of 10k Ω (brown, black, orange) and 100k Ω (brown, black, yellow) is located at the input, so only a small voltage is measured.
The game uses a wire that leads to the outside. You can touch it to change the generated sound. Without touching, an ascending or descending tone sequence usually arises, which tends towards a middle tone. By touching it, the sound can be made higher or lower. Movement of the feet also affects the pitch. When you are near electrical wires, the pitch may change quite irregularly. This effect can be amplified if a second person holds the pinboard with the battery compartment in their hand.
Electric charges It all sounds like magic, but in fact the whole thing is based on physics. The program repeatedly measures the electrical voltage at the input and thus controls the pitch. However, it is an open, extremely high-impedance input, which can charge itself to any random voltage. The smallest charges can change the voltage. Every person always carries some electrical charge, which can change quickly due to friction.
The finger contacts are made of pieces of wire that are not wrapped too tightly around two fingers. Then the game starts for two people.
questions - with or without lies. Of course, you always have to remember that this polygraph is just a game and can’t prove beyond any doubt that someone is lying. The interrogation begins quite harmless, so that once relaxation occurs, the sound is deeper. Then, very slowly, an unpleasant topic is raised that puts the interviewee under pressure. And finally, when the key question is answered with a lie, the tone may increase. It depends on how sensitive someone is.
13 Hearing test This game is a hearing test with which you can determine the highest pitch you can hear. A resistance of 15k Ω (brown, green, orange) is again used to select the current program. After starting the game, you first hear a relatively low tone. This gets higher quickly, and you should press the button as soon as you can no longer perceive the actual sound. You still hear a cracking sound every time you switch to a new sound, but you do not hear the sound itself.
Tones and frequencies The sound starts at 1.5 kHz and ends at around 40 kHz. A young person hears notes up to about 20 kHz; in old age, however, the limit can be well below 10 kHz. But you will only be seriously hard of hearing when notes of 3 kHz can no longer be heard. The last note of 40 kHz should not be perceivable by humans. For dogs and cats, the sound can be very uncomfortable. You can also use the highest note to test a bat detector, because the calls of bats are also in this range.
Now the game can begin. There are two buttons that need to be pressed in a specific order. However, you do not know which button to start with, nor how many keystrokes are needed in total. You can only try. Whenever the lock detects an incorrect input, you hear a low note. As soon as the right combination is found, however, an ascending sequence of notes is produced, indicating that the lock opens. You can actually do as many attempts as you can to get the secret combination.
15 Ball trainer This time, you’re dealing with a sports game. You should hit a ball with the right button, which will then come down again. At the right moment, you hit again, as often as possible. The 22k Ω resistor (red, red, orange) is needed to select the program. The left button is still without any function, but it may remain connected, because it will be needed again for the next game.
The ball height is represented by four LEDs. On the far right, the upper point is reached. In addition, the ball slows down as it rises, until it reaches its reversal point – just as the physics books say. The throw time is constant, so you know for sure, when the ball will return. At that exact moment, you need to hit it again. If you hit too late, you will realize that all LEDs are off for a moment. 16 Ball trainer for two The LED row is now rebuilt so that the first three LEDs are green.
Brightness control So far, all LEDs have either been completely switched on or completely switched off. This corresponds to the normal behaviour of a switch, and there are electronic switches in the microcontroller. At pin 10 is a very special exit, with which one can do more than just turn it on and off. Here, the brightness can be changed in many stages. In fact, it also hides a switch that switches on and off so fast that you only see the average brightness.
17 Ball trainer for three With a third push-button, the game is to be extended so that now three people can hit the ball alternately. That requires even more concentration. Who will be the first to miss his shot? 18 Relaxation light Same structure, different program: After a hard round, you need to relax. And there is now a relaxation program, more specifically a sub-program to the ball trainer. To start it, press Reset and the left button.
You can set the blinking speed as desired. The right button makes it faster, the left slower. For example, you set the speed so that the blinking matches your own breathing rhythm. Then you concentrate on your breath and achieve complete relaxation. 19 Whack-a-mole A resistance of 33K Ω (orange, orange, orange) launches an old fairground game where you have to try to hit moles that are looking for holes with your hammer: “Whack-a-mole!” You start the game and see one of the LEDs light up.
20 Whack-a-mole 2 This time, four green LEDs are to be installed. Now all moles have the same colour, making the game even more difficult. But that’s the way it is - in the darkness of the night, all the moles are grey, especially when they look out of their holes.
21 Ping-pong This simple tennis game is modelled after the well-known classic game “Pong” by Atari, albeit in a simplistic form. For program selection, a resistor with 47k Ω (yellow, violet, orange) is used. The ball continuously flies back and forth. If you want to play, you have to press the button exactly when the ball has just landed on one of the sides. If the timing is right, you will hear a short sound every time. If you press too long, the ball is stopped.
22 Ping-pong for professionals A resistance of 68k Ω (blue, grey, orange) starts a second version of the ping-pong game, which is much more difficult. Everything has to be exactly right this time. Again, two players strike the ball the exact moment that it arrives at their respective sides. There is close monitoring of whether it is the precise time. If you strike too early or too late, an error will sound and the program will stop until you release the button.
to look, and can simply hear the smooth, regular noises of the strikes on ping-pong for professionals. 23 Reaction test With a resistance of 100k Ω (brown, black, yellow), a reaction game starts. You can see a light bar growing quickly from left to right with up to four LEDs. As soon as the first LED is on, you should press the button. But most of the time you can’t do that, and then two or three LEDs will light up. Each LED represents a tenth of a second. The usual response time is about 0.2 to 0.
If you only press the button when all four LEDs are on, it becomes clear that you really need to relax properly. The program then automatically changes to the already known relaxation light. The brightness of the LED furthest to the right changes to a slower rate. If you already know that you need to relax, you can also start the relaxation light directly by holding down the left button and performing a reset. The optimal speed can be set again with the two buttons.
two buttons, you can adjust the speed. In complete darkness, one can only see moving objects by the light of the stroboscope. Movements are resolved into individual pictures. If you light a rotating motor or a fan on the computer, you can set a stroboscope speed, in which the rotational movement seems to freeze or become very slow. A similar effect can be heard from the piezo speaker. It produces a note that is always only briefly switched on to the rhythm of the stroboscope.
25 The electronic cricket With a blue LED, you can achieve mysterious lighting effects in the dark. Add to that the special sounds of a cricket. This completely different sound effect is created by starting the subroutine of the stroboscope with the left button and a reset: Press and hold the left button while briefly pressing Reset. The electronic cricket produces rare, very high notes that are difficult to localise. In addition, irregular blue light flashes arise in an irregular manner.
26 Simon says With a resistance of 220k Ω (red, red, yellow), you start a demanding game that has been known since 1978 under the name “Senso”, or “Simon” in the English-speaking world, sometimes called “Simon Says”. It was built by several companies, including Atari, as a small handheld device. Later, it appeared again and again in new variants. In this game, there are four different colours that light up in a random order. Each colour has its own note.
only one colour, but by the second round you already have to remember two. So, it continues up to a sequence of ten colours and notes. If you can correctly repeat the ten in order, the game is won. The well-known victory fanfare is played. But if you press a wrong key before, the game ends prematurely with the loser sound.
Imprint Dear customers! This product has been manufactured in accordance with the applicable European directives and therefore bears the CE mark. The intended use is described in the enclosed instructions. For any other use or modification of the product, you alone are responsible for compliance with applicable rules. Therefore, install the circuits exactly as described in the instructions. The product may only be distributed with this manual.