
User manual


6
Components and connections
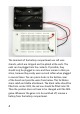
The HT46F47 microcontroller has 18 connections. If you use
it as shown in the picture, the label is legible. There is also a
notch on the left edge. The right position is crucial, because
subsequent additional components have to fit to be added. It
is also important that the battery is connected to the correct
terminals. The negative supply voltage (GND) pin is pin 9
(bottom right), and the positive pin (VCC) is pin 12 (the third
pin from the right in the top row). If the battery is connected
incorrectly, the microcontroller may be destroyed. Therefore,
everything has to be checked very carefully before inserting the
batteries for the first time.
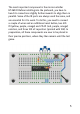
The upper and lower horizontal contact strips are connected
to the negative pole. This remains the case with all subse-
quent games. When an LED is connected, the shorter wire
(the cathode) must always be at this negative terminal. pin 9
(bottom row, the second from the right) is a special connec-
tor. It is at first with the negative pole, but is subsequently
repeatedly connected in different ways to start individual
games in the controller.
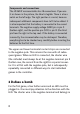
2 Defuse a bomb
For the first game, a few further wires and an LED must be
plugged in. One must pay attention to the direction with the
LED. The shorter wire is the negative terminal and belongs in