ENGLISH (Original instructions) INSTRUCTION MANUAL Cordless Power Planer 1051D 002541 WARNING: For your personal safety, READ and UNDERSTAND before using. SAVE THESE INSTRUCTIONS FOR FUTURE REFERENCE.
ENGLISH (Original instructions) SPECIFICATIONS Model 1051D Planing width 50 mm Planing depth 0.5 mm Shiplapping depth 15 mm No load speed (min-1) 9,000 Overall length 297 mm Net weight 2.3 kg Rated voltage D.C.14.4V • Due to our continuing programme of research and development, the specifications herein are subject to change without notice. • Specifications and battery cartridge may differ from country to country.
increase the risk of electric shock. When operating a power tool outdoors, use an extension cord suitable for outdoor use. Use of a cord suitable for outdoor use reduces the risk of electric shock. 9. If operating a power tool in a damp location is unavoidable, use a ground fault circuit interrupter (GFCI) protected supply. Use of an GFCI reduces the risk of electric shock. Personal safety 10. Stay alert, watch what you are doing and use common sense when operating a power tool.
GEB064-1 19. Disconnect the plug from the power source and/or the battery pack from the power tool before making any adjustments, changing accessories, or storing power tools. Such preventive safety measures reduce the risk of starting the power tool accidentally. 20. Store idle power tools out of the reach of children and do not allow persons unfamiliar with the power tool or these instructions to operate the power tool. Power tools are dangerous in the hands of untrained users. 21. Maintain power tools.
injury. 3. Charge the battery cartridge with room temperature at 10 C - 40 C (50 F - 104 F). Let a hot battery cartridge cool down before charging it. Charge the Nickel Metal Hydride battery cartridge when you do not use it for more than six months. ENC004-2 IMPORTANT SAFETY INSTRUCTIONS 4. FOR BATTERY CARTRIDGE 1. Before using battery cartridge, read all instructions and cautionary markings on (1) battery charger, (2) battery, and (3) product using battery. 2. Do not disassemble battery cartridge.
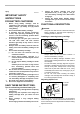
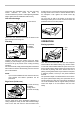
• CAUTION: The knob can be turned beyond the 0.5 mm graduation. However, do not operate the tool with a depth of cut more than 0.5 mm The motor may be burned out or the battery cartridge may be damaged. 1. Installation bolts 2. Hex wrench 1 2 Switch action 002557 1. Lock-off button 2. Switch trigger 1 Push the blade from the belt side with the hex wrench. Remove the other blade in the same manner. 2 1. Hex wrench 2.
thumb screw (A). Loosen the thumb screw (B) and adjust the edge fence until it comes in contact with the side of the workpiece. Then tighten the thumb screw (B) securely. You may wish to add to the length of the fence by attaching an extra piece of wood. Convenient holes are provided in the fence for this purpose. Loosen the two installation bolts. Turn the pan head screws clockwise to retract the blade or counterclockwise to protrude it.
Shiplapping (Rabbeting) 1. V groove 1 002586 MAINTENANCE 002580 To make a stepped cut as shown in the figure, use the edge fence (guide rule). Draw a cutting line on the workpiece. Align the blade edge with the cutting line. Then adjust the edge fence as explained in the "Edge fence" section. CAUTION: Always be sure that the tool is switched off and the battery cartridge is removed before attempting to perform inspection or maintenance. • Never use gasoline, benzine, thinner, alcohol or the like.
Makita Corporation Anjo, Aichi, Japan 884326F222 12