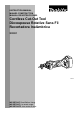
INSTRUCTION MANUAL MANUEL D'INSTRUCTION MANUAL DE INSTRUCCIONES Cordless Cut-Out Tool Découpeuse Rotative Sans Fil Recortadora Inalámbrica XOC01 014848 IMPORTANT: Read Before Using. IMPORTANT: Lire avant usage. IMPORTANTE: Leer antes de usar.
ENGLISH (Original instructions) SPECIFICATIONS Model XOC01 Collet chuck capacity 3.18 mm (1/8"), 6.35 mm (1/4") No load speed (RPM) 30,000 /min Overall length 296 mm (11-5/8") Net weight 1.4 kg (3.1 lbs) 1.7 kg (3.7 lbs) Standard battery cartridge BL1815 / BL1815N BL1830 / BL1840 Rated voltage 313 mm (12-3/8") D.C. 18 V • Due to our continuing program of research and development, the specifications herein are subject to change without notice.
27. Under abusive conditions, liquid may be ejected from the battery; avoid contact. If contact accidentally occurs, flush with water. If liquid contacts eyes, additionally seek medical help. Liquid ejected from the battery may cause irritation or burns. Service 28. Have your power tool serviced by a qualified repair person using only identical replacement parts. This will ensure that the safety of the power tool is maintained. 29. Follow instruction for lubricating and changing accessories. 30.
10. 11. 12. 13. 14. 15. 16. 17. 18. 19. 3. If operating time has become excessively shorter, stop operating immediately. It may result in a risk of overheating, possible burns and even an explosion. 4. If electrolyte gets into your eyes, rinse them out with clear water and seek medical attention right away. It may result in loss of your eyesight. 5. Do not short the battery cartridge: (1) Do not touch the terminals with any conductive material.
FUNCTIONAL DESCRIPTION • CAUTION: Always be sure that the tool is switched off and the battery cartridge is removed before adjusting or checking function on the tool. • Installing or removing battery cartridge 1. Red indicator 2. Button 3. Battery cartridge 2 1 In this situation, turn the tool off and stop the application that caused the tool to become overloaded. Then turn the tool on to restart. If the tool does not start, the battery is overheated.
To install the bit, place it in the collet cone as far as it goes and then tighten the collet nut securely with the shoe as a wrench. To remove the bit, follow the installation procedure in reverse. Switch action • CAUTION: Before installing the battery cartridge into the tool, always check to see that the slide switch actuates properly and returns to the "OFF" position when the rear of the slide switch is depressed. Changing the collet cone (country specific) 1.
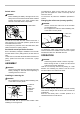
Circular guide (optional accessory) Circular cutting diameters: 10 cm (4") - 34 cm (13-3/8") Installing circular guide 1. Thumb screw 2. Shoe 1 014858 When cutting straight line, clamp a straight board firmly to the material and use it as a guide. Move the tool in the direction of the arrow with the shoe base flush with the side of the guide board. When the cut is complete, turn the tool off and wait for the bit to stop rotating and then carefully remove it from the material.
of the adjustment, tighten the knob securely. 1. Tool 2. Vacuum cover 3. Hose 28 4. Dust collector 1 1. Knob 4 2 1 3 014860 When connecting to Makita dust collector, connect the hose for the dust collector directly to the dust nozzle. 014864 Install the end of the knob into the center of the circle to be cut, and proceed to cut in a clockwise direction.
1. Brush holder cap 2. Screwdriver 1 MAKITA LIMITED ONE YEAR WARRANTY Warranty Policy Every Makita tool is thoroughly inspected and tested before leaving the factory. It is warranted to be free of defects from workmanship and materials for the period of ONE YEAR from the date of original purchase. Should any trouble develop during this one year period, return the COMPLETE tool, freight prepaid, to one of Makita’s Factory or Authorized Service Centers.
FRANÇAIS (Mode d’emploi original) SPÉCIFICATIONS Modèle XOC01 Capacité du mandrin à bague 3,18 mm (1/8"), 6,35 mm (1/4") Vitesse à vide (RPM) 30 000 /min Longueur totale 296 mm (11-5/8") Poids net 1,4 kg (3,1 lbs) 1,7 kg (3,7 lbs) Batterie standard BL1815 / BL1815N BL1830 / BL1840 Tension nominale 313 mm (12-3/8") C.C.
réduisent les risques de démarrage accidentel de l'outil électrique. 20. Après l'utilisation d'un outil électrique, rangez-le hors de portée des enfants et ne laissez aucune personne l'utiliser si elle n'est pas familiarisée avec l'outil électrique ou les présentes instructions d'utilisation. Les outils électriques représentent un danger entre les mains de personnes qui n'en connaissent pas le mode d'utilisation. 21. Veillez à l’entretien des outils électriques.
Réparation 28. Faites réparer votre outil électrique par un réparateur qualifié qui utilise des pièces de rechange identiques aux pièces d'origine. Le maintien de la sûreté de l'outil électrique sera ainsi assuré. 29. Suivez les instructions de lubrification et de changement des accessoires. 30. Maintenez les poignées de l'outil sèches, propres et exemptes d'huile ou de graisse. 10. 11. 12. 13. GEB123-1 CONSIGNES DE SÉCURITÉ POUR L’OUTIL DE COUPE SANS FIL 1. 2. 3. 4. 5. 6. 7. 8. 9. 14. 15. 16.
ENC007-8 2. Ne rechargez jamais une batterie complètement chargée. La surcharge réduit la durée de service de la batterie. Rechargez la batterie à une température ambiante comprise entre 10 ゚ C et 40 ゚ C (50 ゚ F - 104 ゚ F). Si la batterie est chaude, laissezla refroidir avant de la recharger. Rechargez la batterie tous les six mois si l'appareil n'est pas utilisé pendant de longues périodes. CONSIGNES DE SÉCURITÉ IMPORTANTES 3. POUR LA BATTERIE 1.
procéder à la coupe pour éviter de frapper une surface dure comme le plancher, l'établi, etc. Système de protection de la batterie L'outil est équipé d'un système de protection de la batterie. Ce système coupe automatiquement l'alimentation du moteur pour augmenter la durée de vie de la batterie.
ASSEMBLAGE • UTILISATION ATTENTION: Assurez-vous toujours que l'outil est hors tension et que sa batterie est retirée avant de l'ajuster ou de vérifier son fonctionnement. ATTENTION: Évitez de forcer la fraise pour la plier ou la tordre. Elle risquerait de se casser. • Avant de mettre l'outil en marche, assurez-vous que la fraise et l'écrou du mandrin sont fermement serrés.
• • s'émousser ou de se casser rapidement si vous exercez une pression excessive ou coupez trop vite. Lorsque vous coupez autour des coffrets de prise de courant dans des plaques de plâtre, procédez dans le sens inverse des aiguilles d'une montre pour faciliter la coupe. La fraise fournie en équipement standard avec cet outil sert exclusivement à la coupe dans les plaques de plâtre.
Installez l'extrémité du bouton au centre du cercle à couper et effectuez la coupe dans le sens des aiguilles d'une montre. ENTRETIEN Couvercle d'aspirateur (accessoire en option) • Pour une utilisation plus propre, utilisez le couvercle d'aspirateur et raccordez l'outil à un aspirateur ou capteur de poussières Makita. 1 • 1. Vis à oreilles 2.
Remettez le couvercle de porte-charbon en place sur l'outil. Pour maintenir la SÉCURITÉ et la FIABILITÉ du produit, les réparations, tout autre travail d'entretien ou de réglage doivent être effectués dans un centre de service Makita agréé ou un centre de service de l'usine Makita, exclusivement avec des pièces de rechange Makita. GARANTIE LIMITÉE D’UN AN MAKITA Politique de garantie Chaque outil Makita est inspecté rigoureusement et testé avant sa sortie d’usine.
ESPAÑOL (Instrucciones originales) ESPECIFICACIONES Modelo XOC01 Diámetro de la pinza de sujeción 3,18 mm (1/8"), 6,35 mm (1/4") Velocidad sin carga (RPM) 30 000 r/min Longitud total 296 mm (11-5/8") Peso neto 1,4 kg (3,1 lbs) 1,7 kg (3,7 lbs) Cartucho de batería estándar BL1815 / BL1815N BL1830 / BL1840 Tensión nominal 313 mm (12-3/8") 18 V c.c. • Debido a nuestro programa continuo de investigación y desarrollo, las especificaciones aquí dadas están sujetas a cambios sin previo aviso.
19. Desconecte la clavija de la fuente de energía y/o la batería de la herramienta eléctrica antes de realizar ajustes, cambiar accesorios o guardar las herramientas eléctricas. Dichas medidas de seguridad preventivas reducen el riesgo de que la herramienta se inicie accidentalmente. 20. Guarde la herramienta eléctrica que no use fuera del alcance de los niños y no permita que las personas que no están familiarizadas con ella o con las instrucciones la operen.
27. En condiciones de mal uso, podrá escapar líquido de la batería; evite tocarlo. Si lo toca accidentalmente, enjuague con agua. Si hay contacto del líquido con los ojos, acuda por ayuda médica. Puede que el líquido expulsado de la batería cause irritación o quemaduras. Servicio de mantenimiento 28. Haga que una persona calificada repare la herramienta utilizando sólo piezas de repuesto idénticas. Esto asegura que se mantenga la seguridad de la herramienta eléctrica. 29.
USD301-1 GUARDE ESTAS INSTRUCCIONES. Símbolos A continuación se muestran los símbolos utilizados para la herramienta. ・ volts o voltios Consejos para alargar al máximo la vida útil de la batería 1. ・ corriente directa o continua ・ velocidad en vacío o sin carga ・ revoluciones o alternaciones minuto, frecuencia de rotación. por Cargue el cartucho de batería antes de que se descargue completamente.
Para quitar el cartucho de batería, deslícelo de la herramienta mientras desliza el botón sobre la parte delantera del cartucho. Para colocar el cartucho de batería, alinee la lengüeta sobre el cartucho de batería con la ranura en la carcasa y deslice en su lugar. Instale por completo hasta que se fije en su lugar con un pequeño clic. Si puede ver el indicador rojo del lado superior del botón, esto indica que no ha quedado fijo por completo. 1.
Función preventiva del re-arranque accidental Incluso cuando el cartucho de batería está instalado en la herramienta con el interruptor de deslizamiento en la posición de encendido “I (ON)”, la herramienta no enciende. Para iniciar la herramienta, primero deslice el interruptor hacia la posición de apagado "O" ("OFF") y luego vuélvalo a deslizar a la posición de encendido "I" ("ON"). 2 3 014853 Para cambiar el cono de sujeción, afloje la tuerca de sujeción y retire.
Cuando corte en línea recta, sujete con la abrazadera un tablón firmemente al material y úselo como guía. Mueva la herramienta en dirección de la flecha al ras de la base de la zapata con el costado del tablón de guía. Cuando se finalice el corte, apague la herramienta y espere a que la broca pare de girar y luego cuidadosamente retire del material. Guía circular (accesorio opcional) Diámetros de corte circular: 10 cm (4") - 34 cm (13-3/8") Instalación de la guía circular 1. Tornillo de mariposa 2.
circular como referencia general). Tras finalizar el ajuste, apriete la perilla firmemente. 1. Herramienta 2. Cubierta de la aspiradora 3. Manguera 28 4. Recolector de polvo 1 1. Perilla 4 2 3 014860 1 Al conectar a un recolector de polvo Makita, conecte la manguea del recolector de polvo directamente a la boquilla para polvo. 014864 Instale el extremo de la perilla en el centro del círculo a ser cortado y proceda a cortar en dirección de las manecillas del reloj.
1. Tapa del carbón 2. Destornillador 1 GARANTÍA LIMITADA MAKITA DE UN AÑO Ésta Garantía no aplica para México Política de garantía Cada herramienta Makita es inspeccionada y probada exhaustivamente antes de salir de fábrica. Se garantiza que va a estar libre de defectos de mano de obra y materiales por el periodo de UN AÑO a partir de la fecha de adquisición original.
< USA only > WARNING Some dust created by power sanding, sawing, grinding, drilling, and other construction activities contains chemicals known to the State of California to cause cancer, birth defects or other reproductive harm. Some examples of these chemicals are: • lead from lead-based paints, • crystalline silica from bricks and cement and other masonry products, and • arsenic and chromium from chemically-treated lumber.