
Use and Care Manual


4
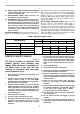
17. Turn off the tool and wait for the wheel to stop
before moving workpiece or changing settings.
18. Do not touch the workpiece immediately after
operation; it is extremely hot and could burn
your skin.
19. Store wheels in a dry location only.
SAVE THESE INSTRUCTIONS
WARNING:
MISUSE or failure to follow the safety
rules stated in this instruction manual
may cause serious personal injury.
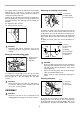
INSTALLATION
Securing cut-off
This tool should be bolted with two bolts to a level and
stable surface using the bolt holes provided in the tool’s
base. This will help prevent tipping and possible personal
injury.
FUNCTIONAL DESCRIPTION
CAUTION:
• Always be sure that the tool is switched off and
unplugged before adjusting or checking function on
the tool.
Switch action
CAUTION:
• Before plugging in the tool, always check to see
that the switch trigger actuates properly and returns
to the “OFF” position when released.
To prevent the switch trigger from being accidentally
pulled, a lock-off button is provided.
To start the tool, depress the lock-off button and pull the
switch trigger. Release the switch trigger to stop.
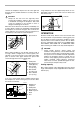
Spark guard
The spark guard is factory-installed with its lower edge
contacting the base. Operating the tool in this position
will cause many sparks to fly around. Loosen the screw
and adjust the spark guard to a position at which mini-
mum sparks will fly around.
Stopper plate
The stopper plate prevents the cut-off wheel from con-
tacting the workbench or floor. When a new wheel is
installed, set the stopper plate to position (A). When the
wheel wears down to the extent that the lower portion of
the workpiece is left uncut, set the stopper plate to posi-
tion (B) to allow increased cutting capacity with a worn
down wheel.
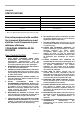
Interval between vise and guide plate
1. Base
2. Bolt holes
1. Lock-off button
2. Switch trigger
1
2
003800
1
2
003754
1. Screw
2. Spark guard
1. Stopper plate
1. Socket wrench
2. Guide plate
3. Move
4. Hex bolts
1
2
003756
1
(A)
(B)
003757
1
2
3
4
003758