Cutout Tool MODEL 3706 DOUBLE INSULATION I N S T R U C T I O N M A N U A L WARNING: For your personal safety, READ and UNDERSTAND before using. SAVE THESE INSTRUCTIONS FOR FUTURE REFERENCE. w w w. m a k i t a t o o l s.
SPECIFICATIONS Collet chuck capacity No load speed (RPM) Overall length Net weight 1/4”, 1/8” 32,000/min. 250 mm (9-7/8”) 1.1 kg (2.4 lbs) • Manufacturer reserves the right to change specifications without notice. • Specifications may differ from country to country. GENERAL SAFETY RULES USA002-2 (For All Tools) WARNING: Read and understand all instructions. Failure to follow all instructions listed below, may result in electric shock, fire and/or serious personal injury.
damaged cords immediately. Damaged cords increase the risk of electric shock. 8. When operating a power tool outside, use an outdoor extension cord marked “W-A” or “W”. These cords are rated for outdoor use and reduce the risk of electric shock. Personal Safety 9. Stay alert, watch what you are doing and use common sense when operating a power tool. Do not use tool while tired or under the influence of drugs, alcohol, or medication.
USE PROPER EXTENSION CORD: Make sure your extension cord is in good condition. When using an extension cord, be sure to use one heavy enough to carry the current your product will draw. An undersized cord will cause a drop in line voltage resulting in loss of power and overheating. Table 1 shows the correct size to use depending on cord length and nameplate ampere rating. If in doubt, use the next heavier gage. The smaller the gage number, the heavier the cord.
10. Always use with the shoe securely attached to the tool and positioned flat and firmly against the workpiece. 16. Always switch off and wait for the bit to come to a complete stop before removing the bit from workpiece. 11. Hold the tool firmly. 17. Do not touch the bit or the workpiece immediately after operation; it may be extremely hot and could burn your skin. 12. Do not perform any operation using your hands to support or guide the workpiece. 13. Keep hands away from moving parts. 14.
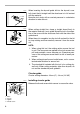
FUNCTIONAL DESCRIPTION • 001624 CAUTION: Always be sure that the tool is switched off and unplugged before adjusting or checking function on the tool. Adjusting depth of cut To adjust the shoe, turn the thumb screw to loosen. Slide the shoe to the desired position and tighten the thumb screw securely. Check for the proper clearance beneath the workpiece before cutting so that the bit will not strike a hard surface such as the floor, workbench, etc. 1 2 1. Shoe 2.
• 001626 1 4 5 6 2 3 1. 2. 3. 4. 5. 6. 7. When using the bit with 6.35 mm (1/4”) shank diameter, first remove the adapter from the collet cone, then install the bit. To install the bit, insert the bit all the way into the collet cone. Press the shaft lock to keep the shaft stationary and use the wrench to tighten the collet nut securely. To remove the bit, follow the installation procedure in reverse.
001629 When inserting the drywall guide bit into the drywall, carefully insert the bit straight until the shoe base is in full contact with the material. Move the tool slowly with a constant pressure in a clockwise direction to make the cut. 001630 When cutting straight line, clamp a straight board firmly to the material and use it as a guide. Move the tool in the direction of the arrow with the shoe base flush with the side of the guide board.
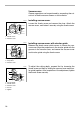
001632 Align the projections in the circular guide with the grooves in the shoe, and secure the shoe and circular guide using the thumb screw. 001633 To adjust the cutting depth, proceed first by loosening the thumb screw and then by sliding the shoe and circular guide together. After completion of the adjustment, tighten the thumb screw securely. 001634 Operation 2 3 1 1. Shoe 2. Circular guide 3. Projections 2 3 1 1. Shoe 2. Circular guide 3.
Vacuum cover Cleaner operations can be performed by connecting the cutout tool to Makita vacuum cleaner or dust collector. OPERATION 001636 1 Installing vacuum cover Loosen the thumb screw and remove the shoe. Attach the vacuum cover, and fasten it securely using the thumb screw. 2 1. Thumb screw 2. Vacuum cover OPERATION 001637 1 Installing vacuum cover with circular guide Release the thumb screw which serves to secure the vacuum cover.
001639 1 Connecting to Makita vacuum cleaner or dust collector Connect the hose of a vacuum cleaner/dust collector to the dust nozzle. When connecting to Makita vacuum cleaner, an optional hose 28 mm (1-1/8”) in inner diameter is necessary. 2 3 1. Vacuum cover 2. Hose 28 3. Hose for vacuum cleaner 001640 1 When connecting to Makita dust collector, connect the hose for the dust collector directly to the dust nozzle. 2 3 1. Vacuum cover 2. Hose 28 3.
ACCESSORIES • CAUTION: These accessories or attachments are recommended for use with your Makita tool specified in this manual. The use of any other accessories or attachments might present a risk of injury to persons. Only use accessory or attachment for its stated purpose. If you need any assistance for more details regarding these accessories, ask your local Makita service center.
Cut First-Class Postage Required Post Office will not deliver without proper postage. Makita U.S.A., Inc.
MAIL THIS PORTION Your answers to the following questions are appreciated. 1. This product was purchased from: Home Center 3. How did you learn about this product: Magazine Radio Hardware/Lumber Store From Dealer Exhibition Tool Distributor Newspaper From Friend Industrial Supply Store Display Previous Usage Construction Supply Catalog Other ( Other ( ) 2. Use of the product is intended for: ) 4.
FACTORY SERVICE CENTERS 1-800-4-MAKITA RETAIN THIS PORTION FOR YOUR RECORDS ALABAMA 2365 Pelham Parkway Pelham, AL 35124 (205) 620-1791 COLORADO 11839 E. 51st Ave. Denver, CO 80239-2709 (303) 371-2850 LOUISIANA 5626 Jefferson Hwy. Harahan, LA 70123 (504) 733-4138 ARIZONA 3707 E. Broadway Rd., Ste. 6 Phoenix, AZ 85040 (602) 437-2850 FLORIDA 620 Douglas Ave.
WARNING Some dust created by power sanding, sawing, grinding, drilling, and other construction activities contains chemicals known to the State of California to cause cancer, birth defects or other reproductive harm. Some examples of these chemicals are: • lead from lead-based paints, • crystalline silica from bricks and cement and other masonry products, and • arsenic and chromium from chemically-treated lumber. Your risk from these exposures varies, depending on how often you do this type of work.