
Instruction manual


5
WARNING:
DO NOT let comfort or familiarity with product
(gained from repeated use) replace strict adherence
to safety rules for the subject product. MISUSE or
failure to follow the safety rules stated in this
instruction manual may cause serious personal
injury.
FUNCTIONAL DESCRIPTION
CAUTION:
• Always be sure that the tool is switched off and
unplugged before adjusting or checking function on
the tool.
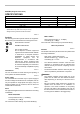
Adjusting bit protrusion
1
2
3
4
002001
To a dj us t t he b it p ro tr usi on , l oos en t he l ev er an d m ove
the tool base up or down as desired by turning the
adjusting roller. After adjusting, tighten the lever firmly to
secure the tool base.
Adjusting angle of tool base
1
2
3
4
5
002002
Loosen the wing bolts and adjust the angle of the tool
base (5° per graduation) to obtain the desired cutting
angle.
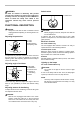
Adjusting amount of chamfering
To a dj us t t he a mo un t of cha mfe ri ng , l oose n the w in g n uts
and adjust the trimmer shoe.
CAUTION:
• With the tool unplugged and switch in the "OFF"
position, rotate the collet nut on the tool several
times to be sure that the bit turns freely and does
not contact the base or trimmer shoe in any way.
Switch action
ON OFF
1
001982
CAUTION:
• Before plugging in the tool, always be sure that the
tool is switched off.
To sta rt the t oo l, mo ve t he s wi tc h le ver to t he I ( ON )
position. To stop the tool, move the switch lever to the O
(OFF) position.
Electronic function
For model 3708FC only
The tool equipped with electronic function are easy to
operate because of the following features.
Constant speed control
Electronic speed control for obtaining constant speed.
Possible to get fine finish, because the rotating speed is
kept constant even under load condition.
Soft start
Soft-start feature minimizes start-up shock, and makes
the tool start smoothly.
Lighting up the lamps
For model 3708F/3708FC only
CAUTION:
• Do not look in the light or see the source of light
directly.
To tu rn on th e l am p, st art the t oo l. Th en , the la mp li gh ts
up the top of the bit. To turn it off, stop the tool.
NOTE:
• Use a dry cloth to wipe the dirt off the lens of lamp.
Be careful not to scratch the lens of lamp, or it may
lower the illumination.
1. Switch lever
1. Wing bolt
2. Graduation
3. Trimmer shoe
4. Amount of
chamfering
5. Base
1. Lever
2. Scale
3. Bit protrusion
4. Adjusting roller