
Specifications


6
FUNCTIONAL
DESCRIPTION
CAUTION:
• Always be sure that the tool is switched off and
unplugged before adjusting or checking function on the
tool.
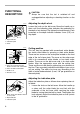
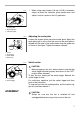
Adjusting the depth of cut
Loosen the knob on the belt cover. Move the handle up or
down until the indication plate indicates the graduation for
the depth of cut desired. The tighten the knob securely. Each
increment on the depth indicator indicates 3 mm (1/8”) cut-
ting depth.
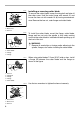
Cutting position
This tool may be operated with conventional cutter blades,
four teeth cutter blades for grooving or dado cutter blades.
There are two arrows on the scale plate located on the front
edge of the tool’s base plate. The arrow on the cutter cover
side is for conventional cutter blades or four teeth cutter
blades. The arrow on the belt cover side is for dado cutter
blades. Align the appropriate arrow with the cutting line.
These arrows are to be used to guide along your desired cut-
ting line. They accurately indicate the left edge of your cut as
you are cutting. The width of cut may vary according to the
width of cutter blade selected. (3 mm; 1/8” per graduation on
the scale plate)
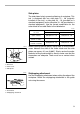
Adjusting the indication plate
Adjust the indication plate as follows when replacing the cut-
ter blade.
• Loosen the knob on the belt cover. Move the handle up
or down until the cutter blade tips are flush with the
underside of the tool base while revolving the cutter
blade by turning the drive belt by hand. Then tighten the
knob securely. Adjust the indication plate so that it points
to the “0” graduation.
1. Depth indicator
2. Indication plate
3. Knob
1
2
3
004819
1. Cutting line
2. Arrow for conventional cutter
blades and four teeth cutter blade
3. Arrow for dado cutter baldes
4. Width of cut
5. Direction of cut
1
2
3
4
5
004820
1. When using cutter blades 120 mm
(4-3/4”) in dia.
2. Depth indicator
3. Indication plate
1
2
3
004821