
Specifications


7
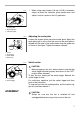
• When using cutter blades 110 mm (4-3/8”) in diameter,
simply re-install the indication plate upside down and
adjust it so that it points to the “0” graduation.
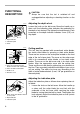
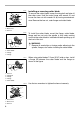
Adjusting the scale plate
Loosen the screws which secure the scale plate. Adjust the
scale plate right or left so that the arrow on the scale plate is
aligned with the side of the cutter blade using the guide rule
as shown in the figure. Tighten the screws securely.
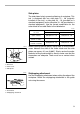
Switch action
CAUTION:
• Before plugging in the tool, always check to see that the
switch trigger actuates properly and returns to the “OFF”
position when released.
To s tar t th e t ool , s imp ly p u ll t he sw itc h t ri gge r. R e lea se t h e
switch trigger to stop.
For continuous operation, pull the switch trigger and then
push in the lock button.
To stop the tool from the locked position, pull the switch trig-
ger fully, and then release it.
ASSEMBLY
CAUTION:
• Always be sure that the tool is switched off and
unplugged before carrying out any work on the tool.
1. When using cutter blades 110 mm
(4-3/8”) in dia.
2. Depth indicator
3. Indication plate
1
23
004822
1. Screw
2. Scale plate
3. Cutter balde
4. Guide rule
12 34
004823
1. Lock button
2. Swtch trigger
1
2
004824