
Specifications


8
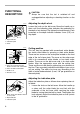
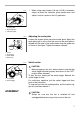
Installing or removing cutter blade
To re move th e c utt er bla d e, lo o se n t he wi ng bo l t an d t ake of f
the cutter cover. Hold the outer flange with wrench 21 and
loosen the hex nut with wrench 19 by turning counterclock-
wise. Remove the hex nut, outer flange and cutter blade.
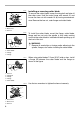
To install the cutter blade, mount the flange, cutter blade,
flange and hex nut onto the spindle in that order, making
sure that the cutter blade is installed with teeth pointing up at
the front of the tool.
WARNING:
• Remove all wood chips or foreign matter adhering to the
spindle, flanges, etc. before installing the cutter blade.
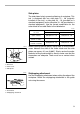
When using cutter blades 7.5 mm (5/16”) wide or less, install
a flange 35 between the cutter blade and the flange as
shown in the figure.
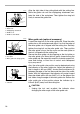
Use the two wrenches to tighten the hex nut securely.
1. Wrench 19
2. Wrench 21
3. Hex nut
1
2
3
004825
1. Hex nut
2. Cutter balde
3. Flange
4. Flange
12
34
004826
1. Hex nut
2. Flange 35
3. Flange
4. Flange
5. Cutter balde
12 3
45
004827
1. Wrench 21
2. Wrench 19
3. Hex nut
1
2
3
004828