N M A N U A L
SPECIFICATIONS Model 4013D 4033D Rated voltage " " D.C. l2 D'C' 14'4 Capacity Dimensions (Lx W x H) Net weight 0.89kg (1.96 Ibs) 0.89kg (1.96 Ibs) 0'5 pint) 465mmx112mmx180mm (18-1/4 x 4-3/8 x 7-1/8") 0'5 pint) 473mmx112mmx180mm (1&5/8 x 4-3/8" x 7-1/8) Manufacturer reserves the right to change specifications without notice. Specifications may differ from country to country.
SAVE THESE INSTRUCTIONS This appliance is intended for household use. ADDITIONAL SAFETY RULES USBO62-1 If you drop or strike the cleaner, check it carefully for cracks or damage before operation. Read this instruction manual and the charger instruction manual carefully before use. 4. Do not pick up wet materials, lit cigarettes or the like. 5. Do not bring close to stoves or other heat Stop operation immediately if you notice anything abnormal. 6. Do not block the intake hole or vent holes.
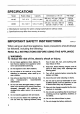
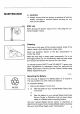
FUNCTIONAL A DESCR IPTlON CAUTION: Alwavs be sure that the cleaner is switched off and the batteiy cartridge is removed before adjusting or checking function on the cleaner. Always switch off the cleaner before insertion or removal of the battery cartridge. I I . 1. Battery cartridge 2. Push button 0 ~1585 To remove the battery cartridge, withdraw it from the cleaner while pressing the buttons on both sides of the cartridge.
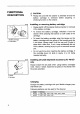
Switch action A CAUTION: Always be sure that the dust bag or paper filter is installed properly in the cleaner before use. Improper installation may allow dust to enter the motor, resulting in malfunction of the cleaner. Always switch off the cleaner after each use to prevent damage to the cleaner and to lengthen the service life of the batteries. To start the cleaner, slide the switch lever forward to the “I” position. To stop the cleaner, slide the switch lever back to the “ 0 position. 1.
001589 Take the dust bag out of the cleaner carefully so that the contents will not spill out. Empty the contents out of the dust bag. Also empty out the dust inside the cleaner itself. Failure to do so may cause the sponge filter to be clogged or the motor to be damaged. installing dust bag Place the dust bag into the cleaner cavity. W15I I Insert the holder of the dust bag all the way into the slots in the cleaner cavity.
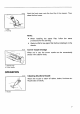
001% Hook the front cover onto the front lip of the cleaner. Then close the front cover. 1. Hook 2. Front lip NOTE: When installing the paper filter, follow the same procedures for the dust bag. Always unfold a new paper filter before installing it on the cleaner. 00159 Corner nozzle storage When not in use, the corner nozzle can be conveniently stored in the cleaner body. Cleaner body 2.
~ 1 5 % Nozzle + Extension wand (Straight pipe) The extension wand fits in between the nozzle and the cleaner itself. This arrangement is convenient for cleaning a floor while standing erect. 1. Cleaner body 2. Extension wand 3. Nozzle ~1597 Corner nozzle Fit on the corner nozzle for cleaning corners and crevices of a car or furniture. 1. Cleaner body 2.
MAINTENANCE A CAUTION: Always be sure that the cleaner is switched off and the battery cartridge is removed before carrying out any work on the cleaner. 001600 After use When storing the cleaner, hang it from a nail using the convenient hanger in back. 001601 Cleaning From time to time wipe off the outside (cleaner body) of the cleaner using a cloth dampened in soapy water. Never use gasoline, thinner or the like. Discoloration or cracks may result. Wash the dust bag in soapy water occasionally.
ACCESSORIES A CAUTION: These accessories or attachments are recommendedfor use with your Makita tool specified in this manual. The use of any other accessories or attachments might present a risk of injury to persons. Only use accessory or attachment for its stated purpose. If you need any assistance for more details regarding these accessories, ask your local Makita service center. Extension wand Nozzle assembly Nozzle assembly (For carpet) Corner nozzle Shelf brush Flexible hose Paper filters (5 pcs.
. - . .. .. .. .. .. ... . . . - -.. . . . . . . . . .. . . . .. .-... . . .
Memo 12
n First Class pastage Req"ited L 3 0 post MllC* Wlll not deliver without proper postage I I Makita U.S.A., Inc.
MAIL THIS PORTION I Your answer to the following questions are appreciated. 3. How did you learn of about this product: 1.This product was purchasedfrom: 0Home Center 0Other ( 0Hardware/Lumber Store 0Tool Distributor 0Industrial Supply 0Construction supply 0Magazine 0From Dealer ) 0Radio 0Exhibition 0From Friend 0Previous usage 0Other ( Newspaper 0Store Display 0Catalog 2. Use of the product is intended for: 4.
FACTORY SERVICE CENTERS 1-800-4-MAKITA RETAIN THIS PORTION FOR YOUR RECORDS ALABAMA R l h a m AL35124 (2051 620 I791 COLORADO l l R 3 Q E 5lslAue Dsnve, CO 80239 2709 (303)371 2850 KENTUCKY NEW MEXICO 1215s nil~riboullle~~~i~~~ 5805 Mens", Bkd NF Louisville KY 10222 AIbeqaerqoe N M B I I I O 15021326 3740 (505)881 4618 ARIZONA 3707 E Binadway Rd Sfe 6 Phoenix A2 85040 (602) 437 2850 CONNECTCUT 508 Spring SI Windsol Lo&> CT 060% i860)292 6405 LOUSIINA NEWVORK 5626 Jslferran Hmi Halahail tb 70123 150
MAKITA LIMITED ONE YEAR WARRANTY Warranty Policy Every Makita tool is thoroughly inspected and tested before leaving the factory. It is warranted to be free of defects from workmanship and materials for the period of ONEYEAR from the date of original purchase. Should any trouble develop during this one-year period, return the COMPLETE tool, freight prepaid, to one of Makita's Factory or Authorized Service Centers.