
Use and Care Manual


6 ENGLISH
Switch action
CAUTION: Before plugging in the tool, always
check to see that the switch trigger actuates
properly and returns to the "OFF" position when
released.
12
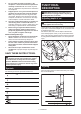
► 1. Switch trigger 2. Lock button / Lock-off button
For tool with lock button
CAUTION: Switch can be locked in "ON" posi-
tion for ease of operator comfort during extended
use. Apply caution when locking tool in "ON"
position and maintain rm grasp on tool.
To start the tool, simply pull the switch trigger. Release
the switch trigger to stop. For continuous operation,
pull the switch trigger, push in the lock button and then
release the switch trigger. To stop the tool from the
locked position, pull the trigger fully, then release it.
For tool with lock-off button
To prevent the switch trigger from being accidentally
pulled, a lock-off button is provided. To start the tool,
press the lock-off button and pull the switch trigger.
Release the switch trigger to stop.
WARNING: NEVER use the tool if it runs when
you simply pull the switch trigger without press-
ing the lock-off button. A switch in need of repair
may result in unintentional operation and serious
personal injury. Return tool to a Makita service center
for proper repairs BEFORE further usage.
WARNING: NEVER defeat the lock-off button
by taping down or some other means. A switch with
a negated lock-off button may result in unintentional
operation and serious personal injury.
CAUTION: Do not pull the switch trigger hard
without pressing in the lock-off button. This can
cause switch breakage.
ASSEMBLY
CAUTION: Always be sure that the tool is
switched off and unplugged before carrying out
any work on the tool.
Hex wrench storage
When not in use, store the hex wrench as shown in the
gure to keep it from being lost.
1
► 1. Hex wrench
Removing or installing diamond
wheel
CAUTION: BE SURE TO TIGHTEN THE HEX
BOLT SECURELY. Also be careful not to tighten
the bolt forcibly. Slipping your hand from the hex
wrench can cause a personal injury.
CAUTION: Use only the Makita wrench and
hex wrench to install or remove the wheel.
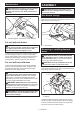
Hold the outer ange with the wrench and loosen the
hex bolt with the hex wrench. Then remove the hex bolt,
outer ange and diamond wheel.
1
2
3
4
5
► 1. Hex wrench 2. Hex bolt 3. Wrench 22 4. Loosen
5. Tighten
To install the diamond wheel, follow the removal pro-
cedure in reverse. Always install the wheel so that the
arrow on the diamond wheel points in the same direc-
tion as the arrow on the gear housing.