ENGLISH (Original instructions) INSTRUCTION MANUAL Cutter 4107RH 005164 IMPORTANT: Read Before Using.
ENGLISH (Original instructions) SPECIFICATIONS Model 4107RH Wheel diameter 180 mm Max. cutting capacities 60 mm No load speed (min-1) 5,000 Overall length 370 mm Net weight 6.8 kg Safety class Class I • Due to our continuing program of research and development, the specifications herein are subject to change without notice. • Specifications may differ from country to country.
Power tool use and care 18. Do not force the power tool. Use the correct power tool for your application. The correct power tool will do the job better and safer at the rate for which it was designed. 19. Do not use the power tool if the switch does not turn it on and off. Any power tool that cannot be controlled with the switch is dangerous and must be repaired. 20.
3. 4. 5. 6. 7. 8. 9. 10. 11. the least amount of wheel is exposed towards the operator. The guard helps to protect operator from broken wheel fragments and accidental contact with wheel. Use only diamond cut-off wheel for your power tool. Just because the accessory can be attached to your power tool, it does not assure safe operation. The rated speed of the wheel must be at least equal to the maximum speed marked on the power tool.
2. Never place your hand near the rotating wheel. Wheel may kickback over your hand. 3. Do not position your body in line with and behind the rotating wheel. Kickback will propel the tool in direction opposite to the wheel's movement at the point of snagging. 4. Use special care when working corners, sharp edges etc. Avoid bouncing and snagging the wheel. Corners, sharp edges or bouncing have a tendency to snag the rotating wheel and cause loss of control or kickback. 5.
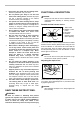
To install the wheel, follow the removal procedure in reverse. Always install the wheel so that the arrow on the wheel points in the same direction as the arrow on the blade case. BE SURE TO TIGHTEN THE HEX BOLT SECURELY. Sighting 1. Notch 1. Hex bolt 2. Diamond wheel 3. Outer flange 4. Inner flange 2 1 1 005166 Align the notch in the front of the base with your cutting line on the workpiece. 3 Switch action • 005170 CAUTION: Use only the Makita wrench to install or remove the wheel.
Cleaning covers OPERATION 1. Clamp 2. Cover (A) 1 2 013266 005173 When accumulation of dust on the cover (A) looks excessive, loosen the clamp and remove the cover (A). Wash off accumulation of dust inside the cover (A) and wipe it. Then hold the cover (A) with its brim facing below, push it as far as it will go and secure it by tightening the clamp. When changing the wheel, clean the cover (B) at the same time. Loosen the screw securing the cover (B) and remove the cover (B).
Use a screwdriver to remove the brush holder caps. Take out the worn carbon brushes, insert the new ones and secure the brush holder caps. 1. Brush holder cap 2. Screwdriver 2 1 005176 To maintain product SAFETY and RELIABILITY, repairs, any other maintenance or adjustment should be performed by Makita Authorized Service Centers, always using Makita replacement parts. OPTIONAL ACCESSORIES CAUTION: These accessories or attachments are recommended for use with your Makita tool specified in this manual.
Makita Corporation Anjo, Aichi, Japan 884270C7 12 www.makita.