
Use and Care Manual


10
ASSEMBLY
CAUTION:
• Always be sure that the tool is switched off and
unplugged before carrying out any work on the tool.
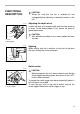
Installing or removing saw blade
CAUTION:
• Use only the Makita wrench provided to install or remove
the blade. Failure to do so may result in overtightening or
insufficient tightening of the hex bolt. This could cause
serious injury to the operator.
• Do not touch the blade with your bare hand immediately
after cutting, it may be extremely hot and could burn your
skin. Put on pair of gloves when removing a hot blade.
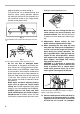
To remove the blade, first push and turn the knob which
secures the dust cover clockwise to the symbol and
remove the dust cover. Press the shaft lock so that the blade
cannot revolve and use the hex wrench to loosen the hex bolt
counterclockwise. Then remove the outer flange and blade.
To install the blade, follow the removal procedure in reverse.
Always install the blade so that the arrow on the blade points
in the same direction as the arrow on the blade case.
BE SURE TO TIGHTEN THE HEX BOLT SECURELY.
After installing the blade, replace the dust cover. Slide the
dust cover carefully so that the slot of its front fits the rib of
the blade case. Make sure the dust cover fits properly then
push and turn the knob counterclockwise to the symbol.
1. Dust cover
2. Knob
1. Hex wrench
2. Shaft lock
1
2
005347
1
2
005348
1. Hex socket head bolt
2. Outer flange
3. Carbide-tipped saw blade
4. Inner flange
1
2
3
4
005349
1. Slot
2. Rib
1
2
005350