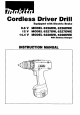
Cordless Driver Drill Equipped with Electric Brake 9.6 V MODEL 6226DW, 6226DWE I 2 V MODEL 6227DW, 6227DWE 14.
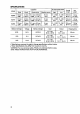
SPECIFICATIONS 1 No load speed (RPMI Capacities Model Steel I Wood 1 Woodscrew IMachine screw I High I Low Overall length I Net weight 6226D '(%? 21" (13/16") 5.1mmx38mm (13/64" x 1-1R"I 6mm W4"I 0-1.100 /min. 0-350 /min. 210" (&1/4"1 1.4kg (3.1 Ibs) 6227D & ' !: 24" 5.1mmx63mm (15/16") (13/64" x 2-1R") 6mm (1/4"1 0-1,100 hin. 0-350 /min. 210mm (&1/4"1 1.5kg (3.3 lbsl 6228D '(%? 24" (15/16"1 6mm (1/4") 0-1,100 hin. 0-350 /min. 210" (&1/4") 1.6kg (3.
GENERAL SAFETY RULES USA0031 (For All Battery Operated Tools) WARNING! Read and understand ail instructions. Failure to follow all instructions listed below, may result in electric shock, fire and/or serious personal injury. SAVE THESE INSTRUCTIONS Work Area 1. Keep your work area clean and well lit. Cluttered benches and dark areas invite accidents. 2. Do not operate power tools in explosive atmospheres, such as in the presence of flammable liquids, gases, or dust.
Tool U s e and Care 12. Use clamps or other practical way t o secure and support the workpiece t o a stable platform. Holding the work by hand or against your body is unstable and may lead t o loss of control. 13. Do not force tool. Use the correct tool for your application. The correct tool will do the job better and safer at the rate for which it is designed. 14. Do not use tool if switch does not turn it on or off. A tool that cannot be controlled with the switch is dangerous and must be repaired. 15.
Specific Safety Rules USBO22-1 1. Hold tool by insulated gripping surfaces when performing an operation where the cutting tool may contact hidden wiring. Contact with a "live" wire will also make exposed metal parts of the tool "live" and shock the operator. 2. Be aware that this tool is always in an operating condition, because it does not have t o be plugged into an electrical outlet. 3.Always be sure you have a firm footing. 4. Be sure no one is below when using the tool in high locations. 5.
IMPORTANT SAFETY INSTRUCTIONS FOR CHARGER & BATTERY CARTRIDGE I. SAVE THESE INSTRUCTIONS - This manual contains important safety and operating instructions for battery charger. 2.Before using battery charger, read all instructions and cautionary markings on (11 battery charger, (2)battery, and (31product using battery. 3.CAUTION - To reduce risk of injury, charge only MAKITA rechargeable batteries marked on the charger label. Other types of batteries may burst causing personal injury and damage. 4.
ADDITIONAL SAFETY RULES FOR CHARGER & BATTERY CARTRIDGE USCool 1 1. Do not charge Battery Cartridge when temperature is BELOW 10°C (5OOF) or ABOVE 4OoC (104OF). 2. Do not attempt to use a step-up transformer, an engine generator or DC power receptacle. 3. Do not allow anything t o cover or clog the charger vents. 4. Always cover the battery terminals with the battery cover when the battery cartridge is not used. 5.
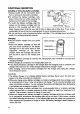
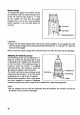
FUNCTIONALDESCRIPTION Installing or removing battery cartridge .Always switch off the tool before insertion or removal of the battery cartridge. To remove the battery cartridge, withdraw it from the tool while pressing the buttons on both sides of the cartridge. *To insert the battery cartridge, align the tongue on the battery cartridge with the groove in the housing and slip it into place. Always insert it all the way until it locks in place with a little click.
Trickle charge (Maintenancecharge) If you leave the battery cartridge in the charger to prevent spontaneous discharging after full charge, the charger will switch into its "trickle charge (maintenance charge)" mode and keep the battery cartridge fresh and fully charged. Tips for maintaining maximum battery life 1 . Charge the battery cartridge before completely discharged. Always stop tool operation and charge the battery cartridge when you notice less tool power. 2.
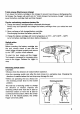
Speed change To change the speed, first switch off the tool and then slide the speed change lever to the "11" side for high speed or "I" side for low speed. Be sure that the speed change lever is set to the correct position before operation. Use the right speed for your job. t 6 Lowspeed Highspeed Speed change lever CAUTION: *Always set the speed change lever fully to the correct position.
ASSEMBLY Installing or removing driver bit or drill bit CAUTION: Always be sure that the tool is switched off and the batten/ cartridge is removed before installing or removing the bit. Hold the ring and turn the sleeve counterclockwise to open the chuck jaws. Place the bit in the chuck as far as it will go. Hold the ring firmly and turn the sleeve clockwise to tighten the chuck. To remove the bit, hold the ring and turn the sleeve counterclockwise.
OPERATION Screwdriving operation Place the point of the driver bit in the screw head and apply pressure to the tool. Start the tool slowly and then increase the speed gradually. Release the trigger as soon as the clutch cuts in. - _ _ - NOTE: *Make sure that the driver bit is inserted straight in the screw head, or the screw and/or bit may be damaged. *When driving wood screws, predrill pilot holes to make driving easier and to prevent splitting of the workpiece. See the chart. f;;:;:A N 2 :$ 3.
CAUTION: *Pressing excessively on the tool will not speed up the drilling. In fact, this excessive pressure will only serve to damage the tip of your bit, decrease the tool performance and shorten the service life of the tool. *There is a tremendous force exerted on the tool/bit at the time of hole breakthrough. Hold the tool firmly and exert care when the bit begins to break through the workpiece. *A stuck bit can be removed simply by setting the reversing switch to reverse rotation in order to back out.
MAINTENANCE CAUTION: Always be sure that the tool is switched off and the battery cartridge is removed before attempting to perform inspection or maintenance. To maintain product SAFETY and RELIABILITY, repairs, maintenance or adjustment should be performed by Makita Authorized or Factory Service Centers, always using Makita replacement parts. Recycling the Battery The only way to dispose of a Makita battery is to recycle it. The law prohibits any other method of disposal.
ACCESSORIES CAUTION: These accessories or attachments are recommended for use with your Makita tool specified in this manual. The use of any other accessories or attachments might present a risk of injury to persons. The accessories or attachments should be used only in the proper and intended manner. Bits Phillips I Size I Part NO. 1 #2 I 7842144A Double-ended Phillips / Slotted bit 1-3/4" long Part No. 7846144 2-1/2" long Part No.
Battery charger Model DC9710 Model DC1470 High capacity battery charger Model D C l 4 l l Battery cartridge 9120 I9122 19134 I9135 Battery cartridge 1420 I 1422 I 1434 I 1435 Battery cartridge 1220 I 1222 I 1234 I 1235 Set plate Plastic carrying case
Dec.
Dec.-o8--'99 MODEL 82280, 82270. 6 2 2 8 0 L ' %M $.ED 1 2 1 1 Speed Change Lever Assembly Housing Set [With Item 201 10 11 3 1 " n e Plate 12 13 4 8 9 5 6 1 1 7 E 9 1 1 1 DESCRIPTION Tappmg Screw Bind PT 3x16 For Model 82280. 62270 For Modsi 6228D Pan Head Screw M4x22 For Mads1 62260.
MAKmA LIMITEDONE YEAR WARRANTY Warranty Policy Every Makita tool is thorou ly ins ected and tested before leaving the factory. It is warranted to be free of defecta from w o r & u d and materials for the period ofONE YEAR from the date of original urchue. Should any troubE develop duthis oneyear period, retum the COMPLETE tool, fre&t prepaid. to one of Makita’s Factory or Authorized Service Centera.