Cordless High Speed Drill Equipped with Electric Brake MODEL 6503D I N S T R U C T I O N M A N U A L WARNING: For your personal safety, READ and UNDERSTAND before using. SAVE THESE INSTRUCTIONS FOR FUTURE REFERENCE. w w w. m a k i t a t o o l s.
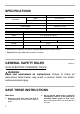
SPECIFICATIONS Model 6503D Capacities Steel 6.5 mm (1/4”) Wood 12 mm (15/32”) No load speed (RPM) 0 - 2,200/min. Overall length 180 mm (7-1/16”) Net weight 1.3 kg (2.9 lbs) Battery Charger DC1414 Input A. C. only 50 Hz - 60 Hz Output D. C. 7.2 V - 14.4 V Battery Cartridge 9122 9134 Voltage Charging time 9135 9.6 V 45 min. 60 min. 70 min. • Manufacturer reserves the right to change specifications without notice. • Specifications may differ from country to country.
. Keep bystanders, children, and visitors away while operating a power tool. Distractions can cause you to lose control. Electrical Safety 4. A battery operated tool with integral batteries or a separate battery pack must be recharged only with the specified charger for the battery. A charger that may be suitable for one type of battery may create a risk of fire when used with another battery. 5. Use battery operated tool only with specifically designated battery pack.
20. Use only accessories that are recommended by the manufacturer for your model. Accessories that may be suitable for one tool may create a risk of injury when used on another tool. SERVICE 21. Tool service must be performed only by qualified repair personnel. Service or main- tenance performed by unqualified personnel may result in a risk of injury. 22. When servicing a tool, use only identical replacement parts. Follow instructions in the Maintenance section of this manual.
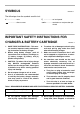
SYMBOLS USD301-1 The followings show the symbols used for tool. n ....................no load speed ˚ V ....................... volts ................... direct current .../min................revolutions or reciprocation per minute IMPORTANT SAFETY INSTRUCTIONS FOR CHARGER & BATTERY CARTRIDGE USC001-3 1. SAVE THESE INSTRUCTIONS - This manual contains important safety and operating instructions for battery charger. 6.
damaged in any way; take it to a qualified serviceman. 11. Do not disassemble charger or battery cartridge; take it to a qualified serviceman when service or repair is required, Incorrect reassembly may result in a risk of electric shock or fire. 12. To reduce risk of electric shock, unplug charger from outlet before attempting any maintenance or cleaning. Turning off controls will not reduce this risk. 14. Young children should be supervised to ensure that they do not play with the battery charger. 15.
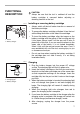
FUNCTIONAL DESCRIPTION • 002053 1 2 Installing or removing battery cartridge • Always switch off the tool before insertion or removal of the battery cartridge. • To remove the battery cartridge, withdraw it from the tool while sliding the button on the side of the cartridge. • To insert the battery cartridge, align the tongue on the battery cartridge with the groove in the housing and slip it into place. Always insert it all the way until it locks in place with a little click.
NOTE: • The battery charger is for charging Makita battery cartridge. Never use it for other purposes or for other manufacturer’s batteries. • When you charge a new battery cartridge or a battery cartridge which has not been used for a long period of time, it may not accept a full charge. This is a normal condition and does not indicate a problem. You can recharge the battery cartridge fully after discharging it completely and recharging a couple of times.
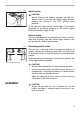
002079 Switch action • 1 CAUTION: Before inserting the battery cartridge into the tool, always check to see that the switch trigger actuates properly and returns to the “OFF” position when released. To start the tool, simply pull the switch trigger. Tool speed is increased by increasing pressure on the switch trigger. Release the switch trigger to stop. 1. Switch trigger Electric brake This tool is equipped with an electric brake.
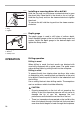
002120 3 1 2 Installing or removing driver bit or drill bit Hold the ring and turn the sleeve counterclockwise to open the chuck jaws. Place the bit in the chuck as far as it will go. Hold the ring firmly and turn the sleeve clockwise to tighten the chuck. To remove the bit, hold the ring and turn the sleeve counterclockwise. 1. Sleeve 2. Ring 3. Tighten 002126 Depth gauge The depth gauge is used to drill holes of uniform depth. Install the depth gauge on the tool with the clamp screw and washer.
• A stuck bit can be removed simply by setting the reversing switch to reverse rotation in order to back out. However, the tool may back out abruptly if you do not hold it firmly. • Always secure small workpieces in a vise or similar holddown device. • If the tool is operated continuously until the battery cartridge has discharged, allow the tool to rest for 15 minutes before proceeding with a fresh battery.
EN0001-1 Recycling the Battery The only way to dispose of a Makita battery is to recycle it. The law prohibits any other method of disposal. To recycle the battery: 1. Remove the battery from the tool. Ni-Cd 2. a) Take the battery to your nearest Makita Factory Service Center or b) Take the battery to your nearest Makita Authorized Service Center or Distributor that has been designated as a Makita battery recycling location.
Cut First-Class Postage Required Post Office will not deliver without proper postage. Makita U.S.A., Inc.
MAIL THIS PORTION Your answers to the following questions are appreciated. 1. This product was purchased from: 3. How did you learn about this product: Other ( Magazine Radio Hardware/Lumber Store From Dealer Exhibition Tool Distributor Newspaper From Friend Industrial Supply Store Display Previous Usage Construction Supply Catalog Other ( Home Center ) 2. Use of the product is intended for: ) 4.
FACTORY SERVICE CENTERS 1-800-4-MAKITA RETAIN THIS PORTION FOR YOUR RECORDS ALABAMA 2365 Pelham Parkway Pelham, AL 35124 (205) 620-1791 COLORADO 11839 E. 51st Ave. Denver, CO 80239-2709 (303) 371-2850 LOUISIANA 5626 Jefferson Hwy. Harahan, LA 70123 (504) 733-4138 ARIZONA 3707 E. Broadway Rd., Ste. 6 Phoenix, AZ 85040 (602) 437-2850 FLORIDA 620 Douglas Ave.
WARNING Some dust created by power sanding, sawing, grinding, drilling, and other construction activities contains chemicals known to the State of California to cause cancer, birth defects or other reproductive harm. Some examples of these chemicals are: • lead from lead-based paints, • crystalline silica from bricks and cement and other masonry products, and • arsenic and chromium from chemically-treated lumber. Your risk from these exposures varies, depending on how often you do this type of work.