
User Manual


6
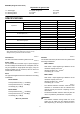
N m
260
(188)
240
(174)
220
(159)
200
(145)
180
(130)
160
(116)
140
(101)
120
(87)
100
(72)
80
(58)
60
(43)
40
(29)
20
(14)
012
3
(S)
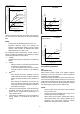
M16X50 at high speed
M16X50 at low speed
M12X50 at high speed
M12X50 at low speed
M10X50 at low speed
M10X50 at high speed
Fastening time
Fastening torque
45 6
High tensile bolt
M16
M12
M10
Proper fastening torque
For 6904VH
.
005302
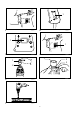
Hold the tool firmly and place the socket over the bolt or
nut. Turn the tool on and fasten for the proper fastening
time.
NOTE:
• Hold the tool pointed straight at the bolt or nut.
• Excessive fastening torque may damage the
bolt/nut or socket. Before starting your job, always
perform a test operation to determine the proper
fastening time for your bolt or nut.
The fastening torque is affected by a wide variety of
factors including the following. After fastening, always
check the torque with a torque wrench.
1. Voltage
Voltage drop will cause a reduction in the fastening
torque.
2. Socket
• Failure to use the correct size socket will cause
a reduction in the fastening torque.
• A worn socket (wear on the hex end or square
end) will cause a reduction in the fastening
torque.
3. Bolt
• Even though the torque coefficient and the
class of bolt are the same, the proper fastening
torque will differ according to the diameter of
bolt.
• Even though the diameters of bolts are the
same, the proper fastening torque will differ
according to the torque coefficient, the class of
bolt and the bolt length.
4. The use of the universal joint or the extension bar
somewhat reduces the fastening force of the
impact wrench. Compensate by fastening for a
longer period of time.
5.
The manner of holding the tool or the material of
driving position to be fastened will affect the
torque.
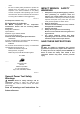
N m
(ft lbs)
(S)
Fastening time
Fastening torque
Standard bolt
Proper fastening torque
50
(510)
100
(1020)
150
(1530)
200
(2040)
0.50 1 1.5
M20X50
M16X50
M12X50
M20
M16
M12
.
.
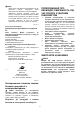
For 6905H
005303
N m
012
3
(S)
Fastening time
Fastening torque
45 6
High tensile bolt
M16
M12
Proper fastening torque
7
8
50
(510)
100
(1020)
150
(1530)
200
(2040)
250
(2550)
300
(3060)
(kg cm)
.
.
M16X50
M12X50
For 6905H
005304
Screwdriving operation
Fig.7
For 6904VH only
When driving screws, install a bit adapter (optional
accessory) on the tool and insert a driver bit (optional
accessory) into the bit adapter.
Hold the tool firmly and place the point of the driver bit in
the screw head. Apply forward pressure to the tool to the
extent that the bit will not slip off the screw. Start the tool
slowly and then increase the speed gradually. Release
the switch trigger just as the screw bottoms out.
NOTE:
• Use the proper bit for the head of the screw/bolt
that you wish to use.
• Hold the tool pointed straight at the screw or the
screw and/or bit may be damaged.
• When driving wood screws, predrill pilot holes to
make driving easier and to prevent splitting of the
workpiece. The pilot holes should be slightly
smaller than the wood screws in diameter.