2-Speed Hammer Drill 13 mm (112”) MODEL 8401 Variable Speed I Reversing INSTRUCTION MANUAL DOUBLE INS ULAT ION SPECIFICATI0 NS Capacities Speed Steel High :.;$,: Low 1 3 mm (,/2”) Wood :&: 30 mm ,l-l/8r,) Concrete No load speed (RPMI 0 - 2,800 1 3 mm (1/2“] 0 ~ 1,100 Blows per minute 0 0 ~ ~ Overall length Net weight 3 1 0 mm 2.2 kg (4.5 Ibsl 30,800 12,100 ( 12-7/32”) * Manufacturer reserves the right t o change specifications without notice.
IMPORTANT SAFETY INSTRUCTIONS (For All Tools) WARNING: WHEN USING ELECTRIC TOOLS, BASIC SAFETY PRECAUTIONS SHOULD ALWAYS BE FOLLOWED TO REDUCE THE RISK OF FIRE, ELECTRIC SHOCK, AND PERSONAL INJURY, INCLUDING THE FOLLOWING: READ ALL INSTRUCTIONS. 1. KEEP WORK AREA CLEAN. Cluttered areas and benches invite injuries. 2. CONSIDER WORK AREA ENVIRONMENT. Don't use power tools in damp or wet locations. Keep work area well lit. Don't expose power tools t o rain.
14. REMOVE ADJUSTING KEYS AND WRENCHES. Form habit of checking t o see that keys and adjusting wrenches are removed from tool before turning it on. 15. AVOID UNINTENTIONAL STARTING. Don't carry tool with finger on switch. Be sure switch is OFF when plugging in. 16. EXTENSION CORDS. Make sure your extension cord is in good condition. When using an extension cord, be sure t o use one heavy enough t o carry the current your product will draw.
VOLTAGE WARNING: Before connecting the tool to a power source (receptacle, outlet, etc.) be sure the voltage supplied is the same as that specified on t h e nameplate of the tool. A power source with voltage greater than that specified for the tool can result in SERIOUS INJURY to the user - as well as damage t o the tool. If in doubt, DO NOT PLUG IN THE TOOL. Using a power source with voltage less than the nameplate rating is harmful to the motor. ADDITIONAL SAFETY RULES 1.
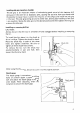
Installing side grip (auxiliary handle) The side grip is an important means of maintaining good control of this hammer drill during use in the even bit or accessory jams, causing the tool twist from your hand with the potential t o cause injury. Loosen the wing nut on the side grip and install the side grip on the tool. The side grip swings around t o either side, allowing easy handling of the tool in any position.
Switch action Tool speed i s increased by increasing pressure on the trigger. To start the tool, simply pull the trigger. Release the trigger to stop. For continuous operation, pull the trigger and then push in the lock button. To stop the tool while in the locked position, pull the trigger fully, then release it. A speed control screw is provided so that tool speed can be maintained a t a constant speed other than i t s maximum speed.
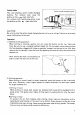
Action mode Action mode changing button This tool employs action mode changing buttons. For rotation only, press the button on the SXmark side fully. For rotation with hammering action, press the button on the c mark side fully. CAUTION : Be sure to press the action mode changing button as far as it will go, Failure t o do so may cause malfunction of the tool. Operation 1 ) Hammer drilling operation When drilling in concrete, granite, tile, etc., press the button on the c mark side fully.
CAUTION : .Pressing excessively on the tool will not speed up the drilling. In fact, this excessive pressure will only serve t o damage the tip of your bit, decrease the tool performance and shorten the service life of the tool. 0 0 0 There is a tremendous twisting force exerted on the tool/bit a t the time of hole breakthrough. Hold the tool firmly and exert care when the bit begins t o break through the workpiece. Use both hands to help control the tool.
MAINTENANCE CAUTION : Always be sure that the tool is switched off and unplugged before attempting to perform inspection or maintenance. To maintain product SAFETY and RELlABl LITY, repairs, carbon brush inspection and replacement, any other maintenance or adjustment should be performed by Makita Authorized or Factory Service Centers, always using Makita replacement parts.
ACCESSORIES CAUTION : These accessories or attachments are recommended for use with your Makita tool specified in this manual. The use of any other accessories or attachments might present a risk of injury to persons. The accessories or attachments should be used only in the proper and intended manner. 0 Tungsten-carbide tipped (hammer) bit Part No. 711120-A I 1 Bit diameter 3/16' 114" 711121-A 0 Part No.
Aug - 2 8 - ' 9 1 EN 13 mm (1/2") 2-SPEED HAMMER DRILL Model 8401 Note: The switch, noise suppressor and other part configurations may differ from country t o country.
iv MODEL 8401 1 2 3 4 5 6 7 8 9 11 12 13 14 15 16 17 lB 19 20 21 22 23 1 1 1 1 1 1 2 2 1 1 1 1 1 1 1 1 1 1 1 1 1 1 A\ug.