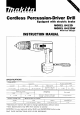
Cordless Percussion-Driver Drill Equipped with electric brake MODEL 8412D MODEL 8412DW With Fast Charger INSTRUCTION MANUAL No load speed 1RPMI Capacltlcs stce1 COllCrele 1" ,,1n1 (3,8"I 1.3 mm (i/z") High - 0 2 4 mrn ( 1 5 / 1 6 " ) Battery Cartridge 1201 I - 0 v :~,",?,gT 3 1 3 mm x 7 9 mm x 2 2 5 mm 112~318" x 3 118" x 8 718"l 4.100 0 LOW 1.
IMPORTANT SAFETY INSTRUCTI0NS (For All Tools) WARNING: WHEN USING ELECTRIC TOOLS, WSlC SAFETY PRECAUTIONS SHOULD ALWAYS BE FOLLOWED TO REDUCE THE RISK OF FIRE, ELECTRIC SHOCK, AND PERSONAL INJURY, INCLUDING THE FOLLOWING: READ ALL INSTRUCTIONS. 1. KEEP WORK AREA CLEAN. Cluttered areas and benches invite injuries. 2. CONSIDER WORK AREA ENVIRONMENT. Don't use power tools in damp or wet locations. Keep work area well lit. Don't expose power tools t o rain.
14. REMOVE ADJUSTING KEYS AND WRENCHES. Form habit of checking t o see that keys and adjusting wrenches are removed from tool before turning it on. 15. AVOID UNINTENTIONAL STARTING. Don't carry tool w i t h finger on switch. Be sure s w i t c h is OFF when plugging in. 16. OUTDOOR USE EXTENSION CORDS. When tool is used outdoors, use only extension cords intended for use outdoors and so marked. 17. STAY ALERT. Watch what you are doing, use common sense. Don't operate tool when you are tired. 18.
IMPORTANT SAFETY INSTRUCTIONS FOR CHARGER & BATTERY CARTRIDGE I.
ADDITIONAL SAFETY RULES FOR CHARGER & BATTERY CARTRIDGE 1. Do not charge Battery Cartridge when temperature is BELOW 10°C (5OOF) or ABOVE 4OoC (104OF). 2. Do not attempt t o use a step-up transformer, an engine generator or DC power receptacle. 3.Do not allow anything t o cover or clog the charger vents. 4. Always cover the battery terminals with the battery cover when the battery cartridge is not used. 5. A battery short can cause a large current flow, overheating, possible burns and even a breakdown.
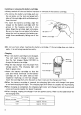
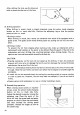
.To remove the battery cartridge, pull out the set plate on the tool and grasp both sides of the cartridge while withdrawing it from the tool. * T o insert the battery cartridge, align the tongue on the battery cartridge with the groove in the housing and slip it into place. Snap the set plate back into place. Be sure to close the set plate fully before using the tool to prevent the battery cartridge from accidentally falling out of the tool.
CAUTION : *The fast charger Model DC1201 is specifically designed to charge only Makita battery cartridges. Never use it for other purposes or for other manufacturer's batteries. 0 When you charge a new battery cartridge or a battery cartridge which has not been used for a long period of time, it may not accept a full charge. This is a normal condition and does not indicate a problem. You can recharge the battery cartridge fully after discharging it completely and recharging a couple of times.
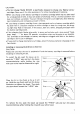
CAUTION : 0 Do not attempt to turn the sleeve forcibly when the sleeve i s in the "LOCK" position. The chuck may be damaged. Always push the sleeve down toward the "LOCK" side before operation. If you operate the tool with the sleeve in the "FREE" position, the chuck may loosen and the bit may come out unexpectedly. Switch action To start the tool, simply pull the trigger. Tool speed is increased by increasing pressure on the trigger. Release the trigger to stop.
Adjusting the fastening torque Turn the adjusting ring so that the pointer points to a number on the adjusting ring. The fastening torque is minimum when the pointer points to the number 1 and maximum when it points to the mark. The clutch will slip a t varying torque levels when the pointer points to the numbers 1 to 10. The clutch i s designed not to slip a t the 6 ” mark.
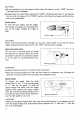
After drilling the hole, use the blow-out bulb to clean the dust out of the hole. 2) Drilling operation When drilling in wood, metal or plastic materials, press the action mode changing button on the a== mark side fully. Position the adjusting ring so that the pointer points to the 6-q mark. 0 0 Drilling in wood When drilling in wood, best results are obtained with wood drills equipped with a guide screw. The guide screw makes drilling easier by pulling the bit into the workpiece.
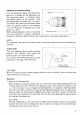
When driving wood screws, predrill pilot holes to make driving easier and to prevent splitting of the workpiece. See the chart at right. Recommended size of pilot hole Imml 2 2 15/64" 3/32',) 2.5 (3132'' 3/32") Nomlnal diameter of screw I") 3 1 1118") 2 0 3 . 5 19164") 3.8 15/32"] 4.5 (1 1/64") 2.2 (3116") I1 3/64',) 17/32") 115164"l 6 1 (15164") fi 4 I1 14") 4.8 5 1 5 5 5 8 ~~ ~ ~ 2.5 2.9 3 1 3 3 36 I I I ~~ ~ ~ 4 0 4 2 A 4 ~ 2 . 8 13/32" ~ 3.4 (118'' 3 .
MAINTENANCE CAUTION : Always be sure that the tool is switched off and the battery cartridge i s removed before attempting to perform inspection or maintenance. To maintain product SAFETY and RELlABl LITY, repairs, maintenance or adjustment should be performed by Makita Authorized or Factory Service Centers, always using Makita replacement parts. Pari No. Size 784201-5 No. 1 L lmm) 65 (2-518“) 784202~3 45 I 1 ~314”) 784203-1 No.
. Tungsten-carbide tipped bit *Drill bit set (For steel) Part No. Sire lmml 791005 8 2 0 (5164"l Part No 3 0 I1 /8"l 6 0 I1 /4"l M a x . drilling depth lmml 791092 7 6 5 1114") 50 12") 791028 6 7 5 19132"l 60 12~318") 71 1057 3 8 0 15/16''] 95 13~314") I d ~~ 791006 6 Bit diameter lmm) 7 9 1 0 0 8 ~ 218.5 111132"l I 7 5 13") Overall length Imm) 8 0 13~118") 90 13~112") 1 2 0 14 3/4"l 1 0 0 14") Each 1 oer set Rubber pad assembly Part No.