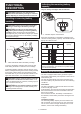
INSTRUCTION MANUAL MANUAL DE INSTRUCCIONES Cordless Angle Drill Taladro Angular Inalámbrico AD03 AD04 IMPORTANT: Read Before Using. IMPORTANTE: Lea antes de usar.
ENGLISH (Original instructions) SPECIFICATIONS Model: Drilling capacities AD03 Steel Wood 12 mm (1/2") No load speed (RPM) 0 - 1,100 /min Overall length 313 mm - 332 mm (12-3/8" - 13-1/8") Rated voltage D.C. 10.8 V - 12 V max Standard battery cartridge BL1016 / BL1021B / BL1041B Net weight • • • AD04 10 mm (3/8") 1.2 - 1.3 kg (2.6 - 2.9 lbs) 1.2 - 1.4 kg (2.7 - 3.0 lbs) Due to our continuing program of research and development, the specifications herein are subject to change without notice.
5. 6. 7. 8. 9. Do not overreach. Keep proper footing and balance at all times. This enables better control of the power tool in unexpected situations. Dress properly. Do not wear loose clothing or jewellery. Keep your hair, clothing and gloves away from moving parts. Loose clothes, jewellery or long hair can be caught in moving parts. If devices are provided for the connection of dust extraction and collection facilities, ensure these are connected and properly used.
. 5. 6. 7. 8. 9. Hold the tool firmly. Keep hands away from rotating parts. Do not leave the tool running. Operate the tool only when hand-held. Do not touch the drill bit or the workpiece immediately after operation; they may be extremely hot and could burn your skin. Some material contains chemicals which may be toxic. Take caution to prevent dust inhalation and skin contact. Follow material supplier safety data. If the drill bit cannot be loosened even you open the jaws, use pliers to pull it out.
Indicating the remaining battery capacity FUNCTIONAL DESCRIPTION Only for battery cartridges with the indicator CAUTION: Always be sure that the tool is switched off and the battery cartridge is removed before adjusting or checking function on the tool. Installing or removing battery cartridge 1 CAUTION: Always switch off the tool before installing or removing of the battery cartridge. CAUTION: Hold the tool and the battery cartridge firmly when installing or removing battery cartridge.
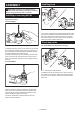
For model AD04 Switch action CAUTION: Before installing the battery cartridge into the tool, always check to see that the switch lever actuates properly and returns to the "OFF" position when released. 1 CAUTION: Be sure to hold the tool firmly before the tool is switched off. ► 1. Lamp Pull the switch lever to light up the lamp. The lamp keeps on lighting while the switch lever is being pulled. The light automatically goes out approximately 10 seconds after the switch lever is released.
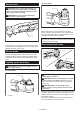
Installing hook ASSEMBLY CAUTION: Always be sure that the tool is switched off and the battery cartridge is removed before carrying out any work on the tool. 1 Installing or removing drill bit Optional accessory 2 For model AD03 3 ► 1. Groove 2. Hook 3. Screw The hook is convenient for temporarily hanging the tool. This can be installed on either side of the tool. To install the hook, insert it into a groove in the tool housing on either side and then secure it with a screw.
OPERATION CAUTION: Pressing excessively on the tool will not speed up the drilling. In fact, this excessive pressure will only serve to damage the tip of your drill bit, decrease the tool performance and shorten the service life of the tool. CAUTION: Always insert the battery cartridge all the way until it locks in place. If you can see the red indicator on the upper side of the button, it is not locked completely. Insert it fully until the red indicator cannot be seen.
MAKITA LIMITED WARRANTY Please refer to the annexed warranty sheet for the most current warranty terms applicable to this product. If annexed warranty sheet is not available, refer to the warranty details set forth at below website for your respective country. United States of America: www.makitatools.com Canada: www.makita.ca Other countries: www.makita.
ESPAÑOL (Instrucciones originales) ESPECIFICACIONES Modelo: Capacidades de taladrado AD03 AD04 Acero 10 mm (3/8") Madera 12 mm (1/2") Velocidad sin carga (rpm) 0 r/min - 1 100 r/min Longitud total Tensión nominal 10,8 V c.c. - 12 V c.c. máx.
Seguridad personal 1. Manténgase alerta, preste atención a lo que está haciendo y utilice su sentido común cuando opere una herramienta eléctrica. No utilice una herramienta eléctrica cuando esté cansado o bajo la influencia de drogas, alcohol o medicamentos. Un momento de distracción mientras opera las herramientas eléctricas puede terminar en una lesión grave. 2. Use equipo de protección personal. Póngase siempre protección para los ojos.
4. 5. 6. 7. En condiciones abusivas, podrá escapar líquido de la batería; evite tocarlo. Si lo toca accidentalmente, enjuague con agua. Si hay contacto del líquido con los ojos, busque asistencia médica. Puede que el líquido expulsado de la batería cause irritación o quemaduras. No utilice una herramienta ni una batería que estén dañadas o hayan sido modificadas. Las baterías dañadas o modificadas podrían ocasionar una situación inesperada provocando un incendio, explosión o riesgo de lesiones.
6. 7. 8. 9. 10. 11. 12. Un cortocircuito en la batería puede causar un flujo grande de corriente, sobrecalentamiento, posibles quemaduras e incluso una descompostura. No guarde la herramienta ni el cartucho de batería en lugares donde la temperatura pueda alcanzar o exceder los 50°C (122°F). Nunca incinere el cartucho de batería incluso en el caso de que esté dañado seriamente o ya no sirva en absoluto. El cartucho de batería puede explotar si se tira al fuego.
Bajo voltaje de la batería: La capacidad restante de la batería es demasiado baja y la herramienta no funcionará. Si enciende la herramienta, el motor no se pone en marcha o se pone en marcha nuevamente pero al poco tiempo se detiene. En este caso, retire la batería y vuelva a cargarla.
Para el modelo AD04 MONTAJE 1 PRECAUCIÓN: Asegúrese siempre de que la herramienta esté apagada y el cartucho de batería haya sido extraído antes de realizar cualquier trabajo en la misma. Instalación o extracción de la broca Accesorio opcional Para el modelo AD03 ► 1. Luz Jale la palanca interruptora para encender la lámpara. La lámpara continuará iluminándose mientras la palanca interruptora se esté jalando.
Instalación del gancho OPERACIÓN PRECAUCIÓN: Siempre inserte completamente el cartucho de batería hasta que quede asegurado en su lugar. Si puede ver el indicador rojo del lado superior del botón, esto indica que no ha quedado completamente asegurado. Insértelo por completo hasta que el indicador rojo no pueda verse. De lo contrario, podría salirse accidentalmente de la herramienta y ocasionarle lesiones a usted o a alguien a su alrededor.
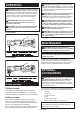
Operación de taladrado ACCESORIOS OPCIONALES Taladrado en madera Cuando taladre en madera, podrá obtener mejores resultados si utiliza brocas para madera equipadas con un tornillo guía. El tornillo guía facilita el taladrado jalando la broca de taladro hacia el interior de la pieza de trabajo. Taladrado en metal Para evitar que la broca de taladro resbale una vez que comience a hacer el orificio, haga un surco con punzón y un martillo en el punto a taladrar.
< USA only > WARNING Some dust created by power sanding, sawing, grinding, drilling, and other construction activities contains chemicals known to the State of California to cause cancer, birth defects or other reproductive harm. Some examples of these chemicals are: • lead from lead-based paints, • crystalline silica from bricks and cement and other masonry products, and • arsenic and chromium from chemically-treated lumber.