
Use and Care Manual

7 ENGLISH
ASSEMBLY
CAUTION: Always be sure that the tool is
switched off and the battery cartridge is removed
before carrying out any work on the tool.
Installing or removing drill bit
Optional accessory
For model AD03
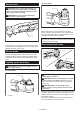
1
►1. Chuck key
Toinstallthedrillbit,placeitinthechuckasfarasitwill
go.Tightenthechuckbyhand.Placethechuckkeyin
each of the three holes and tighten clockwise. Be sure
to tighten all three chuck holes evenly.
Toremovethedrillbit,turnthechuckkeycounterclock-
wiseinjustonehole,thenloosenthechuckbyhand.
Afteruse,returnthechuckkeytothestoragecavityon
the tool.
For model AD04
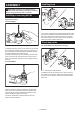
1
►1. Sleeve
Holdthetoolrmlyandturnthesleevecounterclock-
wisetoopenthechuckjaws.Placethedrillbitinthe
chuckasfarasitwillgo.Holdthetoolrmlyturnthe
sleeve clockwise to tighten the chuck.
Toremovethedrillbit,holdthetoolrmlyturnthe
sleeve counterclockwise.
Installing hook
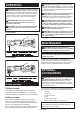
3
2
1
►1. Groove 2. Hook 3. Screw
Thehookisconvenientfortemporarilyhangingthetool.
Thiscanbeinstalledoneithersideofthetool.Toinstall
the hook, insert it into a groove in the tool housing on
eithersideandthensecureitwithascrew.Toremove,
loosen the screw and then take it out.
Chuck key holder
For model AD03 only (optional accessory)
2
1
►1. Chuck key holder 2. Screw
Toinstallthechuckkeyholder,xittotheconvexpor-
tion of the tool housing on either side and then secure
itwithascrew.Toremove,loosenthescrewandthen
take it out.