
Use and Care Manual


6 ENGLISH
3
2
11
2
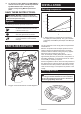
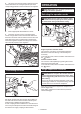
► 1. Hook 2. Hex socket bolt 3. Hole
The hook is convenient for hanging the tool temporarily.
To change the hook position, remove the hex socket bolt
and switch the hook direction. The hook has two holes.
Choose the hole depending on your preferable hook width.
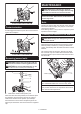
Adjusting the shingle guide
1
2
3
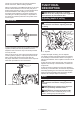
► 1. Contact element 2. Shingle guide 3. Shingle
1
2
► 1. Adjusting plate 2. Lever
The shingle guide is designed for consistent shingle
exposure.
Place shingle in desired position. Turn the lever to
release the adjusting plate. Set the nailer so that the
contact element will depress both the exposed shingle
and previous row of the shingle. Slide the adjusting
plate up against the bottom of the exposed shingle and
return the lever to lock the adjusting plate.
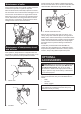
ASSEMBLY
CAUTION: Before carrying out any work on
the tool, always return the trigger and disconnect
the air hose from the tool.
CAUTION: Load the same type, size and
uniform length of nails when loading nails in the
magazine.
Loading nailer
NOTICE: Select nails suitable for your work.
NOTICE: Set the coil support plate according to
the nail size to be used. If the tool is operated with
the coil support plate set to the wrong step, poor nail
feed or malfunction of the tool may result.
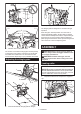
1. Depress the latch lever and open the magazine
cap.
1
2
► 1. Magazine cap 2. Latch lever