INSTRUCTION MANUAL MANUEL D'INSTRUCTION MANUAL DE INSTRUCCIONES Construction Coil Nailer Pistolet Clouer Clavadora Neumática de Carrete AN902 012336 IMPORTANT: Read Before Using. IMPORTANT: Lire avant usage. IMPORTANTE: Leer antes de usar.
ENGLISH (Original instructions) SPECIFICATIONS Model AN902 Air pressure 70 - 120 PSIG (0.49 - 0.83 MPa) Nail length Wire-collated coil nail 45 mm (1-25/32") - 90 mm (3-9/16") Nail capacity 150 - 300 pcs. Min. hose diameter 6.5 mm (2-3/8") Pneumatic tool oil Turbine oil Dimensions (L X W X H) 318 mm (12-1/2") X 128 mm (5") X 378 mm (14-7/8") Net weight 3.5 kg (7.
12. 13. 14. 15. 16. 17. 18. 19. 20. 21. 22. 23. disconnected, altered, or not working properly. Operate the tool within the specified air pressure on the tool label for safety and longer tool life. Do not exceed the recommended max. operating pressure. The tool should not be connected to a source whose pressure potentially exceeds 200 PSIG (1.37 MPa). Never use the tool with other than compressed air. If bottled gas (carbon dioxide, oxygen, nitrogen, hydrogen, air, etc.
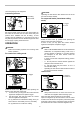
USD501-1 Selecting air hose Symbols The followings show the symbols used for tool. ・ Read and understand tool labels and manual. ・ Operators and others in work area must wear safety glasses with side shields. ・ Keep fingers away from trigger when not driving fasteners to avoid accidental firing. 004294 Use an air hose as large and as short as possible to assure continuous, efficient nailing operation. With an air pressure of 70 PSIG (0.49 MPa), an air hose with an internal diameter of over 6.
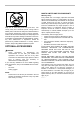
times after pneumatic tool oil is introduced. When nailing workpieces with easily-marred surfaces, use the nose adapter. To attach the nose adapter to the contact element, press it onto the contact element until the protrusion in three places inside the nose adapter fit in three holes in the contact element. FUNCTIONAL DESCRIPTION • CAUTION: Always disconnect the air hose before adjusting or checking function on the tool.
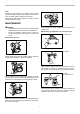
coil is set properly in the magazine. CAUTION: Operating the tool without nails shortens the life of the tool and should be avoided. Connecting air hose 1 1. Air fitting 2. Air socket For sequential mode (intermittent nailing mode) 1. Trigger 2. Lever 1 2 010583 Slip the air socket of the air hose onto the air fitting on the nailer. Be sure that the air socket locks firmly into position when installed onto the air fitting.
Nails Handle nail coils and their box carefully. If the nail coils have been handled roughly, they may be out of shape or their connector breaks, causing poor nail feed. Avoid storing nails in a very humid or hot place or place exposed to direct sunlight. MAINTENANCE 012345 CAUTION: • Always disconnect the air hose from the tool before attempting to perform inspection or maintenance. • Never use gasoline, benzine, thinner, alcohol or the like. Discoloration, deformation or cracks may result.
MAKITA LIMITED ONE YEAR WARRANTY Stove Warranty Policy Every Makita tool is thoroughly inspected and tested before leaving the factory. It is warranted to be free of defects from workmanship and materials for the period of ONE YEAR from the date of original purchase. Should any trouble develop during this one year period, return the COMPLETE tool, freight prepaid, to one of Makita’s Factory or Authorized Service Centers.
FRANÇAIS (Mode d’emploi original) SPÉCIFICATIONS Modèle AN902 Pression d'air 70 - 120 PSI (0,49 - 0,83 MPa) Longueur de clou Clou en rouleau sur fil 45 mm (1-25/32") - 90 mm (3-9/16") Capacité de clouage 150 - 300 agrafes. Diamètre min.
9. 10. 11. 12. 13. 14. 15. 16. 17. 18. Seules les personnes qui participent au travail doivent pénétrer dans la zone de travail. Les enfants, tout particulièrement, doivent être maintenus à l'écart en tout temps. Il se peut que des réglementations locales s'appliquent concernant les niveaux de bruit permis. Veuillez les respecter. Le cas échéant, des volets doivent être installés pour réduire le bruit. Ne modifiez pas l'élément de contact.
29. 30. 31. 32. 33. 34. USD501-1 Déconnectez toujours le tuyau d'air et retirez tous les clous dans les cas suivants : − Lorsque l'outil est laissé sans surveillance. − Avant d'effectuer tout travail d'entretien ou de réparation sur l'outil. − Avant de réparer un blocage. − Avant de déplacer l'outil vers un autre lieu. Procédez au nettoyage et à l'entretien de l'outil une fois le travail terminé. Maintenez l'outil en excellente condition.
Si vous n'utilisez pas de chambre à air, graissez l'outil en versant deux (2) ou trois (3) gouttes d'huile pour outil pneumatique dans le raccord à air. Cette opération doit être effectuée avant et après l'utilisation. Pour assurer une lubrification adéquate, il faut faire déclencher l'outil à quelques reprises après l'insertion de l'huile pour outil pneumatique.
indiquée sur la plaque pointe vers la valeur de graduation correspondante sur le magasin. Si vous utilisez l'outil alors que la plaque de soutien de la bobine n'est pas placée sur la bonne valeur de graduation, l'alimentation en clou risque d'être mauvaise et l'outil risque de mal fonctionner. Utilisez l'adaptateur de bec • ATTENTION: Déconnectez toujours le tuyau avant d'installer ou de retirer l'adaptateur de bec. 2 1 1. Saillie 2. Orifice 3. Adaptateur de bec 1.
Tournez le levier à la position tout en enfonçant le bouton situé de l’autre côté du levier. Pour clouer, placez l'élément de contact sur la pièce et appuyez sur la gâchette. UTILISATION • ATTENTION: Assurez-vous que tous les dispositifs de sécurité sont en état de fonctionner avant d'utiliser l'outil. ATTENTION: SI VOUS MAINTENEZ LA GÂCHETTE EN POSITION À MOITIÉ DÉCLENCHÉE, l'élément de contact peut entrer à nouveau en contact avec la pièce par effet de recul, ce qui cause un clouage inattendu.
ENTRETIEN ATTENTION: Déconnectez toujours le tuyau avant d'effectuer tout travail d'inspection ou d'entretien sur l'outil. • N'utilisez jamais d'essence, de benzine, de solvant, d'alcool ou d'autres produits similaires. Une décoloration, une déformation, ou la formation de fissures peuvent en découler. Entretien de la cloueuse • 012345 Évitez de l’exposer à la lumière directe du soleil et de l’entreposer dans un environnement humide ou chaud.
GARANTIE LIMITÉE D’UN AN MAKITA Réchaud Politique de garantie Chaque outil Makita est inspecté rigoureusement et testé avant sa sortie d’usine. Nous garantissons qu’il sera exempt de défaut de fabrication et de vice de matériau pour une période d’UN AN à partir de la date de son achat initial. Si un problème quelconque devait survenir au cours de cette période d’un an, veuillez retourner l’outil COMPLET, port payé, à une usine ou à un centre de service après-vente Makita.
ESPAÑOL (Instrucciones originales) ESPECIFICACIONES Modelo AN902 Presión de aire 70 - 120 PSIG (0,49 - 0,83 MPa) Longitud del clavo Embobinado intercalado de clavos de alambre entre 45 mm (1-25/32") - 90 mm (3-9/16") Capacidad de clavos 150 - 300 piezas.
9. 10. 11. 12. 13. 14. 15. 16. Sólo aquellos involucrados en la labor deberían estar alrededor. Los niños especialmente deben mantenerse alejados durante todo el tiempo. Puede que haya regulaciones locales respecto al ruido las cuales deben cumplirse al mantener los niveles de ruido dentro de los límites preestablecidos. En determinados casos, deberán usarse silenciadorespara contener el ruido.
28. 29. 30. 31. 32. 33. 34. USD501-1 Detenga la operación de clavado de inmediato si nota algo mal o fuera de lo común con la herramienta. Siempre desconecte la manguera de aire y retire los clavos cuando se dé lo siguiente: − Al desatender la herramienta. − Antes de realizar cualquier mantenimiento o reparación. − Antes de liberar algún atoramiento. − Antes de llevar la herramienta a una locación distinta. Realice operaciones de limpieza y mantenimiento justo después de haber terminado la labor.
Cuando no se use el juego de aire, lubrique la herramienta con aceite para herramientas neumáticas, colocando 2 (dos) o 3 (tres) gotas en el adaptador de aire. Esto deberá realizarse antes y después de cada uso. Para una lubricación adecuada, la herramienta debe dispararse un par de veces después de introducir el aceite para herramientas neumáticas.
2 1 herramienta es usada con la placa de soporte del carrete puesta en un ajuste incorrecto, puede que resulte en una alimentación deficiente de clavo o en fallas durante la operación. 1. Protuberancia 2. Orificio 3. Adaptador de nariz 1. Pinza de alimentación 3 009471 Si desea proteger la superficie de la pieza de trabajo, coloque el adaptador de boquilla del elemento de contacto.
Para modo de clavado secuencial (modo intermitente) OPERACIÓN • PRECAUCIÓN: Asegúrese de que todos los sistemas de seguridad funcionen adecuadamente antes de utilizar la herramienta. 1. Gatillo 2. Palanca 1 Para modo de clavado continuo 1 2 1. Gatillo 2. Palanca 012338 Gire la palanca a la posición mientras presiona el botón sobre el otro lado de la palanca. Para clavar, puede colocar el elemento de contacto contra la pieza de trabajo y jalar el gatillo.
Clavos Tenga un cuidadoso manejo de las bobinas de clavos y de la caja en donde están contenidas. Si las bobinas de clavos se manejan descuidadamente, puede que se deformen o que sus conectores se rompan, resultando en una alimentación deficiente de los calvos. Evite almacenar los clavos en un lugar muy húmedo o caliente, así como dejarlas expuestas a la luz directa del sol.
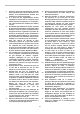
NOTA: • Algunos de los artículos en la lista puede que vengan junto con el paquete de la herramienta como accesorios incluidos. Puede que estos accesorios varíen de país a país. 1. Lubricador 2. Aceite neumático 1 GARANTÍA LIMITADA MAKITA DE UN AÑO Ésta Garantía no aplica para México 2 Política de garantía Cada herramienta Makita es inspeccionada y probada exhaustivamente antes de salir de fábrica.
< USA only > WARNING Some dust created by power sanding, sawing, grinding, drilling, and other construction activities contains chemicals known to the State of California to cause cancer, birth defects or other reproductive harm. Some examples of these chemicals are: • lead from lead-based paints, • crystalline silica from bricks and cement and other masonry products, and • arsenic and chromium from chemically-treated lumber.