
Use and Care Manual


5
times after pneumatic tool oil is introduced.
FUNCTIONAL DESCRIPTION
CAUTION:
• Always disconnect the air hose before adjusting or
checking function on the tool.
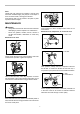
Adjusting the nailing depth of nailing
CAUTION:
• Always disconnect the hose before adjusting the
depth of nailing.
AB
1
012340
123
009180
If nails are driven too deep, turn the adjuster clockwise.
If nails are driven too shallow, turn the adjuster
counterclockwise.
The adjustable range is 6 mm (1/4"). (One full turn
allows 1.0 mm (1/32") adjustment.)
Use the nose adapter
CAUTION:
• Always disconnect the hose before installing or
removing the nose adapter.
1
2
3
009471
If you like to protect the surface of workpiece, attach the
nose adapter of contact element.
When nailing workpieces with easily-marred surfaces,
use the nose adapter. To attach the nose adapter to the
contact element, press it onto the contact element until
the protrusion in three places inside the nose adapter fit
in three holes in the contact element.
ASSEMBLY
CAUTION:
• Always disconnect the air hose before loading the
nailer.
Loading the nailer
1
2
3
012342
Select nails suitable for your work. Depress the latch
lever and open the magazine cap.
1
2
010580
Lift and turn the coil support plate so that the arrow with
nail size indicated on the coil support plate will point to
the corresponding graduation increment marked on the
magazine. If the tool is operated with the coil support
plate set to the wrong step, poor nail feed or malfunction
of the tool may result.
1
012346
Place the nail coil over the coil support plate. Uncoil
enough nails to reach the nail guide. Place the first nail
in the feeder and the second nail in the feed claw. Place
other uncoiled nails on feeder body. Close the magazine
cap slowly until it lock after checking to see that the nail
1. Feed Claw
1. Coil support
plate
2. Graduation
1. Door
2. Latch lever
3. Magazine cap
1. Protrusion
2. Hole
3. Nose adapter
1. Too deep
2. Flush
3. Too shallow
1. Adjuster