
Operation Manual


10 ENGLISH
Selecting air hose
CAUTION: Low air output of the compressor,
or a long or smaller diameter air hose in relation
to the nailing frequency may cause a decrease in
the driving capability of the tool.
►Fig.3
Use a high pressure resistant air hose.
Use an air hose as large and as short as possible to
assurecontinuous,efcientnailingoperation.
Lubrication
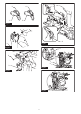
►Fig.4: 1. Pneumatic tool oil
Oil the tool with pneumatic tool oil by placing two or
threedropsintotheairtting.Thisshouldbedone
beforeandafteruse.
Forproperlubrication,thetoolmustberedacoupleof
timesafterpneumatictooloilisintroduced.
FUNCTIONAL
DESCRIPTION
CAUTION: Before adjusting or checking func-
tion on the tool, always lock the trigger by turning
the trigger lock lever to the lock position , and
disconnect the air hose from the tool.
Adjusting depth of nailing
Thistollhastheadjusterofthenailingdepth.Tomod-
ulatethenailingdepth,turntheadjustertotheproper
depth.
►Fig.5: 1.Adjuster
Theadjustablerangeis8.5mm(11/32").(Onefullturn
allows1.25mm(1/16")adjustment.)
►Fig.6: 1.Toodeep2. Flush 3.Tooshallow
Hook
CAUTION: Always disconnect the hose when
hanging the tool using the hook.
CAUTION: Never hook the tool at high loca-
tion or on potentially unstable surface.
CAUTION: Do not hang the hook from the
waist belt.Ifthenaileraccidentallydrops,itmay
resultinmisringandpersonalinjuries.
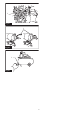
Thehookisusefulforhangingupthetooltemporarily.
Thehookcanbeturnedwhilepushingthebottomtothe
desired angle.
►Fig.7: 1. Hook
Furthermore,thishookcanbeinstalledoneitherside
ofthetool.
Tochangetheinstallationposition,removetheboltwith
a hex wrench. Install the hook on another side and then
secureitrmlywiththebolt.
►Fig.8: 1. Hook 2. Bolt
Nose adapter
Topreventthesurfaceofworkpiecefrombeing
scratchedordamaged,usethenoseadapter.
Todetachthenoseadapterfromitshousingbase,pull
thenoseadapterinthedirectionofthearrow.
►Fig.9: 1. Nose adapter
Toattachthenoseadaptertothecontactelement,
press it onto the contact element until the recessed
partsinfourplacesinsidethenoseadaptertinfour
protrusionsofthecontactelement.
►Fig.10: 1. Nose adapter 2.Contactelement
3. Protrusion 4. Recessed part
Air duster
CAUTION: Do not aim the ejection port of the
air duster to someone. Also, keep your hands and
foot away from the ejection port.Iftheairduster
buttonisaccidentallypushed,itmaycauseaper-
sonalinjury.
CAUTION: Always check your surroundings
before using the air duster.Blowndustorobjects
may hit someone.
CAUTION: Do not connect or disconnect the
air hose while pushing the air duster button.
Theairsuppliedtothetoolcanalsobeusedasanair
duster. You can clean the work area by pressing the
button on the grip end.
►Fig.11: 1. Button
NOTICE:Afterusingtheairduster,thedrivingforce
ofthetoolwilltemporarilydecline.Waituntiltheair
pressure recovers in this case.
NOTICE:Performatestblowifyouusetheair
dusterimmediatelyaftertheoilwasapplied.Theoil
may be sprayed with the air.
ASSEMBLY
CAUTION: Before carrying out any work on
the tool, always lock the trigger by turning the
trigger lock lever to the lock position , and
disconnect the air hose from the tool.
Loading nailer
CAUTION: Do not use deformed nails or
linked sheet.
1. Disconnect the air hose.
2. Depress the latch lever and open the door and
magazine cap.
►Fig.12: 1. Latch lever 2. Door 3. Magazine cap
►Fig.13