
Operators Manual


6 ENGLISH
1
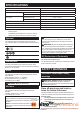
►1. Hook
Furthermore,thishookcanbeinstalledoneitherside
of the tool.
Tochangetheinstallationposition,removetheboltwith
a hex wrench. Install the hook on another side and then
secureitrmlywiththebolt.
2
1
►1. Hook 2. Bolt
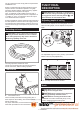
Nose adapter
Topreventthesurfaceofworkpiecefrombeing
scratchedordamaged,usethenoseadapter.
Todetachthenoseadapterfromitshousingbase,pull
the nose adapter in the direction of the arrow.
1
►1. Nose adapter
Toattachthenoseadaptertothecontactelement,
press it onto the contact element until the recessed
partsinfourplacesinsidethenoseadaptertinfour
protrusions of the contact element.
3
2
1
4
►1. Nose adapter 2.Contactelement3. Protrusion
4. Recessed part
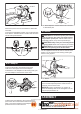
Air duster
CAUTION:
Do not aim the ejection port of the air
duster to someone. Also, keep your hands and foot
away from the ejection port. If the air duster button is
accidentallypushed,itmaycauseapersonalinjury.
CAUTION:
Always check your surroundings before
using the air duster.Blowndustorobjectsmayhitsomeone.
CAUTION: Do not connect or disconnect the
air hose while pushing the air duster button.
Theairsuppliedtothetoolcanalsobeusedasanair
duster. You can clean the work area by pressing the
button on the grip end.
1
►1. Button
NOTICE:Afterusingtheairduster,thedrivingforce
of the tool will temporarily decline. Wait until the air
pressure recovers in this case.
NOTICE: Perform a test blow if you use the air
dusterimmediatelyaftertheoilwasapplied.Theoil
may be sprayed with the air.
ASSEMBLY
CAUTION: Before carrying out any work on
the tool, always lock the trigger by turning the
trigger lock lever to the lock position , and
disconnect the air hose from the tool.