
Operators Manual


7 ENGLISH
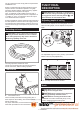
Loading nailer
CAUTION: Do not use deformed nails or
linked sheet.
1. Disconnect the air hose.
2. Depress the latch lever and open the door and
magazine cap.
1
2
3
►1. Latch lever 2. Door 3. Magazine cap
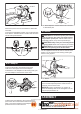
3. Turntheadjustshaftandsetthestepofthe
change plate suitable for the nail length. Make sure that
the arrow points to the corresponding graduation incre-
mentofthenaillengthmarkedontheadjustshaft.
1
2
3
►1.Changeplate2.Adjustshaft3. Arrow
NOTICE: If the tool is operated with the change
platesettothewrongstep,itmayresultinpoornail
feeding or tool malfunction.
4. Place the nail coil over the change plate and
uncoil enough nails to reach the nail rail.
Thenplacetherstnailinthenailrailandthesecond
nailinthefeedclaw.Also,placeotheruncoilednailson
feeder body.
1
2
►1. Nail rail 2. Feed claw
5.
Checkthatthenailcoilissetproperlyinthemagazine.
6. Closethemagazinecapcarefully.Thenwith
depressingthelatchlever,closethedooruntilthelatch
lever locks.
Connecting air hose
CAUTION: Do not connect the air hose with
a nger on the trigger. An unexpected driving will
causeseriousinjury.
1
2
►1.Airtting2. Air socket
Sliptheairsocketoftheairhoseontotheairttingon
thenailer.Besurethattheairsocketlocksrmlyinto
positionwheninstalledontotheairtting.
A hose coupling must be installed on or near the tool in
such a way that the pressure reservoir will discharge at
the time the air supply coupling is disconnected.
Changing the trigger for contact
actuation mode
CAUTION: Always disconnect the air hose
and unload the tool with nails before replacing
the trigger.
CAUTION: After the trigger replacement,
always check that the tool operates properly
before actual work. Do not load the tool with any
nails before checking the function to avoid unex-
pected nailing.