
Operators Manual


8 ENGLISH
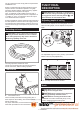
Thetriggerforsinglesequentialactuationmodeis
factory-installed.Tochangethenailingmodetocontact
actuation,replacethetriggerpartwiththeoneforcon-
tact actuation.
1
3
2
4
►1.Triggerforcontactactuation2. Silver part
3.Triggerforsinglesequentialactuation4. Black
part
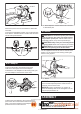
1. Turnthetriggerlocklevertothelockposition
.
1
►1.Triggerlocklever
2. Push the pin securing the trigger from the ure-
thanewasherside,andthenremovetheurethane
washer.Thenpulloutthepinandremovethetrigger.
1
2
3
►1. Pin 2. Urethane washer 3.Trigger
3. Set the trigger assembly for contact actuation.
Withpushinginthehingedpartinward,setthetrigger
so that the hinged part is under the rod of the valve in
the housing.
2
1
►1. Hinged part 2. Rod of the valve
4. Insert the pin to the hole and secure it by urethane
washer.
5. Connecttheairhose,andmakesurethatthe
tooloperatesproperly.Refertothesection“Checking
proper action before operation”.
NOTE:Tosetbacktosinglesequentialactuation,
follow the procedures for changing the trigger above.
OPERATION
CAUTION: Make sure all safety systems are in
working order before operation.
CAUTION: When operating the tool, do not
close the face to the tool. Also keep hands and
feet away from the ejection port area.
CAUTION: When not operating the tool,
always lock the trigger by turning the trigger lock
lever to the lock position
.
CAUTION: Make sure that the trigger is
locked when the trigger lock lever is set to the
lock position .
Checking proper action before
operation
Beforeoperation,alwayscheckfollowingpoints.
— Make sure that the tool does not operate only by
connecting the air hose.
— Make sure that the tool does not operate only by
pulling the trigger.