GB Cordless Driver Drill Instruction manual F Perceuse-visseuse sans fil Manuel d’instructions D Akku-Bohrschrauber Betriebsanleitung I Trapano avvitatore a batteria Istruzioni per l’uso NL Accuschroefboormachine Gebruiksaanwijzing E Taladro sin cables Manual de instrucciones P Berbegvim sem cabos Manual de instruções Akku bore-skruemaskine Brugsanvisning S Sladdlös skruvdragare Bruksanvisning N Batteridrevet boreskrutrekker Bruksanvisning SF Johdoton ruuvinväännin/pora Käyttöohj
1 2 4 3 1 2 A 5 B 6 3 4 8 7 5 6 12 16 9 13 10 15 14 11 7 2 8
18 17 19 9 10 20 16 21 11 12 23 24 22 13 14 25 26 15 28 27 16 3
29 30 17 4
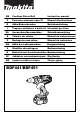
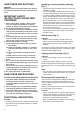
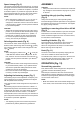
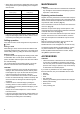
ENGLISH Explanation of general view 1. 2. 3. 4. 5. 6. 7. 8. 9. 10. Red part Button Battery cartridge Switch trigger Lamp Reversing switch lever Speed change lever Action mode change lever Adjusting ring Graduations 11. 12. 13. 14. 15. 16. 17. 18. 19. 20. Arrow Steel band Grip base Side grip Protrusion Groove Sleeve Bit holder Bit Screw 21. 22. 23. 24. 25. 26. 27. 28. 29. 30.
SAVE THESE INSTRUCTIONS WARNING: MISUSE or failure to follow the safety rules stated in this instruction manual may cause serious personal injury. IMPORTANT SAFETY INSTRUCTIONS FOR BATTERY CARTRIDGE 1. Before using battery cartridge, read all instructions and cautionary markings on (1) battery charger, (2) battery, and (3) product using battery. 2. Do not disassemble battery cartridge. 3. If operating time has become excessively shorter, stop operating immediately.
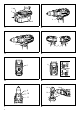
Speed change (Fig. 5) This tool has a three-gear speed change lever. To change the speed, first switch off the tool and then slide the speed change lever to the “1” position for low speed, “2” position for medium speed or “3” position for high speed. Be sure that the speed change lever is set to the correct position before operation. Use the right speed for your job. NOTE: • When changing the position from “1” to “3” or from “3” to “1”, it may be a little difficult to slide the speed change lever.
• When driving wood screws, predrill pilot holes to make driving easier and to prevent splitting of the workpiece. See the chart. Nominal diameter of wood Recommended size of pilot screw (mm) hole (mm) 3.1 2.0 - 2.2 3.5 2.2 - 2.5 3.8 2.5 - 2.8 4.5 2.9 - 3.2 4.8 3.1 - 3.4 5.1 3.3 - 3.6 5.5 3.7 - 3.9 5.8 4.0 - 4.2 6.1 4.2 - 4.4 • If the tool is operated continuously until the battery cartridge has discharged, allow the tool to rest for 15 minutes before proceeding with a fresh battery.
NEDERLANDS Verklaring van het onderdelenoverzicht 1. 2. 3. 4. 5. 6. 7. 8. 9. 10. Rode deel Knop Accu Aan/uit-schakelaar Lamp Omkeerschakelaar Snelheidsinstelknop Werkingsfunctie-instelknop Instelring Schaalverdeling 11. 12. 13. 14. 15. 16. 17. 18. 19. 20. Pijlpunt Metalen klemband Basis van de zijhandgreep Zijhandgreep Uitsteeksel Groef Mof Bithouder Bit Schroef 21. 22. 23. 24. 25. 26. 27. 28. 29. 30.
5. Houd uw handen uit de buurt van draaiende delen. 6. Laat het gereedschap niet ingeschakeld liggen. Bedien het gereedschap alleen wanneer u het vasthoudt. 7. Raak het schroef- of boorbit en het werkstuk niet onmiddellijk na gebruik aan. Zij kunnen bijzonder heet zijn en brandwonden op uw huid veroorzaken. 8. Sommige materialen bevatten chemische stoffen die giftig kunnen zijn. Neem voorzorgsmaatregelen tegen het inademen van stof en contact met de huid.
De lamp op de voorkant inschakelen (zie afb. 3) LET OP: • Kijk niet rechtstreeks in het licht of naar de bron van de lamp. Knijp de aan/uit-schakelaar in om de lamp op de voorkant in te schakelen. De lamp blijft branden zolang u de aan/ uit-schakelaar ingeknepen houdt. De lamp gaat 10 tot 15 seconden nadat u de aan/uit-schakelaar hebt losgelaten uit. OPMERKING: • Gebruik een doek om het vuil van de lens van de lamp te vegen.
De zijhandgreep monteren (extra handgreep) (zie afb. 8) vergemakkelijken en te voorkomen dat het werkstuk splijt. Zie de tabel. Gebruik altijd de zijhandgreep om veilig te kunnen werken. Nominale diameter van houtschroef (mm) Plaats de stalen klemband van de zijhandgreep zodanig over de kop van het gereedschap dat de uitsteeksels op de basis van de zijhandgreep in de groeven van het gereedschap passen. Draai daarna de zijhandgreep vast door deze rechtsom te draaien.
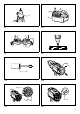
ONDERHOUD LET OP: • Zorg er altijd voor dat de machine is uitgeschakeld en de accu is verwijderd, voordat u een inspectie of onderhoud uitvoert. De koolborstels vervangen Vervang deze wanneer ze tot aan de slijtgrensmarkering zijn afgesleten. Houd de koolborstels schoon en zorg ervoor dat ze vrij kunnen bewegen in de houders. Beide koolborstels dienen tegelijkertijd te worden vervangen. Gebruik alleen identieke koolborstels (zie afb. 13).
ENGLISH ITALIANO EC-DECLARATION OF CONFORMITY We declare under our sole responsibility that this product is in compliance with the following standards of standardized documents, EN60745, EN55014 in accordance with Council Directives, 89/336/EEC, 98/37/EC. LE NORME DELLA COMUNITÀ EUROPEA Dichiariamo sotto la nostra sola responsabilità che questo prodotto è conforme agli standard di documenti standardizzati seguenti: EN60745, EN55014 secondo le direttive del Consiglio 89/336/CEE e 98/37/CE.
PORTUGUÊS NORSK DECLARAÇÃO DE CONFORMIDADE DA CE Declaramos sob inteira responsabilidade que este produto obedece às seguintes normas de documentos normalizados, EN60745, EN55014 de acordo com as directivas 89/336/CEE e 98/37/CE do Conselho. EUs SAMSVARS-ERKLÆRING Vi erklærer på eget ansvar at dette produktet er i overensstemmelse med følgende standard i de standardiserte dokumenter: EN60745, EN550140, i samsvar med Råds-direktivene, 89/336/EEC og 98/37/EC.
ENGLISH ITALIANO For Model BDF441 For European countries only Noise and Vibration The typical A-weighted sound pressure level is 72 dB (A). Uncertainty is 3 dB(A). The noise level under working may exceed 85 dB (A). - Wear ear protection. The typical weighted root mean square acceleration value is not more than 2.5 m/s2. These values have been obtained according to EN60745. Modello BDF441 Solo per i paesi europei Rumore e vibrazione Il livello tipico di pressione sonora ponderato A è di 72 dB (A).
PORTUGUÊS NORSK Para o Modelo BDF441 Apenas para os países Europeus Ruído e vibrações O nível acústico ponderado A é de 72 dB (A). O coeficiente de imprecisão é de 3 dB (A). O nível de ruído quando em funcionamento pode exceder os 85 dB (A). - Use protecção para os ouvidos. A raiz quadrada do valor médio ponderado da variação da aceleração não é superior a 2,5 m/s2. Estes valores foram obtidos segundo a norma EN60745.
ENGLISH ITALIANO For Model BDF451 For European countries only Noise and Vibration The typical A-weighted sound pressure level is 71 dB (A). Uncertainty is 3 dB(A). The noise level under working may exceed 85 dB (A). - Wear ear protection. The typical weighted root mean square acceleration value is not more than 2.5 m/s2. These values have been obtained according to EN60745. Modello BDF451 Solo per i paesi europei Rumore e vibrazione Il livello tipico di pressione sonora ponderato A è di 71 dB (A).
PORTUGUÊS NORSK Para o Modelo BDF451 Apenas para os países Europeus Ruído e vibrações O nível acústico ponderado A é de 71 dB (A). O coeficiente de imprecisão é de 3 dB (A). O nível de ruído quando em funcionamento pode exceder os 85 dB (A). - Use protecção para os ouvidos. A raiz quadrada do valor médio ponderado da variação da aceleração não é superior a 2,5 m/s2. Estes valores foram obtidos segundo a norma EN60745.
66
67
Makita Corporation Anjo, Aichi, Japan 884639A992