
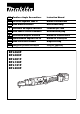
Operation Manual


7
Refresh charging
• Refreshing battery adapter (optional accessory) can
refresh an inactive battery cartridge.
• Refresh charging should be done once a week.
• When you charge a new battery cartridge or a battery
cartridge that has not been used for a long time, it may
not accept a full charge. In this case, refresh charging
must be done. The battery cartridge may decrease the
tool performance, because the chemical substance of
the battery cartridge is inactive.
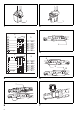
Checking the remaining battery capacity (Fig. 3)
For BH9020A, BH9033A
When charging
When the charging begins, the first (far left) indicating
lamp begins to flicker. Then, as charging proceeds, the
other lamps light, one after the other, to indicate the bat-
tery capacity.
When using
When the tool is switched on, the lamps will light to indi-
cate the remaining battery capacity. When the tool is
switched off, the light goes out. If the battery has not
been used for a long time, or is needed refresh charging,
the orange lamp begins to flicker. Use Makita refreshing
adapter to refresh the battery.
CAUTION:
• A battery cartridge extracted from the charger that has
been unplugged with the battery cartridge inserted
does not indicate the battery capacity due to its protec-
tive function even if the tool is switched on after the bat-
tery insertion into the tool. At this time, recharge it for
about five seconds before use.
NOTE:
• Please contact Makita Authorized or Factory Service
Center if the warning lamp of the battery cartridge does
not light up when using or charging.
Switch action (Fig. 4)
CAUTION:
• Before inserting the battery cartridge into the tool,
always check to see that the switch trigger actuates
properly and returns to the “OFF” position when
released.
To start the tool, simply pull the switch trigger. Release
the switch trigger to stop.
Reversing switch action (Fig. 5)
CAUTION:
• Always check the direction of rotation before operation.
• Use the reversing switch only after the tool comes to a
complete stop. Changing the direction of rotation
before the tool stops may damage the tool.
• When not operating the tool, always set the reversing
switch lever to the neutral position.
This tool has a reversing switch to change the direction of
rotation. Depress the reversing switch lever from the A
side for clockwise rotation or from the B side for counter-
clockwise rotation.
When the reversing switch lever is in the neutral position,
the switch trigger cannot be pulled.
Lighting up the lamps (Fig. 6)
CAUTION:
• Do not look in the light or see the source of light
directly.
Pull the switch trigger to light up the lamp. The lamp
keeps on lighting while the switch trigger is being pulled.
The light automatically goes out 10 seconds after the
switch trigger is released.
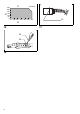
NOTE:
• Use a dry cloth to wipe the dirt off the lens of lamp. Be
careful not to scratch the lens of lamp, or it may lower
the illumination.
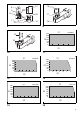
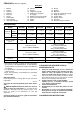
LED indicator / Beeper
LED indicator / Beeper on the tool shows the following functions.
Function Status
Status of
the LED indicator/beeper
Action to be taken
LED indicator Beeper
Auto-stop
fastening
This function works when the tool has
reached the preset fastening torque
and normal tightening has been com-
pleted. This helps overtightening to be
avoided.
Lights up in
green for
approximately
one second.
__ __
Delayed re-start
For approximately one second after
auto-stop fastening, the tool does not
start even if the switch trigger is pulled.
Warning against
insufficient fasten-
ing
Insufficient fastening has been per-
formed when the switch trigger has
released before reaching the preset fas-
tening torque.
Lights up in
red.
A long beep Retighten the screw.
Warning for bat-
tery cartridge
capacity
This indicates the appropriate time to
replace the battery cartridge when the
battery power becomes low.
Flickers in red
slowly.
A series of
long beeps
Replace the battery
with fully charged
one.