GB Cordless Screwdriver Instruction Manual F Visseuse sans fil Manuel d’instructions D Akku-Schrauber Betriebsanleitung I Avvitatrice a batteria Istruzioni per l’uso NL Snoerloze schroevendraaier Gebruiksaanwijzing E Atornillador a batería Manual de instrucciones P Aparafusadora a bateria Manual de instruções DK Akku skruemaskine Brugsanvisning S Sladdlös momentskruvdragare Bruksanvisning N Akku momentskrutrekker Bruksanvisning SF Langaton ruuvinväännin Käyttöohje GR Ασύρµατο κα
3 2 2 1 1 1 2 4 (C) E F orange 4 E 5 80% - 100% 60% - 80% 40% - 60% 10% - 40% 0% - 10% F 5 6 80% - 100% 60% - 80% 40% - 60% 10% - 40% 0% - 10% orange 3 4 A 7 B 8 5 6 10 11 9 7 2 8
13 12 mm (15/32") 10 11 14 15 12 16 9 9 mm (3/8") 10 17 18 11 12 BFT020F BFT021F 19 360 300 240 20 180 120 60 0 0.5 1 1.
BFT122F 19 20 360 300 240 180 120 60 05 21 6 7 8 9 10 11 12 16 BFT081F 19 360 300 240 20 180 120 60 21 0 3 4 5 6 7 8 17 BFT123F 19 20 360 300 240 180 120 60 05 22 6 7 8 9 10 11 12 18 19 23 24 20 4 21
ENGLISH Explanation of general view 1 2 3 4 5 6 7 8 Battery cartridge Button Red part Indicator lamp Capacity Switch trigger Reversing switch lever Front lamp 9 10 11 12 13 14 15 16 LED indicator Adjusting ring Ring Scale Adjusting grip Hole for adjusting grip Yellow line Compression spring 17 18 19 20 21 22 23 24 Bit Sleeve Range of fastening capacity Revolution angle (°) Torque (N•m) Limit mark Brush holder cap Screwdriver SPECIFICATIONS Model Fastening torque (N•m) BFT020F BFT021F BFT040F BFT08
7. 8. 9. 10. 11. 12. 13. 14. 15. Make sure cord is located so that it will not be stepped on, tripped over, or otherwise subjected to damage or stress. Do not operate charger with damaged cord or plug — replace them immediately. Do not operate charger if it has received a sharp blow, been dropped, or otherwise damaged in any way; take it to a qualified serviceman. Do not disassemble charger or battery cartridge; take it to a qualified serviceman when service or repair is required.
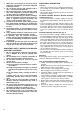
Refresh charging Switch action (Fig. 4) Refreshing adapter (optional accessory) can refresh an inactive battery cartridge. • Refresh charging should be done once a week. • When you charge a new battery cartridge or a battery cartridge that has not been used for a long time, it may not accept a full charge. In this case, refresh charging must be done. The battery cartridge may decrease the tool performance, because the chemical substance of the battery cartridge is inactive.
Function Status Status of the LED indicator/beeper LED indicator Action to be taken Beeper Checking the remaining battery capacity, Autostop This function works when the battery power is almost used up. At this time, tool stops immediately. Lights up in red. A long beep Check the LED indicator, light and beeper operation This function works to check the proper operation of the LED indicator, light and beeper when a battery cartridge has been inserted into the tool.
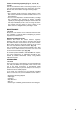
Limits of fastening capacity (Fig. 13, 14, 15, 16, 17, 18) Use the tool within the limits of fastening capacity. If you use the tool beyond the limits, the clutch does not work. And the tool cannot deliver enough fastening torque. NOTE: • The revolution angle means the angle which a screw/ bolt revolves when the tool attains to 100% from 51% of desired torque.
NEDERLANDS Verklaring van algemene gegevens 1 2 3 4 5 6 7 8 9 Accu Knop Rood gedeelte Indicatielampje Capaciteit Aan/uit trekschakelaar Omkeerschakelaar Voorlamp LED-indicator 10 11 12 13 14 Instelring Ring Schaal Instelgreep Bevestigingsgat voor instelgreep 15 Gele streep 16 Drukveer 17 18 19 20 21 22 23 24 Bit Mof Bereik van aandraaicapaciteit Draaiingshoek (°) Aandraaikoppel (N•m) Limietstreep Borstelhouderdop Schroevendraaier TECHNISCHE GEGEVENS Model Aandraaikoppel (N•m) BFT020F BFT021F BFT040
BELANGRIJKE VEILIGHEIDSVOORSCHRIFTEN VOOR ACCULADER EN ACCU AANVULLENDE VEILIGHEIDSVOORSCHRIFTEN VOOR ACCULADER EN ACCU 1. 1. 2. 3. 4. 5. 6. 7. 8. 9. 10. 11. 12. 13. 14. 15. BEWAAR DEZE VOORSCHRIFTEN — Deze gebruiksaanwijzing bevat belangrijke veiligheids- en bedieningsvoorschriften betreffende de acculader.
• Als de accu moeilijk in de houder gaat, moet u niet proberen om hem met geweld erin te duwen. Als de accu er niet gemakkelijk ingaat, betekent dit dat u hem niet op de juiste wijze erin steekt. Laden Lees alle instructies en waarschuwingen op de acculader alvorens hem te gebruiken. Tips om een maximale levensduur van de accu te verzekeren 1. Laad de accu op voordat hij volledig ontladen is.
LED-indicator (Fig. 7) Het lampje op het gereedschap toont de volgende functies. Functie Status van LED-indicator/pieptoon Status LED-indicator Te nemen maatregel Pieptoon Automatisch stoppen met aandraaien Deze functie treedt in werking wanneer het vooraf ingestelde aandraaikoppel is bereikt en de schroef volledig is aangedraaid. Hierdoor wordt voorkomen dat de schroef te vast wordt aangedraaid.
OPMERKING: De cijfers op de aandraaikoppelschaal dienen als een leidraad voor het instellen van het gewenste aandraaikoppel. INEENZETTEN LET OP: Zorg altijd dat het gereedschap is uitgeschakeld en de accu ervan is verwijderd alvorens enig werk aan het gereedschap uit te voeren. Installeren of verwijderen van de schroefbit of sokbit (Fig. 10 en 11) Gebruik uitsluitend de afgebeelde schroefbit of sokbit. Gebruik nooit andere schroefbits of sokbits.