ENGLISH (Original instructions) INSTRUCTION MANUAL Cordless Combination Hammer BHR261 BHR261T 009665 IMPORTANT: Read Before Using.
ENGLISH (Original instructions) SPECIFICATIONS Model BHR261 BHR261T Concrete Capacities 26 mm Steel 13 mm Wood 32 mm No load speed (min-1) 0 - 1,200 Blows per minute 0 - 4,800 Overall length 363 mm Net weight 4.5 kg 387 mm 4.7 kg Rated voltage D.C. 36 V • Due to our continuing programme of research and development, the specifications herein are subject to change without notice. • Note: Specifications and battery cartridge may differ from country to country.
ENG901-1 • • • GEA006-2 The declared vibration emission value has been measured in accordance with the standard test method and may be used for comparing one tool with another. The declared vibration emission value may also be used in a preliminary assessment of exposure. • General Power Tool Safety Warnings WARNING Read all safety warnings and all instructions. Failure to follow the warnings and instructions may result in electric shock, fire and/or serious injury.
power tool’s operation. If damaged, have the power tool repaired before use. Many accidents are caused by poorly maintained power tools. 22. Keep cutting tools sharp and clean. Properly maintained cutting tools with sharp cutting edges are less likely to bind and are easier to control. 23. Use the power tool, accessories and tool bits etc. in accordance with these instructions, taking into account the working conditions and the work to be performed.
4. 5. 6. 7. 8. 9. 10. 11. 12. 13. 14. shock. Wear a hard hat (safety helmet), safety glasses and/or face shield. Ordinary eye or sun glasses are NOT safety glasses. It is also highly recommended that you wear a dust mask and thickly padded gloves. Be sure the bit is secured in place before operation. Under normal operation, the tool is designed to produce vibration. The screws can come loose easily, causing a breakdown or accident. Check tightness of screws carefully before operation.
switch trigger again to restart. When the tool does not work even after pulling the switch trigger, the battery power auto-stop is still at work. Charge the battery cartridge before use. When the remaining battery capacity becomes low: Recharge the battery cartridge. FUNCTIONAL DESCRIPTION • CAUTION: Always be sure that the tool is switched off and the battery cartridge is removed before adjusting or checking function on the tool.
Attaching the quick change drill chuck Reversing switch action A B 1. Reversing switch lever 1. Quick change drill chuck 2. Spindle 3. Change cover line 4. Change cover 2 1 3 4 1 009685 009669 Check the line of the quick change drill chuck shows the symbol. Grasp the change cover of the quick change drill chuck and set the line to the symbol. Place the quick change drill chuck on the spindle of the tool.
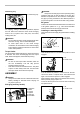
Hammering only CAUTION: Always use the side grip to ensure operating safety. Install the side grip so that the teeth on the grip fit in between the protrusions on the tool barrel. Then tighten the grip by turning clockwise at the desired position. It may be swung 360° so as to be secured at any position. • 1. Hammering only Bit grease Coat the bit shank head beforehand with a small amount of bit grease (about 0.5 -1 g). This chuck lubrication assures smooth action and longer service life.
Bit angle (when chipping, scaling or demolishing) Dust cup 1. Dust cup 1. O symbol 2. Action mode changing knob 1 1 2 001300 Use the dust cup to prevent dust from falling over the tool and on yourself when performing overhead drilling operations. Attach the dust cup to the bit as shown in the figure. The size of bits which the dust cup can be attached to is as follows. 009676 The bit can be secured at the desired angle.
control of the tool and potentially severe injury. NOTE: Eccentricity in the bit rotation may occur while operating the tool with no load. The tool automatically centers itself during operation. This does not affect the drilling precision. 1 1. Sleeve 2. Ring 2 Blow-out bulb (optional accessory) 1. Blow-out bulb 009683 Use the optional drill chuck assembly. When installing it, refer to "Installing or removing the bit" described on the previous page.
You can drill up to 13 mm diameter in metal and up to 32 mm diameter in wood. • • • • • 1. Brush holder cap 2. Screwdriver CAUTION: Never use "rotation with hammering" when the drill chuck assembly is installed on the tool. The drill chuck assembly may be damaged. Also, the drill chuck will come off when reversing the tool. Pressing excessively on the tool will not speed up the drilling.
Makita Corporation Anjo, Aichi, Japan 884883B220 12 www.makita.