GB Rechargeable Flashlight Instruction manual F Lampe torche Manuel d'instructions E Linterna recargable Manual de instrucciones BML145/BML185
3 2 4 1 1 2 5 6 3 4 7 5 2
Symbols The following show the symbols used for the equipment. Be sure that you understand their meaning be-fore use. Symboles Les symboles utilisés pour l’appareil sont indiqués ci-dessous. Assurez-vous d’avoir bien compris leur signification avant l’utilisation. Símbolos Se utilizan los siguientes símbolos para el equipo. Asegúrese de que comprende su significado antes del uso. ❏ Read instruction manual. ❏ Veuillez lire le manuel d’instructions. ❏ Lea el manual de instrucciones.
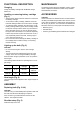
ENGLISH Explanation of general view 1. 2. 3. 4. 5. 6. Battery cartridge Button Red part 7. Switch Ring Bulb Shoulder strap SPECIFICATIONS Model BML145 BML185 Bulb 12 V 0.7 A 18 V 0.6 A Dimensions L 284 mm (11 - 1/8”) 284 mm (11 - 1/8”) W 84 mm (3 - 5/16”) 84 mm (3 - 5/16”) H 96 mm (3 - 3/4”) 96 mm (3 - 3/4”) 0.36 kg (0.79 lbs) 0.36 kg (0.
FUNCTIONAL DESCRIPTION MAINTENANCE Charging To maintain product safety and reliability, repairs, maintenance or adjustment should be carried out by a Makita Authorized Service Center. Charge the battery cartridge with the Makita charger before use. Installing or removing battery cartridge (Fig. 1) • Always switch off the tool before insertion or removal of the battery cartridge. • To remove the battery cartridge, withdraw it from the tool while sliding the button on the front of the cartridge.
FRANÇAIS Descriptif 1. 2. 3. 4. 5. 6. Batterie Bouton Partie rouge 7.
DESCRIPTION DU FONCTIONNEMENT ASSEMBLAGE Remplacement de l’ampoule (Fig. 3 et 4) Charge Avant l’utilisation, chargez la batterie avec le chargeur Makita. Installation et retrait de la batterie (Fig.1) • Mettez toujours l’outil hors tension avant d’insérer ou de retirer la batterie. • Pour retirer la batterie, sortez-la de l’outil tout en faisant glisser le bouton à l’avant de la batterie.
ESPAÑOL Explicación de los dibujos 1. 2. 3. Cartucho de la batería Botón Parte roja 4. 5. 6. 7.
DESCRIPCIÓN DEL FUNCIONAMIENTO Primero gire el anillo en sentido contrario a las agujas del reloj y extraiga el reflector. A continuación, sustituya la bombilla. Carga Cargue el cartucho de la batería con el cargador de Makita antes de su uso. Instalación o extracción del cartucho de la batería (Fig. 1) • Apague siempre la herramienta antes de insertar o extraer el cartucho de la batería.
Makita Corporation 884643B941