
Operators Manual


7 ENGLISH
For model DA333D
1
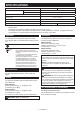
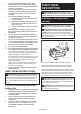
►1. Lamp
Pulltheswitchlevertolightupthelamp.Thelamp
keeps on lighting while the switch lever is being pulled.
Thelightautomaticallygoesoutapproximately10sec-
onds after the switch lever is released.
NOTE: Use a dry cloth to wipe the dirt off the lens of
the lamp. Be careful not to scratch the lens of lamp, or
it may lower the illumination.
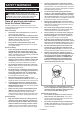
Reversing switch action
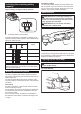
A
B
1
1
►1. Reversing switch lever
CAUTION: Always check the direction of
rotation before operation.
CAUTION: Use the reversing switch only after
the tool comes to a complete stop. Changing the
direction of rotation before the tool stops may dam-
age the tool.
CAUTION: When not operating the tool,
always set the reversing switch lever to the neu-
tral position.
Thistoolhasareversingswitchtochangethedirection
of rotation. Depress the reversing switch lever from the
AsideforclockwiserotationorfromtheBsideforcoun-
terclockwise rotation.
When the reversing switch lever is in the neutral posi-
tion, the switch lever cannot be pulled.
ASSEMBLY
CAUTION: Always be sure that the tool is
switched off and the battery cartridge is removed
before carrying out any work on the tool.
Installing or removing drill bit
Optional accessory
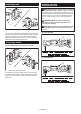
For model DA332D
1
►1. Chuck key
Toinstallthedrillbit,placeitinthechuckasfarasitwill
go.Tightenthechuckbyhand.Placethechuckkeyin
each of the three holes and tighten clockwise. Be sure
to tighten all three chuck holes evenly.
Toremovethedrillbit,turnthechuckkeycounterclock-
wiseinjustonehole,thenloosenthechuckbyhand.
Afteruse,returnthechuckkeytothestoragecavityon
the tool.
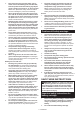
For model DA333D
1
►1. Sleeve
Holdthetoolrmlyandturnthesleevecounterclock-
wisetoopenthechuckjaws.Placethedrillbitinthe
chuckasfarasitwillgo.Holdthetoolrmlyturnthe
sleeve clockwise to tighten the chuck.
Toremovethedrillbit,holdthetoolrmlyturnthe
sleeve counterclockwise.