
Operation Manual


10
OPERATION
CAUTION:
• To connect attachments, such as nozzle, twist-insert
attachment in direction of arrow to ensure secure con-
nection during use. To disconnect attachment, twist-
extract also in direction of arrow. (Fig. 24)
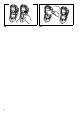
Cleaning (Suction)
Nozzle (Fig. 25)
Attach the nozzle to clean off tables, desks, furniture, etc.
Nozzle slips on easily.
Nozzle + Extension wand (Straight pipe) (Fig. 26)
The extension wand fits in between the nozzle and the
cleaner itself. This arrangement is convenient for
cleaning a floor while standing erect.
Corner nozzle (Fig. 27)
Fit on the corner nozzle for cleaning corners and crevices
of a car or furniture.
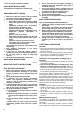
Corner nozzle + Extension wand (Straight pipe)
(Fig. 28)
In tight quarters where the cleaner itself cannot squeeze
in, or in high places hard to reach, use this arrangement.
Cleaning without nozzle (Fig. 29)
You can pick up powder and dust without nozzle.
MAINTENANCE
CAUTION:
• Always be sure that the tool is switched off before
attempting to perform inspection or maintenance.
After use
NOTE:
• Putting the cleaner against the wall without any other
support cause the cleaner to fall down and be dam-
aged. (Fig. 30)
Cleaning
From time to time wipe off the outside (cleaner body) of
the cleaner using a cloth dampened in soapy water.
Clean out also the suction opening, dust bag/dust pack
mounting area and the dust stopper. (Fig. 31)
CAUTION:
• Never use gasoline, benzine, thinner, alcohol or the
like. Discoloration, deformation or cracks may result.
Wash the dust bag in soapy water when it is clogged with
dust and the cleaner power becomes small. Dry it out
thoroughly before use. An insufficiently dried bag may
cause poor suction and shorten the service life of the
motor. (Fig. 32)
NOTE:
• Dust pack is a throw-away type.
When the sponge filter is clogged with dust, remove it
from the cleaner and then wipe it off or wash in water.
Removing and installing the sponge filter (Fig. 33
& 34)
To remove the sponge filter, remove the dust bag or dust
pack and then pinch and take it out.
Press in the whole edge of the sponge filter against the
recessed wall inside the dust bag/dust pack mounting
area.
CAUTION:
• After cleaning sponge filter, be sure to install it on the
cleaner. If washed in water, dry it up before installing.
An insufficiently dried sponge filter may shorten the
service life of the motor.
Things to Check Before Asking for Repairs
011566
NOTE:
• Do not attempt to repair cleaner by yourself.
To maintain product SAFETY and RELIABILITY, repairs,
any other maintenance or adjustment should be
performed by Makita Authorized Service Centers, always
using Makita replacement parts.
OPTIONAL ACCESSORIES
CAUTION:
• These accessories or attachments are recommended
for use with your Makita cleaner specified in this
manual. The use of any other accessories or
attachments might present a risk of injury to persons.
Only use accessory or attachment for its stated
purpose.
If you need any assistance for more details regarding
these accessories, ask your local Makita Service Center.
• Extension wand (Straight pipe)
•Nozzle
• Nozzle for carpet
• Shelf brush
• Corner nozzle
• Round brush
• Flexible hose
• Paper pack
• Makita genuine battery and charger
NOTE:
• Some items in the list may be included in the tool
package as standard accessories. They may differ from
country to country.
Symptom Area to be investigated Fixing method
Weak suction power
• Is dust bag or paper pack full of dust? • Empty dust bag or paper pack.
• Is dust bag clogged? • Dust down or wash the dust bag.
• Is paper pack clogged? • Replace paper pack.
• Is battery cartridge exhausted? • Charge the battery cartridge.
Not working • Is battery cartridge exhausted? • Charge the battery cartridge.