
Instructions


9
NOTE
• Depending onthe conditionsof useand theambient
temperature,theindicationmaydifferslightlyfromthe
actualcapacity.
OPERATION
CAUTION
To reduce the risk of scalding, follow the instructions
below:
• Donotremovethelterholder/cafepodholderduring
the brewing cycle. Steam builds up under the lter
holder/cafepodholder.
• Whenthebrewingsectionmarkedwith
issteaming,
donottouchit.(Fig. L)
• Beawarethathotcoffeedripsfromthebottomofthe
lter holder/cafe pod holder even after the brewing
cycle.
• After the brewing is nished, wait at least 5 minutes
beforeremovingthelterholder/cafepodholder.
• Ifanotherbrewingcycleistobestarted,waitatleast
5 minutes before supplying water to the appliance.
Otherwise,steamandhotwatercouldbereleasedand
scaldingmayresult.
• Donottouchtheplateonthebottomoftheappliance
duringandimmediatelyafterbrewing.
NOTE
• Forbrewing,donotuseanyotherliquidthanwater.
• Alwaysusecoldwaterforbrewing.Hotwaterpromotes
thedripping speed andcauseoverow fromthelter
holder/cafepodholder.
• The maximum water tank capacity is 240ml. Do not
pourtoomuchwatertothewatertank.Excesswater
maycomeoutoftheoverowopening.
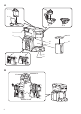
Brewing
1. Openthewatertanklidandtakethewatertankout.
(Fig. C)
2. Pour preferred amount of fresh cold water into the
watertankandinstallittotheappliance.(Fig. D)
Style
Recommended amount
of water
Groundcoffee
(6.5g*)
160ml
Cafepod
(60mmtype)
120ml
*Equalstoalevelofthesuppliedspoon.
3. Closethewatertanklid.
4. Removethelterholder/cafepodholder.(Fig. E)
5. Followtheproceduresbelowaccordingtothestyleof
thecoffeetobebrewed:
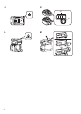
Ground coffee (Fig. F)
Open the cover. Take the lter out from the lter
holder. Put preferred amount of ground coffee into
thelter.Placethelterbackinpositonandclosethe
cover.
Cafe pod (Fig. G)
Setacafepodintothecafepodholder.
- Besurethattheatsurfaceofthecafepodfaces
upwhenplaced.
- Donotuseatorncafepod.
- Donotsettwoormorecafepods.Hotwaterwill
overow.
6. Insertthelterholder/cafepodholdertothesloton
theappliance.
Iftheholder/cafepodholdercannotbeinsertedtothe
slotproperly, checkif thelter/cafe pod is correctly
installed.
7. Putthecoveronthecoffeecupandplaceitonthe
cuprest.(Fig. H)
8. Press the power switch. The power lamp
lights up and brewing cycle begins. (Fig. I)
The appliance will automatically turn off the
power when the brewing cycle is nished.
Pressthepowerswitchifyouwanttostopthebrewing
inthemiddle.
Estimated time for brewing (160 ml)
Battery cartridge
(fully charged)
Estimated time
18V
(withBL1830B)
approx.5min.
14.4V
(withBL1430B)
approx.5min.
10.8V-12Vmax
(withBL1041B)
approx.7min.
MAINTENANCE
WARNING
• When servicing is required, ask a Makita authorized
servicecenterwhichdealsgenuinereplacementparts.
Useofanyotherpartsmaycreateahazardorcause
productdamage.
• To avoid serious personal injury, always remove
the battery cartridge from the unit when cleaning or
performinganymaintenance.
• Donotimmersetheapplianceandbatteryinwateror
otherliquids.
Daily cleaning
NOTICE
• Neverusegasoline,benzine,thinner,alcoholorthelike
whencleaningplasticparts.Discoloration,deformation
orcracksmayresult.Afterappliancecooled,useclean
clothestoremovedirt,dust,oil,greaseetc.
• Donotuseabrasivecleansersorscouringpads.
• Donotdrytheinsideoftheappliancewithacloth,as
lintmayremain.
Proper maintenance will ensure years of service for
your appliance. Clean theappliance after every use to
maintainqualitycoffeeavor.
1. Removethebatteryfromtheapplianceandallowthe
appliancetocool.
2. Wipe the exterior with a soft cloth moistened with
water.
3. Remove the lterholder(withlter)orthecafepod
holderfromtheappliance.Washtheremoved parts
withsoapywater.Afterthat,rinsethemwithwater.
4. Allowtheapplianceandallpartstodrycompletely.