Owner’s and Safety Manual for Gasoline Chain Saws (page 2 - 31) Manuel d’emploi et de securite de tronGonneuses thermiques (page 32 - 61) DCS 430,431 DCS 520,520i DCS 540 DCS 5200i WARNING! Read and understand this Manual. Always follow safety precautions in the Owner’s and Safety Manual. Improper use can cause serious injury! The engine exhaust from this product contains chemicals known to the State of California to cause cancer, birth defects or other reproductive harm.
WARNING I Careless or improper use of this product can cause serious or even fatal injury. Before operating a chain saw or other MAKITA products it is important that you read, fully understand and carefully follow the instructionsoutlined in this owners manual. Kickback may cause severe or fatal injury and. is one of many potential dangers in operating a chain saw. Kickback and other safety related precautions are described in detail within this owners manual.
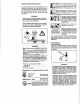
Delivery inventory 4 I 2- I ’I I 1 Chainsaw 2 Sawchain 6 5 7 3 Guidebar 4 Chain protection cover 5 Universal wrench 6 &Wrench 7 Screw driver for carburetor adjustment (only in delivery for model 5200i) 8 Owner’s and Safety Manual (not shown) In case one of the parts listed should not be included in the delivery inventory, please consult your sales agent.
Safety precautions for chain saw operators Additional safety precautions While operating the chain saw please observe the following rules: a) Contact of the guide bar nose with any object should be avoided. b) Tip contact may cause the guide bar to move suddenly upward and backward, which may cause serious or fatal injury. Always operate the chain saw with both hands. c) The following additional safety precautions should be . observedby all users of chain saws: 1.
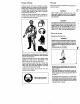
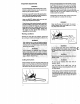
Maximum Computed Kickback Angle (CKA)' without using the chain brake when using the recommended bar and chain combinations (In this example the CKAis 45"). General Safety Precautions The use of any chain saw may be hazardous. At full throttle chain speed can reach 45 mph (20 m/s).It is importantthat you read; fully understand and observe the following safety precautions and warnings. Read the owner's manual and the safety instructions periodically.
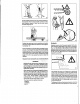
Proper clothing The saw Clothing must be sturdy and snug-fitting, but allow complete freedom of movement. Avoid loose-fitting jackets, scarfs, neckties,jewelry, flared or cuffed pants, or anything that could become entangled with the saw or brush. Wear overalls or jeans with a reinforced cutting resistant insert (fig. 3). Parts of the chain saw: illustrationsand description of parts see page 16. Protect your hands with gloves when handling saw and saw chain.
Chain saw operating instructions Wipe off any spilled fuel before starting your saw and check for leakage. For assembly follow the procedure in the appropriate section "MountingGuide Barand Chain"of this manual. MAKITA chain, guide bar and sprocket must match each other (see the appropriate section inthis manual). Check for fuel leakage while refueling and during operation. If fuel or oil leakage is found, do not start or run the engine until leak is fixed and spilled fuel has been wiped away.
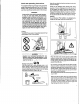
Important adjustments Wrap your fingers tightly around the handles, keeping the handlescradled betweenyour thumb andforefinger (fig. 7). With your hands in this position, you can best oppose and absorb the push, pull and kickback forces of your saw without having it slip out of your grip (see section of reactive forces). Make sure your chain saw handle and grip are in good condition and free of moisture, pitch, oil or grease. WARNING1 At correct idle speed, chain should not tum.
In order to keep controlof your saw, always maintain a firmfoothold.Neverworkonaladder,inatreeoronany other insecure support. Never use the saw above shoulder height (fig. 9). Positionthe chain saw in such a way that your body is clear of the cutting attachment whenever the engine is running(fig. 10). Don't put pressure on the saw when reaching the end of a cut. The pressure may cause the bar and rota!ing chain to pop out of the cut or kerf, goout of control and strike the operator or some other object.
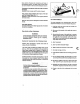
Many factors influence the occurence and force of the kickback reaction. The type of bar and saw chain you use is a factor in the force of the kickback reaction. The speed of contact at which the cutter contacts theobject. Kickback force increase with the rate of impact.. The contact angle between the nose of the bar and the foreign object (fig. 11). Kickback is most pronounced in the upper quadrant of the bar nose. MAKITA chain types are designed to reduce kickback forces.
Pushback: To avoid pull-in Pushback occurs when the chain on the top of the bar is suddenly stopped when it is pinched, caught or encountersa foreign object in the wood. The reaction of the chain drives the saw straight back toward the operator causing loss of saw control. Pushback frequently occurs when the top of the bar is used for cutting (fig. 14). 1. Always start a cut with the chain rotating at full speed and the spike bar in contact with the wood. 2.
, - .- - - ---1 I 1 I' ' I - --____--- . = cutting down area I When felling, maintain a distance of at least 2 1/2 tree lengths from the nearest person (see fig. 17). If the tree has large buttress roots, cut into the largest buttresses vertically first (horizontally next) and remove (fig. 20). . Note: The noise of your engine may drown any waming call.
Begin the felling cut slighty higher than the felling notch and on the opposite side of the tree (fig. 22). Then cut horizontally through towards the felling notch. Apply the chain saw with its spikes directly behind the uncut portion of wood and cut toward the notch (fig. 23). Leave approximately 1/10 of the tree diameter uncut! This is the hinge (fig.23). Do not cut through the hinge because you could lose control of the direction of the fall.
Bucking Bucking is cutting a log into sections. 29 WARNING! There is an extreme danger of kickback at this point. Extra caution must be taken to maintain control of the saw. To make the felling cut, follow the sectioning method described previously (fig. 29). If you are inexperienced with a chain saw plunge-cutting should not be attempted. Seek the help of a professional. WARNING! 1. When bucking, do not stand on the log. Make sure the log will not roll down-hill.
Maintenance and Repair Never operate a chain saw that is damaged, improperly adjusted or not completely or securely assembled. Follow the maintenance and repair instructionsin the appropriate section of this manual. WARNING ! li 3: 1 I 2. Cross cut Always stop the engine and make sure that the chain is stopped before commencing any maintenance or repair work or cleaning the saw. Do not attempt any maintenance or repair work not described in this manual.
Denomination of components 12 10 9 8 Identification plate (example model DCS 5200i) Indicate when ordering spare parts! 24 23 22 18 21 1 Handle 13 Guide bar 2 Choke 14 Chain 3 Filter cover 15 Hand guard (release for chain brake) 4 Tubular handle 16 Starter grip 5 Muffler 17 Adjusting screws "S-L-H" for carburetor 6 Retaining nuts 18 VSTOP-switch 7 Spike bar 19 Stop knob for halfway throttle (toothed stop for holding saw steady against wood) 20 Safety locking button 8 Chain catcher
Technical data DCS 430 I 431 I DCS 520 I5201 DCS540 I DCS 52001 Approved bar and chain combinations "Low-kickback saw chain is a chain which has met the kickback performance requirements of ANSI B 175.1-1991 (Amencan NationalStandardfor PowerTools-Gasoline-PoweredChain Saws-Safety Requirements)when testedon the representative sample of chain saws below 3.8 c.i.d. specifed in ANSI B 175.1-1991".The approved bar and chain combinations are low kickback chains according to ANSI 6 175.
PUlTlNG INTO OPERATION Mounting the guide bar and saw chain Use the universalwrench delivered with the chain saw for the following work. Put the chain saw on a stable surface and carry out the following steps for mounting the guide bar and chain: CAUTION: Before doing any work on the guide bar or chain. M y s switch off the engine and pull the plug cap off the spark plug (see 'Replacing thespark plug"). Alwayswear protectivegloves! CAUTION: Start the chain saw only after having assem- .
El - Turn the chain tightener (W6) to the right (clockwise) until the chain engagesthe guide groove of the bottom side of the bar (see circle). Press the guide bar against the housing with your left hand. Tightening the saw chain Slightly lift the end of the guide bar and turn the chain adjusting screw (116) to the right (clockwise) until the chain rests against the bottom side of the guide bar. While still holding up the tip of the guide bar, tighten the retaining nuts (W3)with the universal wrench.
Fuel I Refuelling I Gasoline I I + I 40:l omer dl 1 @@ 501 pJ MAKITA a1 I 1OO:l W K A oil 1 1.3nOr(3acm) 1.0 US-@. (3.71) 32nOr(94a)) 25nOr@OTt'l 2.5 U S - ~ I . (9.4 I) aonOrmcm) wn~r(iescm)~znozp~m 5.0 US-Wl. (18.9 I) lROIbZ(473aIFI 128IbZ(nScm) 6.4fbZ(189cm) U Chain oil Use an oil with adhesive additive for lubricating the chain and guide bar. The adhesive additive prevents the oil from being flung off the chain too quickly.
AVOID SKIN AND EYE CONTACT Mineral oil products degrease your skin. If your skin comes in contact with these substances repeatedly and for an extended period of time, it will desiccate. Various skin deseases may result. In addition, allergic reactions are known to occur. Eyes can be irritated by contact with oil. If oil comes into your eyes, immediately wash them with clear water.
Starting the engine - Move at least 10 feet (3m) away from the place where you \ - , fuelled the saw. Makesureyou have agoodfooting, and placethesaw on the ground in such a way that the chain is not touching anything. Engage the chain brake (lock). Holdthe tubular handletightly wlth one hand and press the chain saw to the ground. Steady the rear handle by standing in the hand guard. Cold-starting the DCS 520i and DCS 5200i: The carburetors of these saws have a fuel-injection system .
Checking the chain brake IICI Checking the chain lubrication I Do not work with the chain saw without flrst checking the chain brake1 Start the engine as described(make sure you have a good footing, and place the chain saw on the ground in such a way that the guide bar is free of contact). - Graspthe tubular handlefirmly with one hand and holdthe grip with the other. -With the engine runningat moderatespeed, pressthe hand f guard ((31) in the direction of the arrow y muntil the chain brakeengages.
Working in winter ,: In order to prevent carburetor icing in conditionsof low temperature combined with high humidity. and in order to get up to operating temperature faster in subfreezing temperatures. heated air can be taken from the cylinder. At temperatures above freezing the carburetor must NOT be fed heated air. Failure to follow these instructions can lead to damage to the cylinder and piston! c - I- _- I _. I - The snow filter (Wl, see "Accessories") prevents the induction of powder snow.
Chain Sharpening angle a Front rake 085 (.325") 25" 60' 094.102 (38') 30" 05' Files and how to work with them - Sharpen usinga special file holderwith a saw chain roundfile: 085 (.325')chain: File the first cutter half with a 4.5 mm dia. round saw-chain file. then switch to a 4 mm dia. file. 094,102 (3/8')chain: Round saw-chain file 4.8 mm diameter. Normal round files are not appropriate for this work. See 'Accessories' for the order number. The file should cut only when pushed forwards (arrow).
Cleaning the brake band and sprocket interior Replacing the saw chain CAUTION: Use only chains and guide bars designed for this saw (see the Extract from the spare-parts list and page 17)! C I ' I 1 2 \ I 4 CAUTION: Before doing any work on the guide bar or chain, w y s switch off the engine and pull the plug cap off the spark plug (see 'Replacing the sparkplug').
Cleaning the air filter - Remove the filter cover (W1) (2 screws). Loosen the screws on the air filter (F/2) and remove from intake manifold. Loosen the screw on the prefilter cover (F/3) and remove. Remove prefilter (F/4). IMPORTANT: Cover the intake opening with a clean cloth to prevent dirt particles from getting into the carburetor. Pry apart the top and bottom of the air filter as shown in Figure G.
Replacing the starter cable ". - - Unscrew the four screws (Nl)holdingdown the fan housLift the housing slightly, pull in the direction of the ing (N2). arrow, and remove. Remove all pieces of cable. - Thread in a new cable (4mn-d.16' dia. x 1000 "/39' long) as shown in Figure B and tie the ends as shown. Pull knot (B/l) into the cable pulley (W3). Pull knot into the cable grip (814). Wind the cable around the pulley in the direction shown by the arrow.
Instructions for daily and periodic maintenance To ensure long life. prevent damage and ensure the full functioning of the safety features the following maintenance must be performed regularly. Guarantee claims can be recognized only if this work is performed regularly and properly. Failure to perform the prescribed maintenance work can lead to accidents! Perform the following servicing work daily after use. Make a habit of it, it does not require much time and your saw will always function properly.
Spare parts Reliable long-term operation. as well as the safety of your chain saw, depend among other things on the quality of the spare parts used. Use only original MAKITA parts, marked A ./MA Only original spare parts and accessories guarantee the highest quality in material, dimensions, function and safety. Original spare parts and accessoriescan be obtained from your local dealer.
5 ilSt repairs and r MAKITA service center. 7 DCS 430,431 DCS 520,52Oi, 540,5200i pw. MAKITA-NO. 1 aty.
ATTENTION! Une utilisation negligenteou incorrecte de ce produit peut entrainer des blessures graves ou mortellesl Avant d'utilserune tronpmeuse ou d'autres prcduitsMAKITA, ilest importantque vous aye2 lu et entieremant mmprk et que voussuiviezavecsoinles instructionsfournies par le presentmode d'emploi. Le retour de chaine peut entrainer des blessures graves ou mortelles et constitue I'un des nombreux dangers potentiels lies a rutilisatiind'une tronpnneuse.
Address list Adressenliste Liste d’adresses MAKITA WERlQEUG GES. M.E.H. KolpingstraOe 13 A . Lista de direcciones A-1232Wien - . AUS MAKITA (AUSTRALIA) PTY. LTD. 92 Wetherill Street E S.A. MAKITA N.V. Mechelsesteenweg 323 ER MAKITA DO ERASIL Rua Makita Brasil. No200 * S.B. Campo-Sao Paulo CDN MAKITA CANADA INC. 1950 Forbes Street CH HEBOR SA 2.1. en Carouge CY A&P ANDREOU EROS. LTD. Larnaka Industrial Area * P.O. Box 451 cz MAKITA S.R.O.