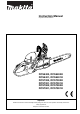
Instruction Manual Original Instruction Manual DCS6400, DCS6400H DCS6401, DCS6401H DCS7300, DCS7300H DCS7301, DCS7301H DCS7900, DCS7900H DCS7901, DCS7901H Important: Read this instruction manual carefully before putting the chain saw into operation and strictly observe the safety regulations! Keep this instruction manual!
Thank you for purchasing a MAKITA product! Congratulations on choosing a MAKITA chain saw! We are conÞdent that you will be satisÞed with this modern piece of equipment. The DCS6400 - 7901H are very handy and robust chain saws with a new Design. The automatic chain lubrication with variable-ßow oil pump and maintenance-free electronic ignition ensure trouble-free operation, while the hand-saving anti-vibration system and ergonomic grips and controls make work easier, safer, and less tiring for the user.
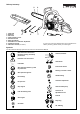
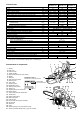
Delivery inventory 2 3 4 1. 2. 3. 4. 5. 6. 7. 8. 9. Chain saw Guide bar 5 6 Saw chain Chain protection cover Universal wrench Offset screwdriver Screwdriver for carburetor adjustment Cylinder Þn cleaner Instruction manual (not shown) 7 8 1 In case one of the parts listed should not be included in the delivery inventory, please consult your sales agent.
SAFETY PRECAUTIONS Intended use Power chain saws This power chain saw may be used only for sawing wood out of doors. It is intended for the followung uses depending on its class: - Professional and mid-class: Use on small, medium and large trees: felling, limb removal, cutting to length, thinning. Hobbyklasse: Occasional use on small trees, fruit-tree care, felling, limb removal, cutting to length. Unauthorised users: prescribed equipment and must always be worn during operation of the chain saw.
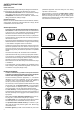
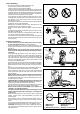
Fuels / Refuelling - - - Stop the engine before refuelling the chain saw. Do not smoke or work near open Þres (5). Let the engine cool down before refuelling. Fuels can contain substances similar to solvents. Eyes and skin should not come in contact with mineral oil products. Always wear protective gloves when refuelling. Frequently clean and change protective clothes. Do not breathe in fuel vapors. Inhalation of fuel vapours can be hazardous to your health. Do not spill fuel or chain oil.
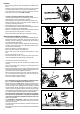
Kickback - When working with the chain saw dangerous kickbacks may occur. - Kickback occurs when the upper part of the end of the guide bar inadvertently touches wood or other hard objects (10). - This causes the saw to be thrown back toward the user with great force and out of control. Risk of injury! - In order to prevent kickback, follow these rules: Only specially-trained persons should perform plunge cuts, i.e.
- - Be careful when cutting splintery wood. Cut pieces of wood may be pulled along (risk of injuries). When cutting with the upper edge of the guide bar, the chain saw may be pushed in the direction of the user if the chain gets clamped. For this reason use the lower edge of the bar whenever possible. The chain saw will then be pushed away from you (15). If the timber is under tension (16), Þrst cut the pressure side (A). Then the crosscut can be performed on the tension side (B).
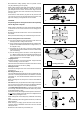
Transport and storage - When changing your location during work switch off the chain saw and actuate the chain brake in order to prevent an inadvertent start of the chain. - Never carry or transport the chain saw with the chain running. - When transporting the chain saw over long distances the guide bar protection cover (delivered with the chain saw) must be applied. - Carry the chain saw with the tubular handle. The guide bar points backwards (20).
Technical data Stroke volume Bore Stroke Max. power at speed 3) Max. torque at speed 3) Idling speed / max. engine speed with bar and chain Clutch engagement speed Sound pressure level at the workplace LpA, eq per ISO/CD 22868 1) 4) Sound power level LWA, eq per ISO/CD 22868 1) 4) Vibration acceleration ahv, eq per ISO 22867 1) 4) - Tubular handle - Rear handle Carburetor (diaphragm carburetor) Ignition system Spark plug Electrode gap Fuel consumption at max. load per ISO 7293 3) SpeciÞc consumption at max.
PUTTING INTO OPERATION CAUTION: Before doing any work on the guide bar or chain, always switch off the engine and pull the plug cap off the spark plug (see „Replacing the spark plug“). Always wear protective gloves! CAUTION: Start the chain saw only after having assembled it completely and inspected. A Mounting the guide bar and saw chain Use the universal wrench delivered with the chain saw for the following work.
6 Pull the chain (6) around the sprocket nose (8) of the guide bar in the direction of the arrow. 8 E Guide the chain over the chain catch (9). Pull the guide bar as shown by the arrow to take the slack out of the chain, so that it comes up to the bottom edge of the guide bar (10). 9 F 10 Line up the holes in the sprocket guard (3) with the bolts (11). Turn the chain tensioning screw (H/13) until the chain tensioning bolt (12) is aligned with the hole in the guide bar. Replace the sprocket guard.
Checking the chain tension STOP The tension of the chain is correct if the chain rests against the bottom side of the guide bar and can still be easily turned by hand. While doing so the chain brake must be released. Check the chain tension frequently - new chains tend to get longer during use! When checking the chain tension the engine must be switched off. NOTE: It is recommended to use 2-3 chains alternatively.
Fuel CAUTION: This saw is powered by mineral-oil products (gasoline and oil). Be especially careful when handling gasoline . Do not smoke. Keep tool well away from open ßames, spark, or Þre (explosion hazard). Gasoline Fuel mixture In order to obtain an optimum engine output and to protect your health and the environment use unleaded fuel only. To lubricate the engine, use a synthetic oil for two-stroke aircooled engines (quality grade JASO FC or ISO EGD), which has to be added to the fuel.
Important note on bio-degradable chain oils If you are not planning to use the saw again for an extended period of time, empty the oil tank and put in a small amount of regular engine oil (SAE 30), and then run the saw for a time. This is necessary to ßush out all remaining bio-degradable oil from the oil tank, oil-feed system, chain and guide bar, as many such oils tend to leave sticky residues over time, which can cause dam- age to the oil pump or other parts.
Checking the chain lubrication Never work with the chain saw without sufÞcient chain lubri-cation. Otherwise the service life of the chain and guide bar will be reduced. Before starting work check the oil level in the tank and the oil feed. Check the oil feed rate as described below: Start the chain saw (see „Starting the engine”). Hold the running chain saw approx. 15 cm above a trunk or the ground (use an appropriate base).
Starting the engine Start the chain saw only after having assembled it completely and inspected. Move at least 3m away from the place where you fuelled the saw. Make sure you have a good footing, and place the saw on the ground in such a way that the chain is not touching anything. Engage the chain brake (lock). Hold the tubular handle tightly with one hand and press the chain saw to the ground. Steady the right foot by standing in the rear handle.
Adjusting the carburetor (only for EU-countries) S CAUTION: Do not adjust the carburetor until the machine has been completely assembled and checked! Do not adjust the carburetor without a tachometer! Carburetor adjustment is necessary for optimum engine performance, for safer and more economical operation. Adjust the carburetor only with the engine warm, a clean air Þlter, and properly installed cutting tool. Carburetor adjustment may be done only by a MAKITA service centre.
Adjusting the carburetor (only for not EU-countries) S 8 9 L Carburetor adjustment is necessary for optimum engine performance, for safer and more economical operation. The engine should be warm, the air Þlter clean, and the chain properly tensioned. Have carburetor adjustment done by an authorised MAKITA service centre. The carburetor is factory-adjusted for the air pressure at sea level.
Working in winter B In order to prevent carburetor icing in conditions of low temperature combined with high humidity, and below + 5°C in order to get up to operating temperature faster, heated air can be taken from the cylinder. A Remove the Þlter hood (see „Cleaning air Þlter“) Remove the insert (10) and insert it as shown in position B for cold-weather operation. 10 At temperatures above + 5°C the carburetor must NOT be fed heated air.
MAINTENANCE Sharpening the saw chain CAUTION: Before doing any work on the guide bar or chain, always switch off the engine and pull the plug cap off the spark plug (see „Replacing the spark plug“). Always wear protective gloves! The chain needs sharpening when: The sawdust produced when sawing damp wood looks like wood ßour. The chain penetrates the wood only under great pressure. The cutting edge is visibly damaged. The saw is pulled to the left or right when sawing.
Files and how to work with them Sharpen using a special Þle holder with a saw chain round Þle. Normal round Þles are not appropriate for this work. See „Accessories“ for the order number. File the Þrst cutter half with a 5.5 mm dia. round saw-chain Þle, then switch to a 4.8 mm dia. Þle. The Þle should cut only when pushed forwards (arrow). Lift the Þle when leading it backwards. First sharpen the shortest cutter. The length of this cutter is then the standerd for all other cutters of the chain.
Cleaning the brake band and sprocket interior CAUTION: Before doing any work on the guide bar or chain, always switch off the engine and pull the plug cap off the spark plug (see „Replacing the spark plug“). Always wear protective gloves! CAUTION: Start the chain saw only after having assembled it completely and inspected. 4 5 Remove the sprocket guard (1) (See „PUTTING INTO OPERATION“ Þgs. B) and clean the interior with a brush Remove the chain (3) and guide bar (2).
Cleaning the guide bar CAUTION: Protective gloves must be worn. Regularly inspect the bearing surfaces of the guide bar for damage, and clean them with a suitable tool. C Replacing the saw chain CAUTION: Use only chains and guide bars designed for this saw (see the Extract from the spare-parts list)! 12 Check the sprocket before mounting a new chain. Worn out sprockets (12) may damage the new chain and must therefore be replaced. Remove the sprocket guard (1) (See „PUTTING INTO OPERATION“ Þgs. B).
5 Cleaning the air Þlter 4 3 1 CAUTION: To prevent eye injury, always wear eye protection when cleaning the Þlter with compressed air! Do not use fuel to clean the air Þlter. Unhook the Þlter hood clips (1) with the combination tool and remove the Þlter hood (2). Pull out the choke (3) to prevent dirt particles from getting into the carburetor. Unhook the air Þlter retainer (4) by pressing in the direction shown by the arrow. Pull the air Þlter (5) up and out.
Replacing the spark plug CAUTION: 6 Do not touch the spark plug or plug cap if the engine is running (high voltage). Switch off the engine before starting any maintenance work. A hot engine can cause burns. Wear protective gloves! The spark plug must be replaced in case of damage to the insulator, electrode erosion (burn) or if the electrodes are very dirty or oily. 0,5 mm Remove the Þlter cover (see „Cleaning the air Þlter“). Pull the plug cap (6) off the spark plug.
Replacing the starter cable / Replacing the return spring Unscrew three screws (1). Remove fan housing (2). NOTE: The screws (1) are secured against falling out of the housing. CAREFUL! Injury hazard! Do not unscrew screw (5) if the return spring is under tension. If the starter cable is to be replaced although it is not broken, it will be necessary to Þrst de-tension the cable drum return spring (3). To do this, use the grip to pull the cable all the way out of the fan housing.
15 Mounting the fan housing 16 Put the fan housing (13) on. Press the screws (14) into their holes. Lift the engine hood (15) slightly and use your thumb to hook in the tab (16) on the fan housing. Straighten out the fan housing, push lightly against the saw and pull the starter grip until the starting mechanism catches. Tighten screws (14). 13 B 14 Cleaning the cylinder area 17 Remove the Þlter hood and air Þlter. Remove the spark plug cap and unscrew the spark plug.
Instructions for periodic maintenance To ensure long life, prevent damage and ensure the full functioning of the safety features the following maintenance must be performed regularly. Guarantee claims can be recognized only if this work is performed regularly and properly. Failure to perform the prescribed maintenance work can lead to accidents! The user of the chain saw must not perform maintenance work which is not described in the instruction manual.
Spare parts Reliable long-term operation, as well as the safety of your chain saw, depend among other things on the quality of the spare parts used. Use only original MAKITA parts, marked Only original spare parts and accessories guarantee the highest quality in material, dimensions, function and safety. Original spare parts and accessories can be obtained from your local dealer.
Extract from the spare parts list Use only original MAKITA parts. For repairs and replacement of other parts, see your MAKITA service centre. DCS6400, 6400H, 6401, 6401H DCS7300, 7300H, 7301, 7301H DCS7900, 7900H, 7901, 7901H Pos. MAKITA-No. Qty.
EU Conformity Declaration The undersigned, Tomoyasu Kato, as authorized by MAKITA Corporation, declare that the MAKITA machines, Typ: 038, 039, 040 Chain saw EU prototype test certiÞcate No.
To Þnd your local distributor, please visit www.makita-outdoor.com MAKITA Corporation 3-11-8 Sumiyoshi-Cho Anjo, Aichi 446-8502 Japan SpeciÞcations subject to change without notice Form: 995 707 142 (2.