
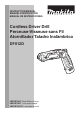
Use and Care Manual


7 ENGLISH
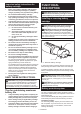
Lighting up the front lamp
CAUTION: Do not look in the light or see the
source of light directly.
Toturnonthelight,slidethelampswitchtotheA
position.Toturnoffthelight,slidethelampswitchtoB
position.
Evenifyouleavethelampon,thelightwillautomati-
cally turn off after 5 minutes.
A
B
1
2
►1. Lamp switch 2. Lamp
NOTE:Thelampsignalsbyickeringduringuse
when the battery power is almost used up.
Atthistime,rechargethebatteryorreplacethebat-
tery with a fully charged one.
ASSEMBLY
CAUTION: Always be sure that the tool is
switched off and the battery cartridge is removed
before carrying out any work on the tool.
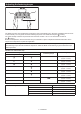
Installing or removing driver bit/
socket bit
Optional accessory
12 mm
(15/32”)
9 mm
(3/8”)
Useonlythedriverbit/socketbitshowninthegure.Do
not use any other driver bit/socket bit.
1
2
►1. Driver bit 2. Sleeve
Toinstallthedriverbit,pullthesleeveinthedirectionof
the arrow and insert the driver bit into the sleeve as far
as it will go.
Thenreleasethesleevetosecurethedriverbit.
Toremovethedriverbit,pullthesleeveinthedirection
of the arrow and pull the driver bit out.
NOTE: If the driver bit is not inserted deep enough
intothesleeve,thesleevewillnotreturntoitsoriginal
position and the driver bit will not be secured. In this
case,tryre-insertingthebitaccordingtotheinstruc-
tions above.
NOTE:Afterinsertingthedriverbit,makesurethatit
isrmlysecured.Ifitcomesout,donotuseit.
OPERATION
CAUTION: When bending the tool to use in
the pistol shape or straightening to use in the
straight shape, do not hold the bendable part of
the tool. Failure to do so may cause your hand and
ngerstobepinchedandinjuredbythispart.
Thetoolcanbeusedintwoways;astraightshapeand
a pistol shape which are selectable according to the
conditions of workplace and screwdriving.